
A static test for home plumbing is a method used to check the strength and integrity of the plumbing system by sealing off sections and filling them with water to detect leaks. It involves monitoring water levels in pipes without any water movement, particularly effective for identifying leaks in drainpipes under the home’s foundation, which could cause costly damage if left unchecked. This test helps prevent water damage and protects the structural integrity of the home by early detection of plumbing issues.
What Is a Static Test for Home Plumbing?
A static test for home plumbing represents one of the most reliable methods for checking pipe integrity without running water through the system. The test involves filling your plumbing lines with water and monitoring whether the water level drops over time. If the level drops even though no one is using water, you’ve got a leak somewhere in the system.
Unlike dynamic tests that assess how water flows through pipes, static tests focus solely on whether pipes can maintain pressure when water is at rest. Think of it like checking a balloon for holes: inflate it and see if it deflates on its own. Your plumbing system undergoes the same principle during a static test.
The beauty of this testing method lies in its simplicity and effectiveness. Professionals isolate sections of your plumbing system, fill them with water to a specific level, and then observe what happens. They don’t need to run water continuously or use complex equipment to get accurate results. The test reveals even the most minor leaks that might otherwise escape detection during regular use.
Static tests differ significantly from pressure tests, though people often confuse the two. While pressure tests use air or water under pressure to stress-test pipes, static tests rely solely on gravity and water weight. This gentler approach makes static testing ideal for older homes where aggressive pressure testing could damage aging pipes.
Key Components of a Static Test
The test examines several critical aspects of your plumbing:
- Drain line integrity from fixtures to the primary sewer connection
- Vertical stack performance in multi-story homes
- Underground pipe conditions that you can’t visually inspect
- Joint and connection quality throughout the system
Plumbers particularly value static tests because they provide precise, measurable results. Either the water level stays constant (passing the test) or it drops (indicating a problem). This black-and-white outcome eliminates guesswork and helps homeowners understand exactly what’s happening with their plumbing.
Why Is a Static Test Important in Home Plumbing?
Water leaks don’t always announce themselves with obvious drips or puddles. Many leaks hide behind walls, under floors, or in underground pipes, where they can cause damage for months before you notice anything wrong. By the time you spot that mysterious water stain or smell that musty odor, extensive damage may have already occurred to your home’s structure.
Preventing Catastrophic Water Damage
Static tests catch these hidden leaks before they escalate. A small pinhole leak might seem insignificant, but it can release gallons of water daily into your walls or foundation. This constant moisture creates perfect conditions for mold growth, wood rot, and foundation problems that cost tens of thousands of dollars to repair.
Insurance companies increasingly recognize the value of preventive testing. Some insurers offer discounts to homeowners who conduct regular plumbing inspections, including static tests. They understand that prevention costs far less than paying out claims for water damage restoration.
Building Code Compliance
Most municipalities require static testing for new construction and major renovations. Building inspectors won’t sign off on plumbing work without proof that the system passed a static test. This requirement protects both current and future homeowners from inheriting faulty plumbing systems.
Even if you’re not dealing with inspectors, following building code standards makes good sense. These codes exist because experts have identified best practices for safe, reliable plumbing systems. Static testing helps ensure your home meets these professional standards.
Long-term Cost Savings
Consider the financial impact of catching house problems early. Fixing a small leak might cost a few hundred dollars, while repairing water-damaged drywall, flooring, and structural elements can easily exceed $10,000. Add in temporary housing costs if the damage makes your home uninhabitable, and the numbers become even more compelling.
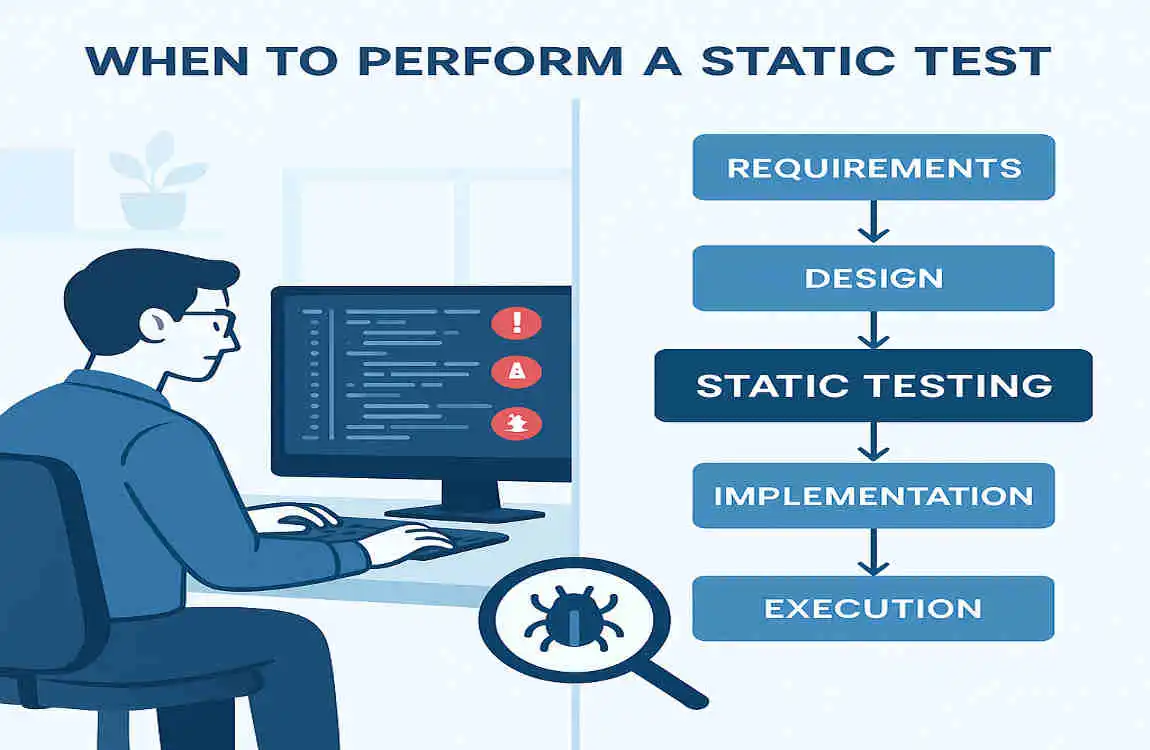
When Should You Perform a Static Test?

Timing your static tests strategically ensures you catch problems early while avoiding unnecessary expenses. Different situations call for testing, and understanding these triggers helps you protect your investment effectively.
Critical Testing Scenarios
New construction always requires static testing before walls go up. Once drywall covers your pipes, finding and fixing leaks becomes exponentially more expensive. Competent builders test multiple times during construction to ensure everything works perfectly before finishing work begins.
Major renovations involving plumbing changes also demand static testing. Whether you’re adding a bathroom, moving kitchen plumbing, or updating old pipes, testing confirms your new connections won’t cause problems down the road. Many homeowners skip this step to save money, only to regret it later when leaks appear.
After significant plumbing repairs, static testing verifies the fix worked properly. You wouldn’t trust a mechanic who didn’t test-drive your car after major engine work. The same logic applies to plumbing repairs that affect your home’s water system.
Regular Maintenance Testing
Even without specific triggers, periodic static testing makes sense for older homes. Pipes deteriorate over time, especially in homes built before modern materials became standard. Scheduling tests every 5 to 7 years helps detect age-related problems before they cause damage.
Warning Signs That Indicate Testing Need
Several symptoms suggest your plumbing needs immediate testing:
- Unexplained increases in water bills
- Musty smells without visible mold
- Foundation cracks or shifting
- Slow drains throughout the house
- Water stains on walls or ceilings
How Is a Static Test Conducted? Step-by-Step Process
Understanding the static testing process helps you prepare properly and know what to expect when professionals arrive. The procedure follows specific steps that ensure accurate results while protecting your plumbing system from damage.
Pre-Test Preparation
Before testing begins, plumbers conduct a thorough visual inspection of accessible pipes. They’re looking for obvious problems that need to be addressed before the test. This preliminary check saves time and prevents wasting effort on systems with visible major issues.
Your plumber will explain the testing process and identify which areas will be tested. In most cases, they test the drainage system separately from supply lines. You’ll need to avoid using water during the test period, so planning ahead prevents inconvenience.
Essential Tools and Equipment
Professional static testing requires specific tools:
EquipmentPurposeImportance
Test balls/plugs. Seal pipe openings. Critical for isolating test sections
A water level gauge measures water level. Ensures accurate monitoring
Inspection camera, Locate hidden problems, Helps identify leak sources
Marking dye Trace leak paths Makes small leaks visible
Pressure gauge Monitor system pressure Provides precise measurements
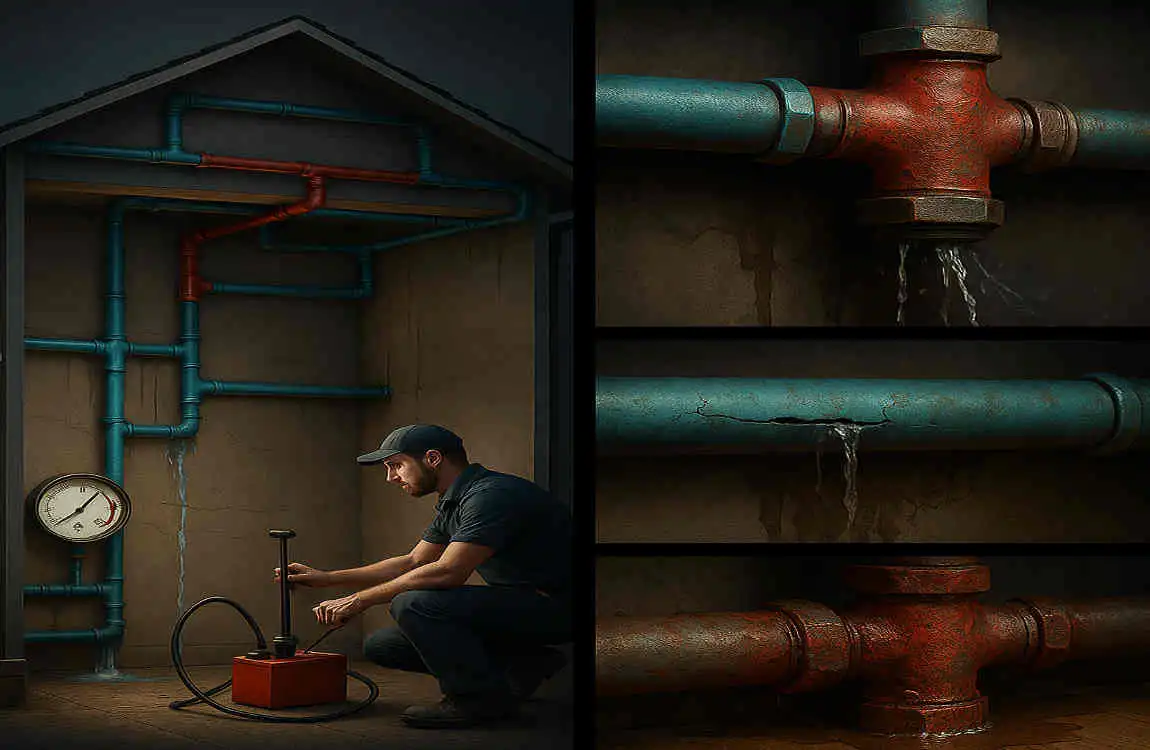
System Isolation
The plumber starts by isolating the section being tested. They insert inflatable test balls or mechanical plugs into strategic locations, typically at the main drain line and any branch connections. This isolation ensures water stays in the specific area under examination.
For whole-house testing, the main sewer line gets plugged where it exits your home. Individual fixture tests require plugging at specific drain points. The plumber double-checks all seals to prevent false readings from improper plugging.
Filling the System
Once isolated, the plumber fills the test section with water. They typically fill to the lowest fixture level or to a predetermined height that creates adequate test pressure. This process happens slowly to prevent air pockets that could affect results.
The filling process itself can reveal major leaks. If water won’t reach the proper level despite continuous filling, you’ve got a significant leak that needs immediate attention. Most systems should fill in 15-30 minutes, depending on size.
Monitoring Period
After reaching the proper water level, the waiting begins. Standard tests run for 15-30 minutes, though some situations require more extended monitoring periods. The plumber marks the initial water level and notes the exact time testing starts.
During this period, they watch for any drop in water level. Even a slight decrease indicates a leak somewhere in the system. Modern digital gauges can detect drops as small as 1/8 inch, catching leaks that older methods might miss.
Temperature changes can slightly affect water levels, so experienced plumbers account for this factor. They also check that ground conditions haven’t shifted, which could create false readings in underground pipes.
Interpreting Results
When monitoring ends, the plumber evaluates what happened. A passing test shows no measurable water loss beyond what temperature changes might cause. Any significant drop indicates your system has a leak that needs to be located and repaired.
Failed tests trigger additional investigation. The plumber might isolate smaller sections to pinpoint the leak’s location. They may also use cameras or dye testing to identify where water escapes from the system.
Professional vs. DIY Testing

While some homeowners attempt DIY static testing, professional testing offers significant advantages. Certified plumbers understand local codes, have the proper equipment, and carry insurance in case something goes wrong. They also provide official documentation that meets the requirements of inspectors and insurance companies.
DIY testing might save money initially, but mistakes can cause expensive damage. Improperly sealed test plugs can blow out under pressure, flooding your home. Without proper experience, you might also miss subtle signs of problems that professionals would catch immediately.