
Laminate flooring has emerged as one of the most popular flooring choices in recent years. Its stunning wood-like appearance, combined with exceptional durability and budget-friendly pricing, makes it an attractive option for homeowners looking to transform their living spaces. But here’s the burning question that keeps many people up at night: Can you install laminate flooring over tile?
The short answer is yes—but, like most home improvement projects, there’s more to the story. This comprehensive guide will walk you through everything you need to know about installing laminate flooring over your existing tile.
What is Laminate Flooring?
Before we explore whether you can install laminate flooring over tile, let’s understand what makes laminate such a popular choice among homeowners today.
The Composition and Structure
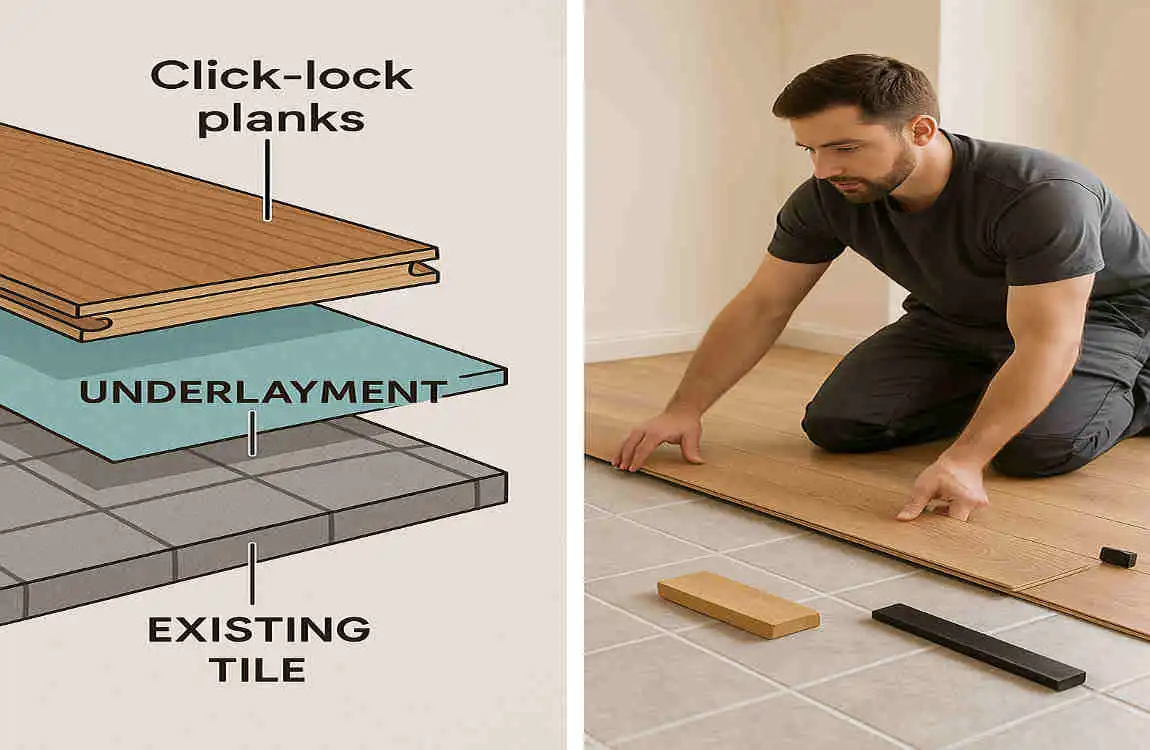
Laminate flooring is a multi-layer synthetic product designed to mimic the appearance of natural materials like hardwood or stone. Each plank consists of four distinct layers working together. The wear layer on top provides protection against scratches and stains. Below that, the design layer features a high-resolution photograph of wood grain or stone texture. The core layer, made from high-density fiberboard, gives the plank its strength and stability. Finally, the backing layer protects against moisture from below.
Why Homeowners Love Laminate
The benefits of laminate flooring extend far beyond its attractive appearance. First, it offers remarkable durability that withstands heavy foot traffic, making it perfect for busy households with kids and pets. The cost-effectiveness is another major draw – you can achieve the look of expensive hardwood at a fraction of the price.
Installation is typically straightforward, especially with modern click-lock systems that snap planks together without glue or nails. This DIY-friendly nature saves you money on professional installation costs. Additionally, laminate requires minimal maintenance compared to natural wood floors. A simple sweep and occasional damp mop keep it looking pristine for years.
Comparing Flooring Options
When you stack laminate against other flooring types, its advantages become even clearer. Unlike hardwood, laminate won’t warp or stain easily, and it costs significantly less. Compared to vinyl, laminate offers a more authentic wood look and feel. While tile is durable, laminate provides better comfort underfoot and doesn’t require grout maintenance.
The versatility of laminate makes it suitable for almost any room in your home. From bedrooms to living rooms, and even kitchens with proper water-resistant varieties, laminate adapts to your lifestyle needs.
Understanding Tile Flooring as a Base
Now that we’ve covered laminate basics, let’s examine the tile floor you’re working with. Understanding your existing tile is crucial for determining whether it’s a suitable base for laminate installation.
Types of Tile Flooring
Your home might feature one of several tile types, each with unique characteristics. Ceramic tiles are the most common, made from clay and fired at high temperatures. They’re generally smooth and level, making them decent candidates for overlay installation. Porcelain tiles, a subtype of ceramic, are denser and more water-resistant. Natural stone tiles, including marble, granite, and slate, offer luxury and durability but may have more surface variation.
Key Characteristics for Overlay Installation
The success of your laminate-over-tile project depends heavily on specific tile characteristics. Surface flatness is paramount – your tile floor should be level, with no significant dips or rises. The hardness and stability of tile provide an excellent foundation, as they won’t flex or compress under the laminate.
Grout lines present a unique consideration. While shallow grout lines (less than 1/4 inch) might not require filling, deeper ones will need attention to prevent the laminate from developing weak spots or clicking sounds when walked upon.
Advantages and Challenges
Using tile as a base offers several benefits. The solid, stable surface eliminates concerns about subfloor integrity. The existing tile acts as an additional moisture barrier, protecting your new laminate from below. You’ll also save time and money by avoiding demolition costs and disposal fees.
However, challenges exist too. The combined height of tile and laminate might create transition issues with adjacent rooms or doorways. Any existing tile damage must be repaired before installation. Additionally, extremely textured or uneven tiles may require more extensive preparation.
Can You Install Laminate Flooring Over Tile?
Let’s address the question you’ve been waiting for: Can you install laminate flooring over tile? The answer is a resounding yes, but success depends on meeting specific conditions and understanding both the advantages and potential drawbacks.
The Conditions for Success
Installing laminate over tile works best when your existing tile floor meets specific criteria. First and foremost, the tile must be firmly attached to the subfloor with no loose or hollow-sounding areas. When you tap on the tiles, they should sound solid, not hollow or drumlike. Any movement in the tiles will transfer to your laminate, causing premature wear and annoying squeaks.
The surface should be relatively level, with no variations greater than 3/16 inch over a 10-foot span. While minor imperfections can be addressed with leveling compound, significant slopes or waves in the floor require more extensive correction. Your grout lines also matter—if they’re deeper than 1/4 inch or wider than 1/2 inch, you’ll need to fill them to create a smooth surface.
The Benefits You’ll Enjoy
Choosing to install laminate over tile offers substantial advantages that make this option attractive to many homeowners. The cost savings alone can be significant – you’ll avoid demolition costs that typically run $3-5 per square foot, plus disposal fees for the old tile. Labor costs drop dramatically when you skip the removal process.
Time efficiency is another significant benefit. Removing tile can take days and create clouds of dust that infiltrate every corner of your home. By leaving the tile in place, you can complete your flooring project in a weekend rather than a week. The existing tile also provides an extra layer of sound dampening and insulation, making your floors quieter and more comfortable underfoot.
Potential Drawbacks to Consider
While installing laminate over tile has many advantages, you should be aware of potential challenges. The most noticeable issue is the increased floor height. Adding laminate and underlayment over tile raises your floor by approximately 1/2 to 3/4 inch. This height change might require adjusting door frames, trimming doors, or installing transition strips between rooms.
If your tile has significant texture or deep grout lines, you might notice these patterns telegraphing through the laminate over time. This is especially true with thinner laminate products. The additional height may also affect kitchen appliances, requiring adjustments to ensure proper fit and function.
Suitable and Unsuitable Tile Surfaces
Not all tile surfaces are created equal when it comes to laminate overlay. Ideal candidates include smooth ceramic or porcelain tiles with minimal grout lines, level surfaces with no significant damage, and tiles that are firmly bonded to the substrate. These conditions provide the stable, flat base that laminate needs to perform well.
Conversely, certain tile situations call for removal rather than overlay. Tiles with severe cracking or extensive damage won’t provide adequate support. Loose or hollow-sounding tiles will cause problems down the line. Highly textured surfaces, like some slate or decorative tiles with raised patterns, create an uneven base that affects laminate performance. If you’re dealing with asbestos-containing tiles (standard in homes built before 1980), professional assessment and removal might be necessary for safety reasons.
Step-by-Step Preparation Before Installing Laminate Over Tile
Proper preparation is the foundation of a successful laminate installation over tile. Taking time to thoroughly prepare your tile surface will ensure your new floors look great and last for years. Let’s walk through each critical step together.
Thorough Tile Inspection
Start your preparation by conducting a comprehensive inspection of your existing tile floor. Get down on your hands and knees with a flashlight to examine every square foot. Look for cracks that run through tiles, not just surface crazing. Tap each tile with a rubber mallet or the handle of a screwdriver – hollow sounds indicate tiles that have separated from the adhesive below.
Mark any problem areas with painter’s tape. Small hairline cracks might be acceptable, but tiles with significant damage need repair or replacement. Check for lippage (uneven tile edges) by running a straight edge across the floor. Any lips greater than 1/8 inch need to be addressed to prevent laminate planks from rocking or breaking.
Pay special attention to high-traffic areas and spots near water sources. These zones often show the most wear and might harbor hidden damage. Document any issues you find – this helps you plan repairs and gather necessary materials.
Deep Cleaning Your Tile Surface
A spotlessly clean surface is essential for proper underlayment adhesion and preventing future problems. Begin by removing all furniture and thoroughly sweeping or vacuuming the floor. Don’t forget corners and edges where dust and debris accumulate.
Mix a solution of warm water and degreasing cleaner. For kitchen floors with grease buildup, use a stronger degreaser or trisodium phosphate (TSP) solution. Scrub the entire floor with a stiff-bristled brush, paying extra attention to grout lines where dirt tends to embed deeply. Rinse thoroughly with clean water – any cleaning residue left behind can interfere with leveling compounds or underlayment.
Allow the floor to dry completely for at least 24 hours. Use fans to accelerate drying if needed. This waiting period might test your patience, but moisture trapped under laminate can cause warping, mold, and premature failure.
Addressing Grout Lines and Surface Irregularities
Grout lines are the most common challenge when installing laminate over tile. Deep or wide grout lines create voids that can cause laminate to sag or crack over time. Here’s how to handle them effectively.
For grout lines less than 1/4 inch deep and 1/2 inch wide, a quality underlayment might provide sufficient bridging. However, for best results, consider filling even these smaller lines. Use a floor-patching compound designed for this purpose. Mix according to the manufacturer’s instructions, then apply with a wide putty knife, working it into the grout lines.
Deeper grout lines require a self-leveling compound. These products flow into low spots, creating a smooth, level surface. Pour the mixed compound onto the floor and use a gauge rake to spread it evenly. The compound will self-level, filling grout lines and minor depressions.
Selecting and Installing Underlayment
Underlayment is absolutely crucial when installing laminate over tile. It serves multiple purposes: cushioning the laminate, reducing noise, providing moisture protection, and helping to smooth minor surface imperfections.
Types of Underlayment to Consider:
Type Best For Thick ness Key Benefits
Foam Budget installations 2-3mm Affordable, easy to install
Cork Sound reduction 3-6mm Excellent noise dampening, eco-friendly
Rubber High-traffic areas 2-4mm Superior durability, moisture resistance
Combination All-purpose use 3-5mm Moisture barrier included, versatile
Choose underlayment with an attached moisture barrier, or install a separate 6-mil plastic sheet first. This is especially important over tile, as temperature differences between the tile and laminate can create condensation.
Roll out the underlayment perpendicular to the direction you’ll install the laminate. Butt seams tightly together without overlapping, and seal with moisture-resistant tape. Extend the underlayment up walls by about 2 inches – you’ll trim this excess after installing the laminate.
Gathering Tools and Materials
Having the right tools and materials on hand prevents frustrating delays mid-project. Here’s your comprehensive shopping list:
Essential tools include a tape measure, chalk line, utility knife, tapping block, pull bar, spacers (1/4 inch), and a miter saw or laminate cutter. You’ll also need safety equipment: knee pads, safety glasses, and dust masks.
Materials should include your laminate flooring (add 10% for waste), underlayment, moisture barrier (if not attached), duct tape or underlayment tape, floor-patching compound or self-leveling compound, transition strips, and baseboards or quarter round molding.
Don’t forget installation accessories like laminate floor cleaner, touch-up markers matching your laminate color, and furniture pads to protect your new floors.
How to Install Laminate Flooring Over Tile
Now comes the exciting part—installing your beautiful new laminate flooring! With proper preparation complete, the installation process becomes straightforward and even enjoyable. Let’s walk through each step to ensure your success.
Acclimating Your Laminate Planks
Before you open a single box, your laminate needs time to adjust to your home’s environment. This process, called acclimation, prevents expansion or contraction issues after installation. Bring all boxes into the room where they’ll be installed at least 48-72 hours before starting work.
Stack boxes flat, no more than three high, with space between stacks for air circulation. Keep them away from exterior walls, heating vents, and direct sunlight. Your room should maintain normal living conditions—between 60-80°F and 30-60% humidity. This might seem like unnecessary waiting, but skipping acclimation is one of the biggest mistakes DIYers make.
During this waiting period, read the manufacturer’s instructions thoroughly. Different brands have specific requirements that could void your warranty if not followed. Check each box for damage and verify you have the exact lot numbers for color consistency.
Planning Your Layout for Success
Thoughtful planning prevents waste and ensures a professional appearance. Start by measuring your room’s length and width at multiple points – rooms are rarely perfectly square. Calculate the square footage and confirm you have enough materials.
Determine your starting wall, typically the longest, straightest wall in the room. Measure the width of the room perpendicular to your starting wall and divide by the plank width. If your last row is less than 2 inches wide, adjust your starting point or trim the first row to achieve a balanced appearance.
Mix planks from different boxes as you work. This blends any slight color variations for a natural look. Inspect each plank before installation, setting aside any with defects for cuts where imperfections won’t show.
Laying Your Underlayment Foundation
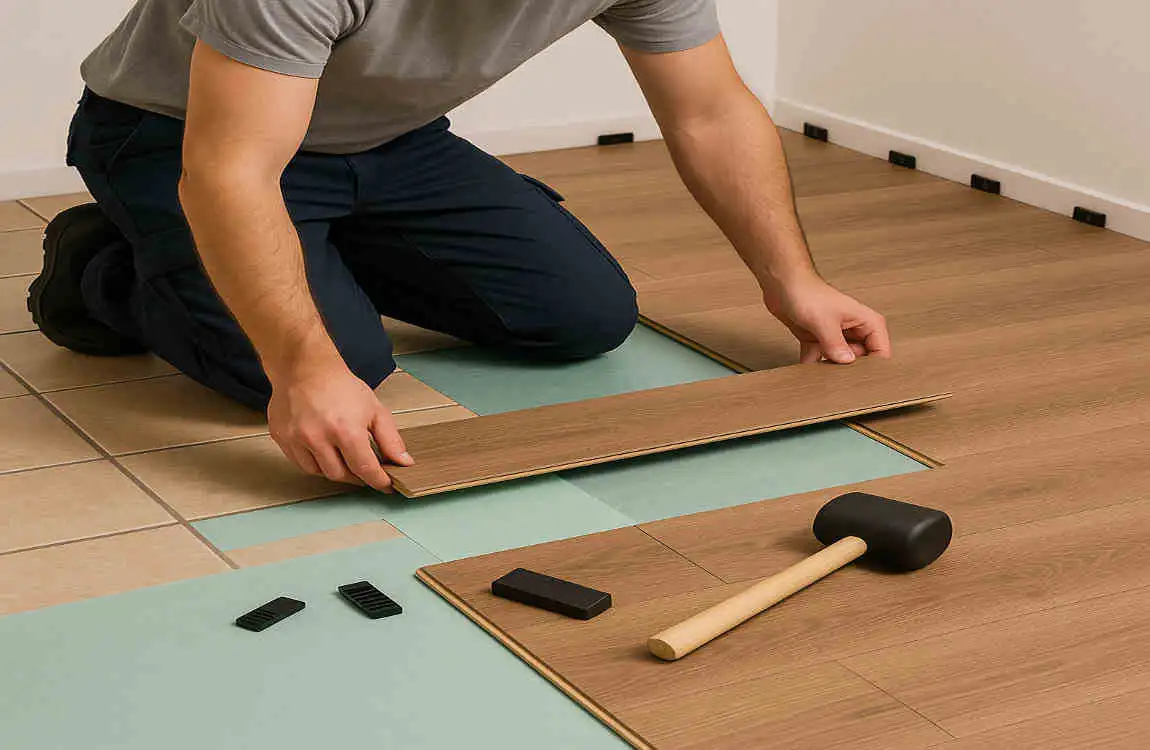
With your tile floor clean, level, and dry, it’s time to install the underlayment. Roll it out perpendicular to your laminate direction, starting at your beginning wall. The underlayment should run up the wall about 2 inches – you’ll trim this later.
Ensure edges butt tightly together without overlapping. Even slight overlaps create bumps that telegraph through your laminate. Secure seams with the recommended tape to create a continuous moisture barrier. If your underlayment doesn’t include a moisture barrier, install 6-mil plastic sheeting first, overlapping seams by 8 inches and sealing with tape.
Work carefully around obstacles like pipes or floor vents. Cut precise holes rather than slits to maintain the integrity of your moisture barrier. Take your time here – a properly installed underlayment contributes significantly to your floor’s longevity and performance.
Installing the First Rows
The first row sets the foundation for your entire floor, so precision is crucial. Place spacers along the starting wall to maintain an expansion gap of 1/4 to 3/8 inch. This gap allows the floating floor to expand and contract with changes in temperature and humidity.
Position your first plank with the tongue side facing the wall. If your wall isn’t straight, scribe and cut the plank to follow the wall’s contour while maintaining your expansion gap. Connect the second plank by angling it into the first plank’s end joint and pressing down until it clicks. Continue across the room, cutting the last plank to fit while maintaining the expansion gap.
Start the second row with the leftover piece from row one, provided it’s at least 8 inches long. This creates a staggered pattern that looks natural and provides structural stability. Angle the plank’s long side into the first row while aligning the end joint. Once positioned, press down firmly until you hear and feel the click.
Continuing the Installation
As you progress across the room, maintain a random pattern with end joints staggered by at least 8 inches between adjacent rows. This prevents weak points and creates an appealing visual rhythm. Work from left to right, installing one complete row at a time.
Use a tapping block and hammer to ensure tight connections when planks don’t click together easily. Never hit the laminate directly – this damages the locking mechanism. For the last plank in each row, use a pull bar to draw it tight while maintaining your expansion gap.
Check your work frequently with a straightedge. Even small gaps compound over a large floor, creating noticeable problems. If you notice planks separating, stop and identify the cause before continuing. Sometimes a small piece of debris or damaged lock is the culprit.
Managing Obstacles and Transitions
Real rooms have obstacles – doorways, pipes, vents, and built-in furniture. Handle each carefully for professional results. For door frames, undercut them using a jamb saw with a scrap of laminate as a height guide. This allows the flooring to slide underneath for a clean appearance.
Around pipes, measure carefully and drill holes 1/2 inch larger than the pipe diameter. Cut the plank through the center of the hole, install both pieces, and glue the cut section back together. Fill gaps with pipe collars or color-matched flexible caulk.
Transition strips bridge height differences between rooms or flooring types. Install these according to manufacturer instructions, ensuring they’re level and securely fastened. T-moldings work for same-height transitions, reducers for height differences, and end caps for transitions to carpet.
Completing Your Installation
The last row often requires ripping planks lengthwise to fit. Measure the distance from the previous complete row to the wall at multiple points, subtract your expansion gap, and cut planks accordingly. A table saw provides the cleanest cuts, but a circular saw with a fine-tooth blade works well too.
Remove all spacers and install baseboards or quarter-round molding to cover expansion gaps. Attach molding to walls, not to the flooring, so the floor can move freely. Pre-drill holes to prevent splitting, especially in older homes with rigid plaster walls.
Clean your new floor with a laminate-specific cleaner, avoiding excessive moisture. Install felt pads on furniture legs before moving pieces back into place. Take photos of your completed floor – you’ve earned bragging rights!
Professional Tips for Superior Results
Here are insider secrets that set amateur installations apart from professional ones. Always work in good lighting – shadows hide gaps and imperfections. Keep a damp cloth handy to immediately wipe up any adhesive or leveling compound that gets on the planks.
Temperature matters more than you might think. Avoid installation on extremely hot or cold days when materials are less cooperative. If you must work in challenging conditions, allow extra time for acclimation and work more slowly.
Maintain consistent expansion gaps, even where they won’t show. Floors that bind against walls develop buckles and peaks. Use a pull bar designed for laminate – improvised tools often damage planks. When in doubt, cut it twice—measure multiple times and cut once still applies!
Common Mistakes to Avoid
Learn from others’ errors to ensure your success. Never skip acclimation, even if you’re eager to start. Insufficient expansion gaps cause more failures than any other mistake. Don’t forget to stagger joints – a ladder pattern weakens your floor and makes it look amateurish.
Avoid using too much force when connecting planks. If they won’t click easily, check for debris or damage rather than forcing them. Never install laminate in rooms with floor drains or chronic moisture problems – even waterproof varieties have limits.
Don’t neglect transitions between rooms. Continuous runs longer than 40 feet require transition strips to prevent buckling. Remember that laminate is a floating floor – never nail or glue it to the subfloor or tile beneath.
Maintaining Laminate Flooring Over Tile
Your beautiful new laminate floor is installed, but the journey doesn’t end there. Proper maintenance ensures your investment looks great and lasts for decades. Let’s explore how to care for your laminate flooring installed over tile.
Daily and Weekly Cleaning Routines
Establishing good cleaning flooring habits from day one protects your floor’s appearance and extends its life. Daily maintenance is surprisingly simple – a quick sweep with a soft-bristle broom or dust mop removes dirt and debris that could scratch the surface. For pet owners, consider running a microfiber dust mop twice daily in high-traffic areas.
Weekly cleaning requires slightly more effort but pays dividends in floor longevity. Use a vacuum designed for hard floors, and ensure the beater bar is off to prevent scratches. Pay special attention to edges and corners where dust tends to accumulate. Once vacuumed, damp mop with a well-wrung microfiber mop and laminate-specific cleaner.
Avoid these common cleaning mistakes that damage laminate floors. Never use steam mops—the heat and moisture they produce can penetrate seams, causing warping and delamination. Skip oil-based cleaners, wax, and polish – these leave residue that attracts dirt and creates slippery surfaces. Standing water is laminate’s enemy, so clean spills immediately and never saturate your floor during cleaning.
Handling Wear, Tear, and Minor Damage
Despite laminate’s durability, life happens. Scratches, chips, and wear patterns eventually appear, especially in high-traffic areas. The good news? Most minor damage is repairable without replacing entire sections.
For surface scratches, laminate repair kits work wonders. These kits include colored putty or markers that fill and disguise scratches. Clean the area thoroughly, apply the repair product as directed, and buff gently. Deeper scratches require filling with color-matched wood filler before touching up.
Small chips respond well to laminate floor filler. Clean the damaged area, apply filler slightly above surface level, and sand smooth once dry. Touch up with a matching repair marker for an invisible repair. For planks with extensive damage, individual board replacement is possible with floating floors—carefully disassemble the rows back to the damaged plank, replace it, and reassemble.
Protecting Your Investment Long-Term
Prevention beats repair every time. Place quality doormats at all entrances – the more dirt stopped at the door, the less wear on your floors. Use furniture pads under all furniture legs and replace them annually as they compress. Felt pads work well for stationary pieces, while furniture sliders help when rearranging rooms.
Control your indoor environment to prevent problems. Maintain humidity between 30% and 50% year-round using humidifiers or dehumidifiers as needed. Extreme humidity fluctuations cause expansion and contraction, which can stress joints and create gaps. Use area rugs in high-traffic zones, but ensure they have non-rubber backing that won’t stain or stick to laminate.
Establish rules that protect your floors. No high heels or cleats indoors – these concentrate weight in small areas, causing dents. Trim pet nails regularly to prevent scratches. Lift furniture when moving it rather than dragging. These simple habits significantly extend your floor’s beautiful appearance.
Cost Comparison and Value Analysis
Let’s talk money – after all, cost savings are likely what drew you to installing laminate over tile. Understanding the financial implications helps justify your decision and set realistic expectations.
Installation Cost Breakdown
Installing laminate over existing tile typically costs $3-8 per square foot for DIY projects, including materials and supplies. Professional installation adds $2-4 per square foot for labor. Compare this to removing tile first, which adds $3-5 per square foot for demolition and disposal, plus potential subfloor repairs costing $2-10 per square foot.
For a 200-square-foot room, installing over tile saves approximately $600-1,500 in removal costs alone. Factor in the time saved – tile removal takes 2-3 days versus 2-3 hours of prep work for overlay installation. If you value your time at even minimum wage, the savings multiply quickly.
Hidden Savings and Avoided Hassles
Beyond obvious cost savings, consider hidden benefits. Tile removal creates dust that infiltrates your entire home, potentially requiring professional cleaning of HVAC systems, carpets, and upholstery. Living in a construction zone for days or weeks has its own costs – eating out more, potential hotel stays, or lost productivity if working from home.
By leaving the tile in place, you avoid the risk of discovering subfloor damage that requires expensive repairs. You also eliminate disposal fees and the environmental impact of landfilling ceramic materials. Some homeowners discover asbestos-containing adhesives under old tile, turning a simple project into a hazardous material remediation costing thousands.
Return on Investment Considerations
Quality laminate flooring typically returns 70-80% of its cost at resale, making it a wise investment. Modern laminate’s realistic appearance and durability appeal to buyers who appreciate low-maintenance flooring. The extra sound-dampening from the tile underneath can be a selling point in multi-story homes or condominiums.
Consider your timeline too. If you’re planning to sell within 5 years, the cost savings of overlay installation improve your immediate return. For long-term residence, the savings can fund other improvements or a higher-quality laminate that better suits your lifestyle.