
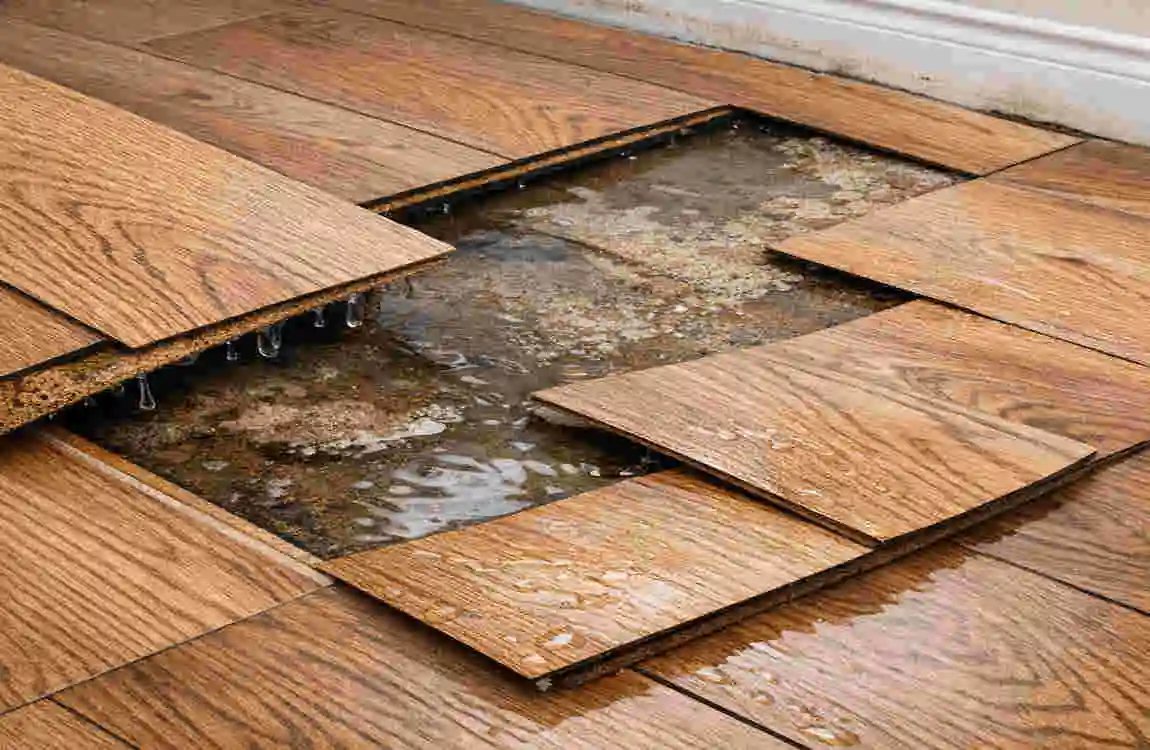
Let’s picture a scenario that every homeowner dreads. You are walking into your kitchen or living room, and your foot hits a surprisingly squishy, wet spot. Maybe the kids spilled a massive pitcher of water, the refrigerator decided to leak, or a heavy rainstorm sneaked inside.
You need to act fast. Leaving moisture trapped underneath your floorboards is a recipe for disaster. If you ignore it, you are looking at severe warping, dangerous mold growth, and incredibly costly replacements.
By taking quick action, you will save yourself a massive amount of time, stress, and hard-earned money. This is especially true in places with humid climates, like Lahore during the monsoon season, where trapped moisture refuses to evaporate on its own.
Why Water Under Laminate is a Problem
You might be thinking, “It was just a little spill, it will dry on its own, right?” Unfortunately, when it comes to laminate, that is a dangerous gamble.
Unlike solid hardwood or waterproof vinyl, traditional laminate is made from a high-density fiberboard (HDF) core. Think of this core as a highly compressed sponge made of sawdust and glue. When water touches that core, it eagerly drinks it up.
Once your flooring absorbs this moisture, several problems start to occur. The planks will begin to swell. This leads to cupping (where the edges rise above the center), buckling (where the floor lifts off the subfloor entirely), or delamination (where the top layer peels away from the core).
Even worse, trapped water is a massive health hazard. Hidden subfloors become the perfect dark, damp breeding ground for black mold. Breathing in mold spores can trigger allergies and asthma for you and your family.
Common culprits include sneaky appliance leaks behind the dishwasher, minor floods, or poor installation that left gaps in the flooring. When you consider that professional repair and replacement costs easily average between $5 to $10 per square foot, taking the DIY route to dry your floors is highly valuable.
Signs to Spot Early
You must keep your eyes peeled for early warning signs. Look for slightly raised seams between the planks. Listen for a hollow or squishy sound when you walk over a specific area. If you notice a faint, musty smell that will not go away, water is likely hiding beneath your feet.
Impact on Home Value
Leaving water damage unchecked does more than ruin your weekend. If you ever plan to sell your home, warped floors are a massive red flag for buyers. They will instantly demand a lower price or insist on a full replacement. Protecting your laminate directly protects your home’s overall value.
Preparation Before Drying
Before you rush in with fans and towels, take a deep breath and prepare your workspace. Rushing into the drying process without a plan can actually cause more harm than good.
Safety first! Always start by turning off the electrical power to the affected room at your breaker box. Water and electricity are a deadly combination, and you do not want to risk a shock if water has reached hidden wires or floor outlets.
Next, properly ventilate the room. Open all your windows and doors to let fresh air circulate. It is also highly recommended to wear basic protective gear. Grab a pair of gloves and a dust mask, especially if the water has been sitting for a few days and you suspect mold is already forming.
Inspecting the Damage
You need to assess the extent of the damage without lifting all the planks aggressively. Walk the perimeter of the wet area. Press down gently with your foot to see how far the squishy feeling extends. Water travels, so the wet area underneath is likely larger than the visible spill on top.
Gathering Your Tools
To do this right, you need the right tools on hand. You don’t need a professional contracting truck, but you do need some basics. Gather up:
Immediate Absorption with Towels and Blotting
When the spill first happens, your immediate reaction is your best defense. This method focuses on physical absorption and removing the bulk of the liquid before it can soak into the fiberboard core.
If the spill is near a wall or a transition strip, you can carefully lift the edge of the baseboard or the final plank just a tiny fraction of an inch. Do not attempt a full demolition! You only want a tiny gap to slide absorbent materials underneath.
The Turkish Towel Trick
Take heavy, highly absorbent towels—like thick Turkish bath towels—and press them firmly against the seams and edges where the water entered. You can even use a wet/dry shop vacuum right against the cracks to suck up standing water.
If you managed to get a tiny edge lifted, gently slide a thin microfiber cloth underneath to soak up the hidden puddles. Leave heavy books or weights on top of the towels so they press firmly against the floorboards, forcing the moisture out.
Using Diatomaceous Earth
For hard-to-reach moisture, you can use natural desiccants. Diatomaceous earth is a highly porous, chalky powder that sucks up moisture like magic. Carefully sprinkle a small amount into the affected seams. Let it sit for a few hours to absorb the water, and then carefully vacuum it up.
Pros and Cons of Blotting
ProsCons
Completely free to do. Very labor-intensive.
Uses items you already have at home. Only works for minor, immediate spills.
Prevents the core from saturating early. Does not reach deep subfloor moisture.
Important Precaution: Never forcefully pry up your planks. If they do not easily give way at the edges, leave them be. Snapping the tongue-and-groove locking mechanism will require you to replace the entire floor.
High-Velocity Fans for Air Circulation
Once you have soaked up the standing water, it is time to bring in the heavy artillery: continuous airflow. Evaporation is your absolute best friend when figuring out how to dry water under laminate flooring.
Stagnant air allows moisture to settle and soak into your subfloor. Moving air pulls the moisture out of the materials and pushes it out of the room. You want to create a wind tunnel effect right over the wet zone.
Strategic Positioning
Grab your box fans, floor fans, or even heavy-duty utility blowers if you have them. Do not just point them randomly. Position the fans so they blow directly across the floor surface, parallel to the ground.
If you can lift an edge piece slightly or remove a baseboard, aim the airflow directly into that gap. The physics of evaporation dictate that moving dry air over a wet surface lowers the air pressure, encouraging the water molecules in your floor to turn into vapor and escape.
The Setup Strategy
Imagine a clock face on your floor. Place one fan at 6 o’clock, blowing straight across the puddle area, and place another fan at 12 o’clock, blowing the air out of the nearest window or door. This creates a continuous sweep of fresh air.
Expected drying time: Depending on the spill, you should leave these fans running non-stop for 2 to 5 days.
Energy Tips and Noise Reduction
Running fans for days can get noisy and use a lot of electricity. To save on your energy bill, use fans on medium speed rather than high—the continuous steady flow matters more than gale-force winds. To deal with the noise, close the room door and run the fans primarily during the day if the sound keeps you up at night, though 24/7 operation is best for the floor.
Dehumidifier Deployment
Fans are great for pushing air around, but if the air in your house is already humid, you are just blowing wet air onto a wet floor. This is a major issue in regions with muggy summers, such as the monsoon season in Pakistan.
This is where deploying a high-quality dehumidifier becomes absolutely crucial. A dehumidifier acts like a giant, electronic sponge for the air. It sucks in the damp air, pulls the water out of it into a collection bucket, and blows bone-dry air back into the room.
Placement Guide
Place your dehumidifier as close as possible to the center of the affected area. Ensure all windows and doors in that specific room are closed tightly. If you leave the windows open, your machine will try to dehumidify the entire neighborhood, which is impossible.
Finding the Right Settings
Turn your machine on and look at the settings. You want to target a relative humidity (RH) level of 40% to 50%. This is the sweet spot. It is dry enough to pull water from beneath your laminate aggressively, but not so dry that it causes your wooden furniture to crack.
Keep a close eye on the room’s humidity using a digital hygrometer. Many modern dehumidifiers have one built in. Be prepared to empty the water collection bucket frequently, perhaps twice a day, until the floor is completely dry.
Cost-Benefit Analysis vs. Professional Services
Buying a decent dehumidifier might cost you between $150 and $250. However, when you compare that to hiring a professional water damage restoration crew—who routinely charge upwards of $1,000 just to set up their commercial machines—the DIY route pays for itself immediately. Plus, you get to keep the machine for future use!
Heat Application via Space Heaters
If you want to speed up evaporation even further, adding a little heat is a fantastic strategy. Warm air holds significantly more moisture than cold air. By raising the room temperature, you encourage the trapped water under your laminate to evaporate much faster.
Safe Low-Heat Methods
The keyword here is safe. You are not trying to bake your floors; you want to warm them up gently. Using standard household space heaters is perfect for this job.
Set your space heater to a low or medium setting. You want the ambient temperature near the floor to be warm, but under 90°F (32°C). If the heat is too intense, the sudden temperature shock can actually cause the laminate planks to warp and buckle worse than the water did!
Safe Positioning and Timers
Never place a space heater directly on the wet spot, and keep it at least 3 feet away from any walls, curtains, or loose towels. Fire hazards are a real threat if you are not careful.
Always plug space heaters directly into a wall outlet, never into an extension cord or power strip, as they draw a lot of power and can easily short out. Use a heater with a built-in timer or auto-shutoff feature so it does not run unchecked while you are sleeping or away from the house.
The 3x Faster Combo
Here is a pro tip: combine Method 4 with Method 2! Place your space heater near the back of your high-velocity fan. The fan will draw in warm air and blow it directly onto the wet floor. This combination of heat and ventilation can yield results up to 3 times faster than using a fan alone.
Plastic Sheeting and Vapor Barriers
Sometimes simply blowing air across the top of the floor isn’t enough, especially if the water has seeped deep into the subfloor. In these tricky cases, you can use the “tenting” method. This involves using thick plastic sheeting to trap dry air directly where you need it.
Sealing Off the Area
This method is highly effective for localized spills. You will need a roll of heavy-duty polyethylene sheeting (commonly found in the painting aisle of any hardware store) and some safe, easy-to-remove painter’s tape.
Installation Steps
First, make sure the laminate surface is completely wiped dry. Then cut a piece of plastic sheeting slightly larger than the water-damaged area. Tape the edges of the plastic securely to the floor, leaving one small opening at the front and one at the back.
Next, take a small fan or the exhaust hose from your dehumidifier, and aim it directly into the front opening of the plastic. Tape the plastic around the fan to create a seal.
Trapping the Dry Air
When you turn the fan on, the plastic will puff up like a balloon. You have just created a micro-environment! The incredibly dry air is now trapped directly against the floor seams, forcing the moisture underneath to evaporate and escape through the small exit hole you left at the back.
This method is ideal for subfloor protection in rentals, where you absolutely cannot afford to damage the property or lift any boards. It takes a little extra setup, but it intensely focuses your drying efforts exactly where they need to go.
Enzyme Cleaners for Hidden Moisture
When dealing with water under laminate flooring, moisture isn’t your only enemy. The organic matter trapped under your floorboards—like dust, pet dander, or spilled food—mixes with the water. This creates terrible odors and fuels rapid mold growth.
If the water sitting under your floor came from a dirty source (like a dishwasher leak or a pet accident), you have to address the bacteria, not just the dampness.
Breaking Down Organic Matter
This is where pet-safe enzyme cleaners come to the rescue. Enzymes are natural proteins that literally eat away at organic bacteria, destroying the source of the nasty musty smells and preventing mold from taking root.
The Syringe Application
But how do you get the cleaner under the floor without ripping it up? The secret is a liquid plastic syringe (the kind you use to give medicine to kids or pets).
Fill the syringe with the liquid enzyme cleaner. Carefully place the tip directly over the seams of the affected laminate planks. Gently squeeze a tiny amount of the liquid into the cracks. Let it seep down into the subfloor.
The cleaner will follow the same path the water took. Leave it alone for a few hours so the enzymes can work their magic, and then resume your fan and dehumidifier setup.
Natural Alternatives and Odor Elimination
If you do not have commercial enzyme cleaners on hand, natural alternatives work well too. Mix a paste of baking soda and a tiny bit of water, and gently rub it into the seams. Baking soda is a natural odor absorber. You can also leave small bowls of white vinegar around the room to pull musty smells out of the air while the floor dries.
Professional-Grade Desiccants
If you are dealing with a stubborn wet spot that refuses to dry, it is time to look at what the professionals use. Commercial restoration crews often rely on highly powerful desiccants to draw out hidden moisture from dense materials.
Silica Gel and Clay Packs
Desiccants are materials specifically designed to induce or sustain a state of dryness. You are probably familiar with those little “Do Not Eat” packets of silica gel that come in shoe boxes.
You can buy professional-grade silica gel or bentonite clay packs in bulk online or at home improvement stores. These heavy-duty packs can absorb large amounts of water from their surroundings.
How to Use Them
You can use these without doing any full demolition. Lay several large desiccant packs directly over the damp seams of your flooring. Cover them closely with a plastic bin or tape a piece of plastic sheeting over them to trap them against the floor.
The desiccants will aggressively pull the moisture up through the microscopic gaps in the laminate locking system.
Sourcing and Refill Advice
Compared to standard DIY methods, professional desiccants are a bit pricier but require no electricity and make no noise. Many large silica gel packs are even reusable! Once they become saturated with water (some change color to let you know), you can bake them in your oven at a low temperature to dry them out, and then use them again.
This method is brilliant for long-term integration of prevention. You can permanently leave a few discreet desiccant packs hidden under baseboards in high-risk areas, such as laundry rooms, or behind the refrigerator.
Comparison of All
To help you decide which route to take, here is a quick breakdown of everything we have covered. You can easily mix and match these strategies for the best results.
Method Tools Needed Time Cost Effectiveness (1-10)Best For
Towels & Blotting Heavy towels, vacuum 24-48 hours. Free 4/10 Immediate action, minor surface spills.
High-Velocity Fans: Box fans, blowers, 2-5 days. Low 7/10: Creating continuous surface evaporation.
Dehumidifier Room dehumidifier 2-5 days Medium 9/10 High-humidity climates, pulling deep moisture.
Space Heaters Heater with timer 1-3 days Low 6/10 Speeding up fans, cold environments.
Plastic Sheeting Poly-sheets, tape, fan 2-4 days Low 8/10 Localized deep spills, rental properties.
Enzyme Cleaners Syringe, liquid enzymes 1 day Low 7/10 Dirty water spills, killing musty odors.
Monitoring Progress and Testing Dryness
You have your fans running and your towels laid out. But how do you actually know when the job is done? Guessing can be a costly mistake. If you turn off the machines too early, the residual dampness will restart the rotting process.
The Value of Moisture Meters
The absolute best way to monitor your progress is by purchasing a digital pinless moisture meter. These handy little gadgets cost under $20 at most hardware stores.
A pinless meter uses electromagnetic sensors to read the moisture levels up to an inch below the surface of the floor—without scratching your laminate! Press the meter flat against the floor. Test a completely dry area of the room first to get a baseline reading. Then, test the damaged area. When the numbers match, your floor is officially dry.
Visual and Sensory Signs of Success
If you don’t have a meter, use your senses.
- Touch: The floor should feel completely room temperature, not cold or clammy.
- Smell: Stick your nose near the floor. There should be absolutely no musty, earthy, or damp smells.
- Sight: The planks should be perfectly flat. If the edges are still slightly raised, moisture is still trapped inside the core.
Re-Inspection Timeline
Make it a habit to do daily checks for the first week. Turn off the fans for about an hour before testing, as the moving air can temporarily mask bad smells or make the floor feel artificially dry. If everything looks good after seven days, you can pat yourself on the back for a job well done.
Prevention Tips for Laminate Longevity
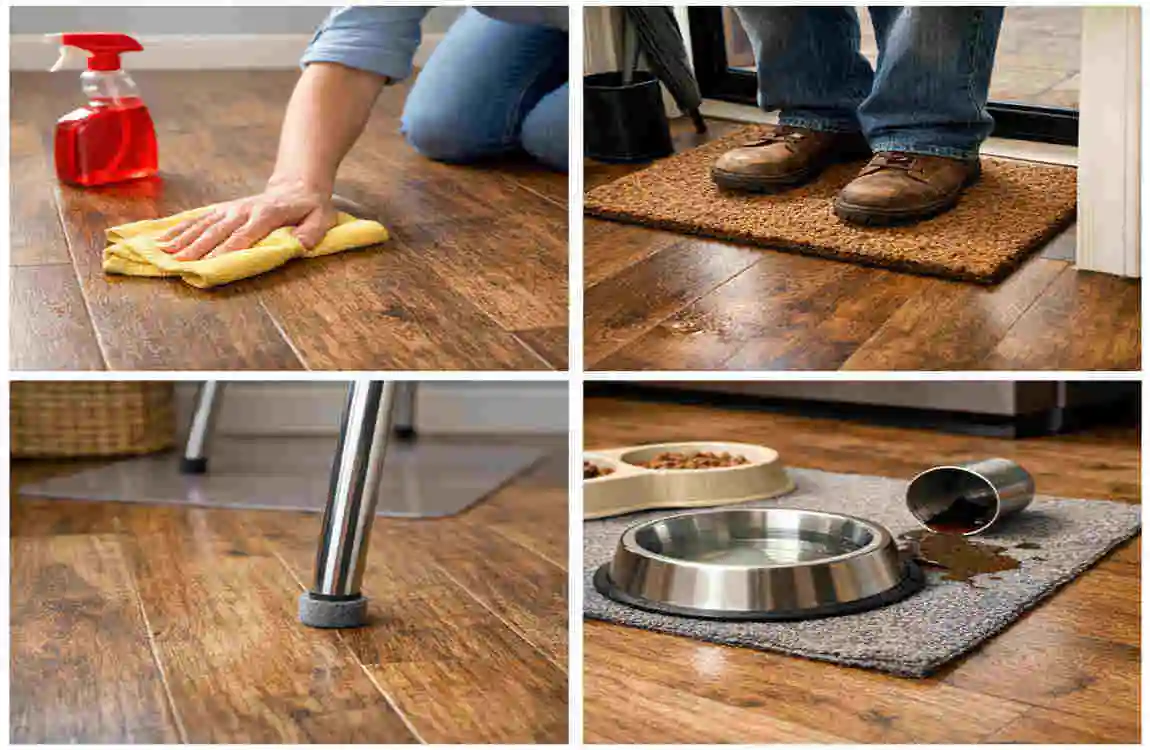
Now that you know how to dry water under laminate flooring, you want to make sure you never have to do it again! Prevention is always cheaper than a cure. With a few simple upgrades, you can make your floors incredibly resilient to future accidents.
Waterproof Underlayment
If you ever decide to replace or reinstall your floors, do not skip the underlayment. Always insist on a Premium, waterproof closed-cell underlayment. This acts as a secondary shield. Even if water gets past the top planks, this barrier stops it from sinking into your wooden subfloor, making cleanup a breeze.
Seal the Edges
Laminate planks lock tightly together, but the perimeter of the room where the floor meets the wall is highly vulnerable. Run a bead of 100% silicone sealant around the expansion gaps near your baseboards, especially in wet zones like kitchens and bathrooms. This stops water from sliding down the walls and underneath the floorboards.
Fix Leaks Promptly and Routine Maintenance
Never ignore a dripping refrigerator line or a weeping window frame. Fix plumbing issues the second you spot them.
For homeowners in places like Lahore, prep your home before the monsoon season arrives. Check your window seals and ensure your roof isn’t leaking. Make it a rule to clean your laminate only with a slightly damp microfiber mop—never use a soaking-wet string mop! Standing water is your enemy, whether it comes from a storm or a cleaning bucket.
When to Call Professionals
While the DIY methods we covered are incredibly effective, you have to know when a situation is beyond your control. Sometimes, the water damage is too severe, and trying to handle it yourself will delay necessary repairs.
Watch Out for Red Flags
You need to call a professional water damage restoration crew immediately if you notice any of these severe red flags:
- Widespread Buckling: If the floor has lifted off the ground like a roller coaster across the entire room, the locking mechanisms are destroyed. The floor must be replaced.
- Toxic Black Mold: If you see dark green or black spots blooming between the seams, or if you feel physically sick when entering the room, stop immediately. Mold remediation requires professional hazmat gear.
- Subfloor Rot: If the floor feels dangerously spongy, like you might fall through it, the structural wooden subfloor beneath the laminate has rotted. This is a major construction issue.
Local Services and Costs
If you live in a major metropolitan area like Lahore, there are dozens of local restoration services available. Keep a few numbers saved in your phone for emergencies.
Professional drying services generally charge a base fee to assess the damage, plus a daily rental fee for their commercial dehumidifiers. Expect a minimum bill of a few hundred dollars. However, if they have to tear up the floor and replace the subfloor, the costs will easily exceed $1,000.
FAQs
Here are some of the most common questions homeowners have when disaster strikes their floors.
Exactly how long does it take for water to dry under laminate flooring? Depending on the severity of the spill and the method used, it typically takes anywhere from 48 hours to 5 days of continuous airflow and dehumidification to completely dry the subfloor.
Can I walk on the laminate while it is drying? You should avoid walking on the wet area whenever possible. The damp HDF core is weakened. Heavy footsteps can easily crack the tongue-and-groove joints or permanently bend the swollen planks.
Will a hair dryer work for drying my floors? While tempting, do not use a hair dryer. The intense, highly focused heat can actually melt the wear layer of your laminate or cause the boards to warp instantly due to thermal shock. Stick to ambient space heaters and fans.
Can warped laminate flatten back out? Sometimes! If you catch the spill immediately and dry it rapidly, minor cupping might settle down as the core shrinks back to its normal size. However, severe buckling is permanent.
How to dry water under laminate flooring without removing planks? Use a combination of high-velocity fans blowing across the seams, a room dehumidifier set to 45% humidity, and inject enzyme cleaners into the seams to prevent mold.
Does homeowner’s insurance cover laminate water damage? It depends on the source. Sudden, accidental issues, such as a burst pipe, are usually covered. Gradual damage from a slow, neglected leak usually is not. Check your specific policy!
Can I use a wet vacuum on laminate? Yes, a wet/dry shop vacuum is excellent for sucking up the initial standing water from the surface and the seams. Still, it will not pull moisture from deep within the core.
Why does my floor smell like dirty socks? That is the smell of organic bacteria and potential mold growing in the damp, dark space under your floor. You must use an enzyme cleaner or vinegar to neutralize it.
Is it safe to leave a dehumidifier running overnight? Yes, modern, high-quality dehumidifiers are designed for continuous use and feature auto-shutoff when their water buckets fill.
What is the best way to clean my laminate after it dries? Once completely dry, use a specialized laminate floor cleaner and a dry microfiber mop. Never use steam cleaners, as the injected steam will cause the same water damage all over again!