
But here’s the catch: a new house interior is not the same as repainting an old room. Fresh drywall, leftover construction dust, and unsealed surfaces can turn a simple DIY project into a frustrating mess if you rush the process. That’s why learning how to paint a new house interior the right way matters so much.
A well-done paint job can improve how your home looks, how long your walls stay clean, and even how healthy your indoor air feels. Some housing experts also note that fresh, professionally finished interiors can help support resale value. On the flip side, skipped prep work often leads to peeling, patchy color, roller marks, and repainting far sooner than expected.
The good news is that you do not need to be a contractor to get beautiful results. With the right prep, tools, and low-toxicity products, you can create a finish that looks polished and lasts for years.
Why Paint Your New House Interior Right the First Time

When you move into a new home, it is tempting to grab a roller and start painting right away. The walls look fresh, so the job should be easy.
Not always.
A newly built interior comes with its own set of challenges. Bare drywall is thirsty. It absorbs paint unevenly, which can leave you with blotchy color, dull spots, or a finish that looks different from wall to wall. If the drywall has not been sealed properly, the paint may not bond as it should.
There is also the issue of construction dust. Even if the builder cleaned the home, fine dust often sits on walls, trim, window ledges, and floors. That dust can mix into your paint or keep primer from sticking well. The result is a weaker finish that may chip, peel, or show texture problems later.
Another reason to paint carefully is indoor air quality. Traditional paints can release VOCs, chemicals that produce strong fumes that can linger indoors. Many homeowners now choose low-VOC or zero-VOC products because they want a healthier space, especially in bedrooms, nurseries, and family rooms. If your goal is eco-friendly interior painting, planning ahead is one of the biggest benefits.
There is also a money angle. Good prep work may feel slow, but it saves real money. If you skip sanding, priming, or cleaning, you may end up buying more paint, fixing mistakes, or repainting entire walls. In many cases, careful prep is what separates a paint job that lasts from one that looks tired within a year.
Common Problems New Interiors Have
New homes may look finished, but the surfaces are often still delicate. You may deal with:
- Small drywall seams or nail pops
- Uneven texture on walls
- Dust in corners and on trim
- Paint absorption issues on raw drywall
- Caulk gaps around baseboards and window trim
These things are normal. The key is to catch them before your color coats go on.
Top 5 Mistakes Homeowners Make
Here are the biggest mistakes people make when learning how to paint a new house interior for the first time:
- Skipping primer on new drywall
- Painting over dust and debris
- Using the wrong sheen for the room
- Ignoring ventilation while painting
- Applying thick coats instead of even coats
Each of these mistakes can ruin the final look, even if you bought expensive paint.
Mistakes vs. Easy Fixes
MistakeWhat HappensBest Fix
No primer on new drywall Uneven coverage, poor adhesion Use a quality drywall primer or low-VOC primer
Painting over dust Rough finish, poor bonding Vacuum and wipe surfaces first
Wrong sheen choice Walls show flaws or wear too fast Match sheen to room use
Poor ventilation Strong odor, slower drying Open windows and use fans
Thick paint coats Drips, lap marks, slow cure time Apply two thin, even coats
If you treat your new walls properly from the beginning, you make every later step easier. That is why painting right the first time is not just about looks. It is about durability, comfort, and fewer headaches down the road.
Choosing Eco-Friendly Paints and Materials for New Interiors
One of the smartest parts of learning how to paint a new house interior is choosing better products before you begin. Paint quality matters, but so does paint chemistry.
If you want cleaner indoor air and fewer fumes, start with low-VOC or zero-VOC paint. These paints release fewer harmful chemicals into your home. That makes them a strong choice for new houses, where windows may stay closed during certain seasons and you may be moving furniture, kids, and pets into the space soon after painting.
What Low-VOC and Zero-VOC Really Mean
VOC stands for volatile organic compounds. These are chemicals that evaporate into the air as paint dries. Traditional paints often have a stronger smell because of these compounds.
Low-VOC and zero-VOC paints are made to reduce that problem. They are especially helpful if:
- You are sensitive to odors
- You have children or pets
- Anyone in the home has asthma or allergies
- You want a more eco-conscious renovation
Picking the Best Paint Type for Each Surface
If you are wondering which paint is best for new home interior walls, the answer depends on where you are painting.
Flat or matte paints hide small flaws very well. That makes them a great match for ceilings and sometimes low-traffic adult bedrooms. But they are less washable.
Eggshell has a soft glow and is one of the most common wall paint colors. It gives you a smooth look without too much shine.
Satin is slightly shinier and more durable. It works well in hallways, kitchens, kids’ rooms, and other areas that are frequently used.
Semi-gloss is usually best for trim, doors, and cabinets because it cleans easily and resists wear.
Sheen Guide for New Interiors
SheenBest For New InteriorsEco Brand ExamplesDurability
Flat Ceilings AFM Safecoat Low
Eggshell Walls in low-traffic rooms Clare Paint Medium
Satin Hallways, kitchens, family spaces ECOS Paints High
Semi-gloss Trim, doors, baseboards Benjamin Moore / Sherwin-Williams low-VOC lines High
Do You Need Primer on a New House Interior?
Yes. In most cases, you absolutely need primer for new drywall.
Fresh drywall and joint compound absorb paint at different rates. That means if you skip primer, you may see dull patches or flashing, where repaired or mudded areas show through your topcoat.
A good primer helps by:
- Sealing porous surfaces
- Creating even absorption
- Helping topcoat color look true
- Improving paint adhesion
- Reducing the number of finish coats needed
For most new drywall, a water-based eco primer is a smart choice. It dries faster, smells less, and cleans up with water. If you have stains, smoke marks, or areas of unusual bleed-through, you may need a stronger stain-blocking primer.
How Much Paint Do You Need?
One of the most common beginner mistakes is buying too little paint. Use this simple formula:
[ \text{Gallons needed} = \frac{\text{Square feet} \times 2 \text{ coats}}{350} ]
That formula assumes average coverage of about 350 square feet per gallon and two coats of paint.
Quick example:
If your room has 700 square feet of wall area:
[ \frac{700 \times 2}{350} = 4 ]
You would need about 4 gallons for two coats.
Buy a little extra if you are painting textured walls, dark colors, or rooms with a lot of cut-in work.
Always Test Before You Commit
Paint chips lie. Store lighting and online photos can be very misleading.
Before painting a whole room, brush a sample on at least two walls and look at it at different times of day. Morning light, afternoon light, and warm lamp light can all change how the color feels.
Essential Tools and Supplies Checklist
A smooth paint job starts long before the first brush stroke. If you want clean lines, even coverage, and less stress, gather everything ahead of time.
You do not need a truck full of contractor gear. But you do need a few solid basics.
Must-Have Painting Tools
Here is a practical painting tools checklist for a new interior:
- Drop cloths to protect floors
- Painter’s tape for trim, outlets, and crisp edges
- Angled sash brush for cutting in
- 9-inch roller frame and covers for walls
- Extension pole for ceilings and tall walls
- Paint tray and liners
- Stepladder
- Vacuum or shop vac for dust cleanup
- Fine sanding sponge
- Eco-friendly cleaner like Simple Green or Krud Kutter
- Spackle and putty knife
- N95 mask, gloves, and safety glasses
For brushes and rollers, quality really matters. A cheaper roller may leave lint or uneven texture. A good angled brush makes cutting in faster and cleaner.
Many painters like tools such as:
- Purdy 2.5-inch angled sash brush
- Wooster 9-inch roller
- Microfiber roller covers for smooth drywall
Estimated Budget for Basic Supplies
ItemEco OptionPrice Range
Primer (1 gal) Low-VOC drywall primer $25–40
Paint (1 gal) Low-VOC or zero-VOC brand $40–60
Roller kit Microfiber roller set $15–25
Angled brush Reusable quality brush $10–20
Painter’s tape Low-bleed tape $6–12
Drop cloths Reusable canvas or recycled material $10–30
Cleaner Eco-safe cleaner $8–15
For a typical DIY room project, your total supply cost may range from $150 to $300, depending on how much equipment you already own.
Step-by-Step Guide: How to Paint a New House Interior
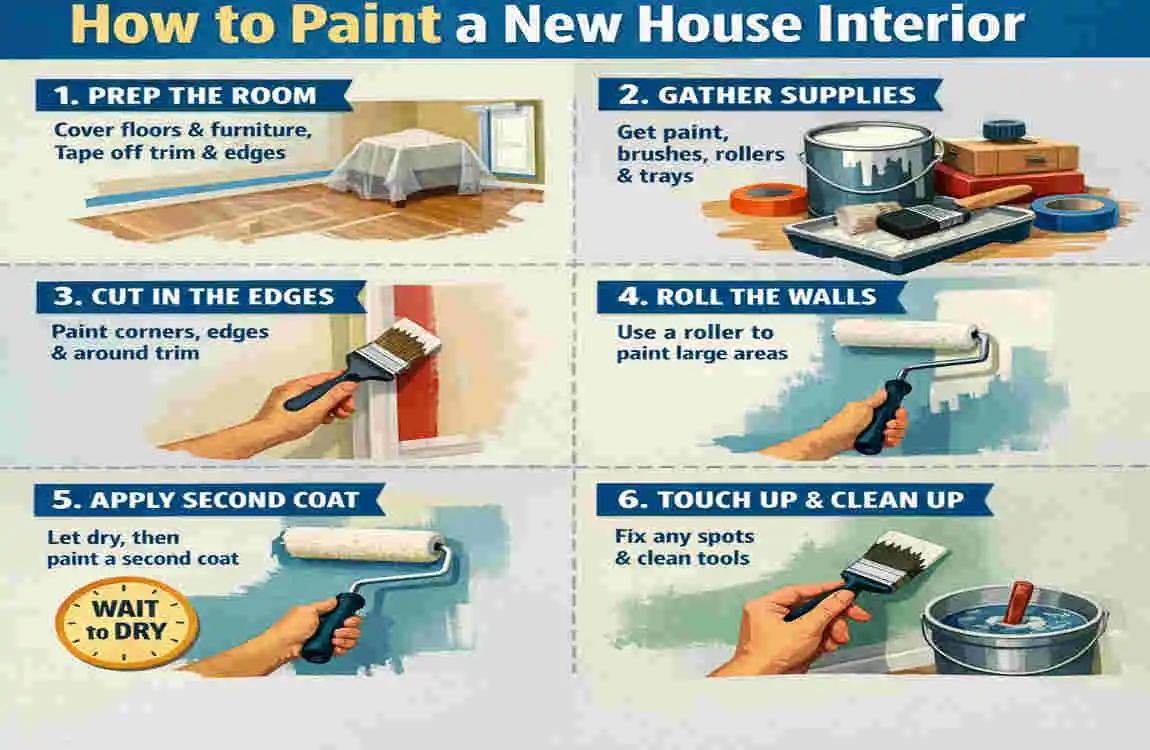
This is the part you came for. If you want to know exactly how to paint a new house interior, follow these steps in order. The process is simple, but the details matter.
Prep Your New Space Like a Pro
Prep is where professional-looking results begin.
Start by removing as much as possible from the room. Take out small furniture, wall décor, rugs, curtains, and anything else that might get in the way. Move larger furniture to the center of the room and cover it with plastic.
Next, protect the floor. Canvas drop cloths work well because they stay in place better than slippery plastic. Use painter’s tape to secure edges if needed.
Now clean the room. This step is extra important in a new house. Construction dust can settle everywhere, even on vertical surfaces. Vacuum the baseboards, window sills, corners, and the floor. Then wipe the walls lightly with a damp microfiber cloth or an eco-safe cleaner. If you use a cleaning solution, make sure the walls dry fully before priming.
After cleaning, inspect the drywall carefully. Look for:
- Small dents
- Screw pops
- Rough patches
- Joint lines
- Caulk gaps around trim
Fill holes or shallow dents with a lightweight spackle such as DAP DryDex or another low-odor patching product. Once dry, sand the area smooth with a fine sanding sponge. You do not need to sand every inch of wall, but you should smooth any bumps, drips, or raised spots.
Then tape off what you do not want painted. Apply painter’s tape to baseboards, trim, window casings, door frames, and outlet covers. Better yet, remove switch plates and outlet covers completely. It gives a cleaner result and takes only a few minutes.
Ventilation matters too. Open windows if weather allows. Set up box fans to move air out of the room. Good airflow helps paint dry more evenly and reduces odor, even with low-VOC products.
One more pro tip: if the house is freshly built, check whether the builder just finished sanding or flooring work. Fine dust can continue settling for days. Please wait until the dirtiest construction work is completely done before painting.
If you ever wonder why some paint jobs look smooth and polished while others look rough and uneven, this is usually the answer. Great painting begins with boring prep work. Do not skip it.
Prime for a Flawless Base
If you remember only one rule from this guide on painting a new house interior, remember this: prime new drywall.
Primer seals the surface and creates an even base. Without it, your finish paint may soak in differently across the wall, especially over taped seams or patched areas. That is how you end up with dull spots and flashing.
Pour primer into your tray, then use a brush to cut in around the edges first. Then roll the large wall areas with a roller. Work in manageable sections and apply a thin, even coat. You do not need to flood the wall.
Most water-based primers dry in about 1 to 4 hours, but always check the can. Dry time depends on humidity, temperature, and airflow.
Once the primer is dry, take a second look at the walls. Primer is great at revealing flaws you missed. If you notice rough spots or small dents, patch and sand them now. Then spot-prime those repaired areas again before moving on to paint.
This step may feel slow, but it sets up everything that follows.
Master Cutting-In and Rolling Techniques
Now comes the visible part of the job: applying your paint.
Start with cutting in. This means painting a narrow strip along the edges where the roller cannot reach, such as corners, ceilings, trim, and around windows. Use your angled brush and work slowly. A steady hand helps, but you do not need perfection on the first stroke. The goal is smooth, controlled coverage.
Try not to overload the brush. Dip only about one-third of the bristle length into the paint, then tap off the extra. Paint a clean band about 2 to 3 inches wide.
After cutting in, move to the roller while that edge is still wet. This helps the brushed and rolled sections blend better.
When rolling, load the roller evenly but do not soak it. A good rule is to fill the roller cover without dripping. Start a few inches away from the edge, then roll into it. Many painters use a “W” or “M” pattern to spread paint across the wall before filling it in with vertical passes.
Use light, even pressure. Let the roller do the work. Pressing too hard can leave tracks and cause paint to squeeze unevenly across the wall.
Here are a few pro technique tips:
Keep a wet edge.
Work one section at a time so the paint stays wet as you move along. This prevents lap marks.
Roll from top to bottom.
This gives a more consistent finish and catches drips earlier.
Use an extension pole.
You will get a smoother, more even pass on walls and ceilings than you will with short, choppy arm movements.
Do not overwork the paint.
Once the paint starts setting, leave it alone. Going back over half-dry paint can create streaks and texture issues.
Most walls need two coats for strong color and good durability, even if the first coat looks decent. Wait the full recoat time listed on the can, usually around 2 to 4 hours for latex paint.
If you are covering a darker builder-grade color with a lighter shade, a second coat becomes even more important.
The difference between an average DIY finish and a clean professional look often comes down to patience during this stage. Slow down. Maintain a rhythm. Let each coat dry properly.
Tackle Trim, Doors, and Ceilings
Once the walls are done, move on to the details.
Ceilings are usually painted first in a full-room sequence, but if you are painting them after the walls for any reason, protect your finished wall color carefully. Flat ceiling paint is best because it reduces glare and hides imperfections.
Use an extension pole and roll in one direction for the final pass. That helps the finish look more uniform when the light hits it.
For trim and baseboards, choose a more durable finish such as semi-gloss or satin. Trim gets touched, bumped, and cleaned more often than walls. A slightly shinier finish helps it stand up better.
Use a smaller angled brush for trim and apply long, smooth strokes. If you see drips forming, catch them quickly.
Doors can be painted in place, but you will usually get the cleanest finish if you remove hardware first. If possible, paint the door flat on sawhorses. For very smooth results, some people use a sprayer. Still, a quality brush and foam or microfiber mini roller can also work well.
Clean Up and Final Inspection
Cleanup starts before the paint is fully dry.
Remove the painter’s tape carefully while the paint is still slightly soft. This helps prevent peeling at the edges. Pull the tape back slowly at a 45-degree angle.
If you used latex or water-based paints, wash brushes and rollers with warm water and mild soap. Eco-friendly products usually make cleanup easier, which is one more reason many homeowners prefer them.
Now inspect your work in both daylight and artificial light. Look for:
- Thin spots
- Missed corners
- Roller lines
- Drips on trim
- Uneven cut-in edges
Use a small brush or mini roller for touch-ups. Keep a little labeled leftover paint for future scuffs or repairs.
Pro Tips for Long-Lasting, Eco-Friendly Results
Once you understand the basics of painting a new house interior, a few extra strategies can make your results even better.
Let the House Settle if Needed
Brand-new homes can continue releasing fine dust after construction wraps up. If the builder just finished sanding, installing flooring, or cutting trim, it may help to wait a short period before painting. Even waiting a couple of weeks can reduce the amount of dust that lands on fresh paint.
Some painters prefer to wait up to 30 days post-construction for final decorative painting, especially if other trades are still moving in and out.
Watch the Weather and Humidity
Paint does best in stable indoor conditions. If humidity is too high, drying slows down. If the space is too cold, paint may not level well.
A comfortable range for most interior paints is around normal room temperature with moderate humidity. If you are painting in winter, use gentle heat and a dehumidifier if needed. Avoid blasting the room with extreme heat, which can dry the surface too fast while the layer underneath stays soft.
Use Eco-Friendly Habits Beyond the Paint Itself
Eco-friendly interior painting is not just about the can label.
You can make the whole project greener by:
- Reusing quality tools instead of buying disposable ones
- Choosing washable drop cloths
- Cleaning tools with low-impact soap
- Recycling empty paint cans where allowed
- Storing leftover paint for touch-ups instead of throwing it away
- Donating unopened paint to community reuse centers if local rules allow
Avoid Overbrushing and Overrolling
Many beginners think more strokes mean a smoother wall. In reality, excessive brushing or rolling often causes streaks, drag marks, and an uneven texture.
Apply the paint, level it out, and move on.
Do Not Ignore Lighting
Color changes with light. Before finalizing your paint plan, check your sample under:
- Morning daylight
- Afternoon sunlight
- Evening lamp light
- Warm LED and cool LED bulbs
This is especially important in open-plan homes where a single color may span several connected spaces.
Consider Modern 2026 Design Trends Carefully
If you want a fresh look, a few 2026 trends continue to show up in stylish homes:
Color drenching means painting walls, trim, and sometimes ceilings in the same color for a dramatic, cozy effect.
Soft earth tones such as clay, warm beige, olive, and muted blue remain popular because they feel calm and timeless.
Low-sheen finishes are also in demand because they look relaxed and modern.
Trends can be fun, but always make sure your choices still fit your furniture, lighting, and daily life.
7 Pro Secrets That Make a Big Difference
- Buy enough paint from the same batch when possible to keep color consistent.
- Box your paint together in a larger bucket before starting, especially if you use multiple cans of the same color.
- Sand between coats on trim for a smoother finish.
- Use a mini roller for touch-ups to better match the surrounding texture.
- Label every leftover can with room name, sheen, and date.
- Do a final walkthrough at night and in daylight to catch flaws under different lighting conditions.
- Give paint time to cure before decorating so frames, furniture, and tape do not damage the fresh surface.
FAQ
How long does it take to paint the interior of a new house?
For a typical 2,000-square-foot home, it usually takes a DIY painter 3 to 7 days, depending on how many rooms you are painting, how much prep is needed, and whether you are also painting trim and ceilings.
What is the best eco-friendly paint for new house interior walls?
Many homeowners like zero-VOC or low-VOC paints from brands such as ECOS, Benjamin Moore, Sherwin-Williams, Clare, and AFM Safecoat. The best choice depends on your budget, preferred finish, and whether you want added durability for busy rooms.
Do I need primer for new drywall?
Yes. New drywall is porous and unevenly absorbs paint. Primer seals the surface, making your color coat look more even and last longer.
Can I paint the interior of a new house in winter?
Yes, you can. Just make sure the room stays within the paint manufacturer’s recommended temperature range and use ventilation or a dehumidifier if moisture builds up.