
Hey there, homeowner! Have you ever stared at a dusty, stuck window in your house and wondered how on earth to get it out without turning your living room into a disaster zone? house Framed windows with screens are those everyday heroes in our homes—they let in fresh air, keep bugs at bay, and frame our views of the outside world. But sometimes, they need a little TLC, like a deep clean, a repair, or even a full replacement. That’s where knowing how to remove framed windows with screens comes in handy.
Why bother learning how to remove framed windows with screens? Well, situations pop up all the time. Maybe you’re prepping for a fresh coat of paint, replacing a cracked pane, or just giving everything a thorough scrub. Doing it wrong could lead to broken glass, damaged walls, or even injury. But don’t worry—I’ve got your back with a straightforward, beginner-friendly approach.
Understanding Framed Windows with Screens
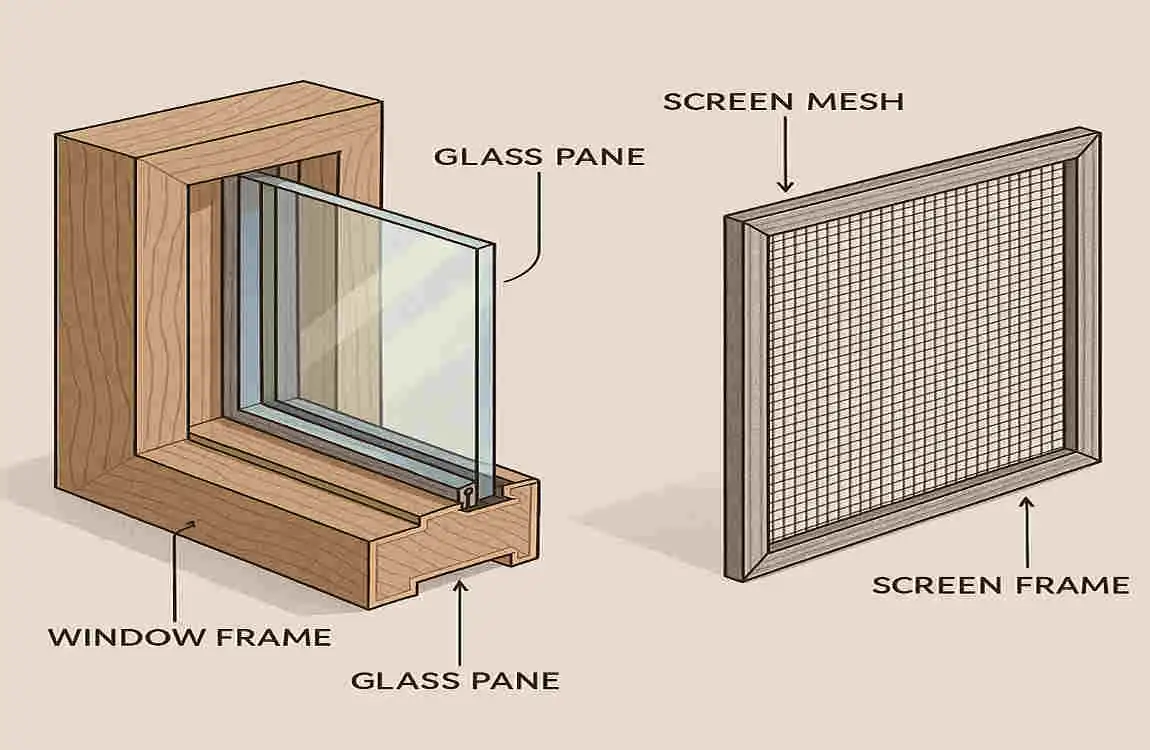
Framed windows with screens are more than just holes in your wall—they’re clever setups that combine functionality with protection. At their core, these windows feature a sturdy frame that holds glass panes and an attached screen that serves as a barrier. The frame is usually fixed to your home’s structure, while the screen keeps out insects and debris without blocking airflow.
Let’s break it down. The frame is the backbone, encasing the glass and providing stability. Screens, on the other hand, are mesh panels that snap or screw into place over the window opening. Together, they create a system that’s perfect for ventilation in warmer months.
You may have different types of windows in your home, and knowing them helps when figuring out how to remove framed windows with screens. Sliding windows glide side to side on tracks—think of those in modern kitchens or patios. They’re straightforward to handle because the sashes (the movable parts) often lift out easily.
Then there are casement windows, which swing open like doors on hinges. These are common in bedrooms for their wide-open feel, but removal might involve unscrewing hardware. Double-hung windows are classics in older homes; they have two sashes that slide up and down, tilting inward for cleaning.
Materials matter too. Wood frames offer a warm, traditional look but can warp over time. Aluminum is lightweight and rust-resistant, ideal for humid areas. Vinyl is budget-friendly and low-maintenance, resisting rot and fading. Screens often use fiberglass mesh for durability or aluminum for strength.
Why do we love these screened setups? They let you enjoy a breeze without swatting flies. Screens block pests, reduce pollen entry, and even add a layer of security. Plus, they improve energy efficiency by allowing natural ventilation instead of cranking the AC.
But how do screens attach? It varies. Some use spring-loaded clips that pop into grooves. Others rely on screws for a secure fit, especially in storm-prone areas. Magnetic strips are popular in newer models for easy removal. Understanding these attachments is key to safe disassembly.
Picture yourself examining your window right now—can you spot the clips or screws? This knowledge sets you up for success when it’s time to remove everything.
Of course, not all windows are created equal. Older homes might have custom frames, while apartments could have standardized ones. Regardless of the circumstances, grasping these basics makes removing framed windows with screens less intimidating.
Tools and Safety Precautions Needed
Before you jump into how to remove framed windows with screens, let’s talk tools. You don’t need a fancy workshop—just some basics to make the job smooth and safe. Gathering them ahead of time saves time and frustration.
Here’s a quick bulleted list of essential tools:
- Screwdrivers: Grab both Phillips and flathead types for different screw heads.
- Pry bars or putty knives: These help gently loosen stuck parts without gouging walls.
- Gloves and safety glasses: Protect your hands from sharp edges and your eyes from debris.
- Ladder: Essential if your windows are high up, like on a second story.
- Utility knife: Perfect for cutting through old caulk or paint seals.
With these in hand, you’re set. Now, safety first—because no one wants a trip to the ER mid-project.
Always handle glass with care; it can shatter unexpectedly. Wear those gloves to avoid cuts, and safety glasses to shield from flying bits. If the window is heavy, use proper lifting techniques: bend your knees, keep your back straight, and lift with your legs.
Protect your surroundings, too. Lay down drop cloths to catch dust or paint chips. Tape off nearby walls to prevent scratches. And if the window is large, grab a partner—teamwork makes lifting easier and safer.
Why emphasize this? Accidents happen when we rush. Imagine dropping a frame and cracking your floor—yikes! Taking precautions ensures you finish the job smiling, not bandaged.
Remember, if you’re unsure, pause and assess. Safety isn’t just a buzzword; it’s what keeps your window home improvement fun.
Step-by-Step Guide on How to Remove Framed Windows with Screens
Ready to get hands-on? This section provides a detailed guide on how to remove framed windows with screens, broken down into clear steps. We’ll cover preparation, screen removal, sash handling, and complete frame extraction. Follow along, and take it slow—rushing leads to mistakes.
Preparing for Removal
Start by clearing the space. Move furniture away from the window inside your home. Outside, trim back bushes or remove obstacles. This gives you room to work without tripping.
Next, strip away window treatments. Take down curtains, blinds, or shades. Unscrew any rods or brackets carefully to avoid damaging the frame.
Now, clean the edges. Use a damp cloth to wipe away dirt, revealing hidden screws or clips. This step makes everything visible and easier to handle. Ask yourself: Is the area clutter-free? Good— you’re prepped!
Removing the Screen
Screens come off first when removing framed windows with screens. Locate the attachment points—clips, screws, or tabs around the edges.
For clip-style screens, press inward on the springs and lift the screen out gently. If it’s screwed in, use your screwdriver to loosen them one by one. Magnetic ones? Just pull steadily.
Once detached, set the screen aside on a soft surface. Roll it up if it’s flexible, or lean it against a wall. Store it flat to prevent bends. Easy. This keeps bugs out while you work on the rest.
Removing the Window Sashes
Sashes are the movable glass parts. Identify your type: Double-hung? Sliding? This guides the process.
For double-hung windows, unlock the sash and tilt it inward. Release any tilt pins or latches first. Slide it out carefully, supporting the weight.
Sliding windows? Lift the sash into the header track, then swing the bottom out. Casement types need you to remove crank handles with a screwdriver.
You may also read (who rents a house and how can you find out).
If hardware like locks or balances is in the way, unscrew them now. Place everything in a labeled bag for later. Feel that progress? You’re halfway there!
Removing the Entire Framed Window
For complete removal, focus on the frame. Scan for screws or nails holding it to the wall—often hidden under trim.
Use your screwdriver to remove visible fasteners. If nails are stubborn, tap them with a hammer or use pliers.
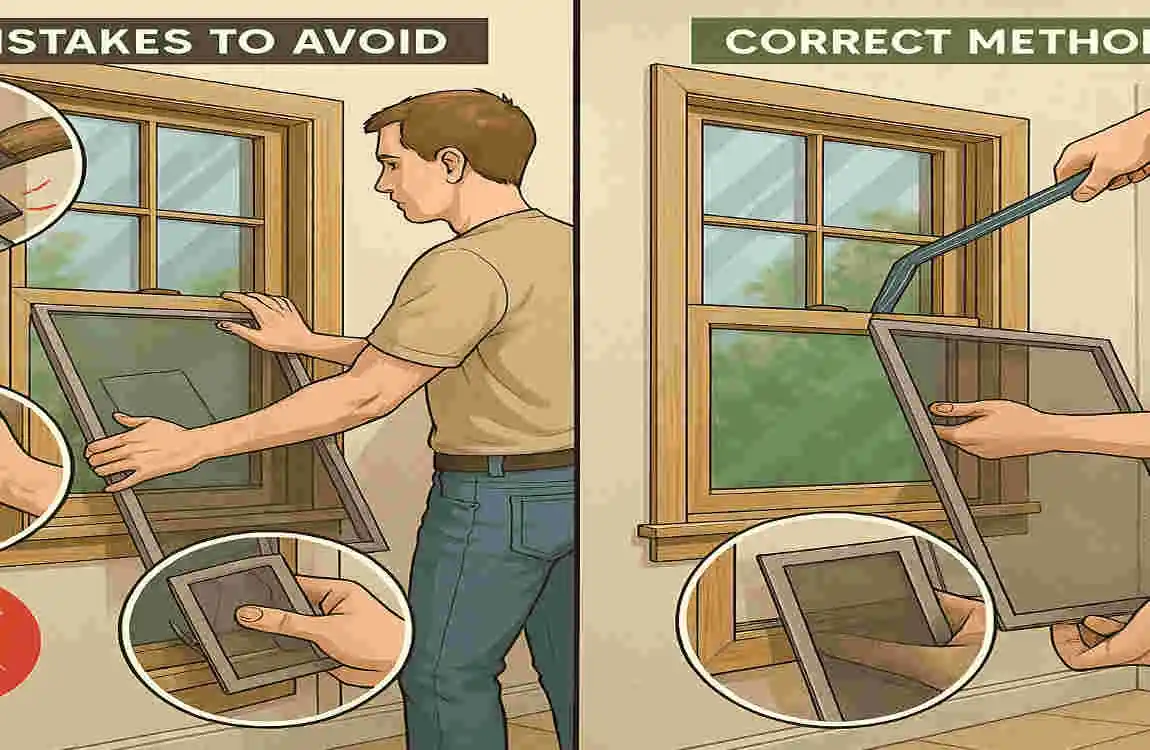
Now, the pry bar: Insert it gently between the frame and wall. Wiggle to loosen, but don’t force it. Work around all sides evenly.
Once loose, pull the frame out slowly. Have a partner steady it to avoid drops. Lift from the bottom and tilt outward.
Tips for Difficult Window Types or Older Frames
Older frames can be tricky—they might be painted shut or caulked tight. Don’t panic; here’s how to handle them.
For painted-over edges, score the paint with a utility knife. Then, apply a heat gun on low to soften it without scorching.
Caulk? Use a solvent or the knife to cut through. Rusted screws? Spray lubricant and let it sit before twisting.
Stubborn nails? Gentle tapping with a hammer loosens them. For custom or antique windows, go extra slow to preserve details.
Remember, patience is your friend here. If something feels off, stop and reassess. You’ve got this!
To make it even more straightforward, here’s a numbered list summarizing the core steps for quick reference:
- Prepare the area by clearing space and removing treatments.
- Detach and store the screen using clips or screws.
- Unlock and remove sashes by tilting or lifting.
- Unscrew and pry the frame loose from the wall.
- Handle difficult spots with heat, solvent, or lubricant.
By following these, how to remove framed windows with screens becomes a straightforward task, even for beginners.
What to Do After Removing the Window
Phew, the window’s out! Now what? First, clean the opening. Wipe away dust, old caulk, or debris with a shop vac or brush. This prevents issues when reinstalling or replacing the software.
Inspect everything closely. Check the frame for cracks, rot, or insect damage. Look at the wall too—any water stains? Address these now to avoid bigger problems later.
If you’re repairing, sand rough spots, and apply sealant. For replacement, measure the opening accurately for a perfect fit.
Finally, handle the old stuff responsibly. Store reusable parts in a dry spot. For disposal, recycle glass and metal at a local center—it’s eco-friendly and easy.
What do you think—ready to tackle that space?
Common Mistakes to Avoid When Removing Framed Windows with Screens
We’ve all been there: Excited to start a project, only to make a rookie error. When learning how to remove framed windows with screens, dodging these pitfalls keeps things smooth.
One big no-no is forcing the window out. You might crack the frame or dent your wall. Instead, loosen gently with tools—patience pays off.
Don’t skip safety gear. Forgetting gloves or glasses could lead to cuts from sharp edges or shards. Suit up every time; it’s a simple habit that protects you.
Another slip-up: Ignoring hardware removal first. Leaving locks or cranks attached complicates things. Take them off early to avoid snags.
For heavy windows, going solo is risky. They can slip and cause injury or damage. Call a friend—two sets of hands make light work.
Lastly, poor storage of parts. Tossing screens or glass haphazardly leads to breaks. Label and store them flat in a safe spot.
Avoid these, and your project stays on track. Which mistake have you made before? Share in the comments!
Additional Tips and Tricks for Easy Window Removal
Want to make removing framed windows with screens even easier? Try these pro tips.
Lubricate stuck parts with WD-40 or soap. A quick spray loosens rusty screws without much effort.
For jammed frames, tap gently with a rubber mallet. It vibrates things free without dents.
Label hardware as you remove it—use sticky notes or bags. This makes reassembly a snap.
Pick mild weather for the job. Rain or extreme heat can make handling slippery or uncomfortable.
If you’re stumped, consult a pro. It’s okay to seek help for complex setups.
These tricks turn a chore into a breeze. Please give them a go!
You may also read (why is my house so hot in summer solutions explained).