
Leaky household plumbing is one of those problems that starts small and quietly, then turns into a loud, expensive headache. The U.S. EPA often-cited estimate is that leaks in the average home can waste around 10,000 gallons of water per year—and that’s before you count the cost of damaged cabinets, stained ceilings, or warped flooring. That’s real money, real time, and real stress.
The good news: you don’t need to be a plumber to protect your household plumbing. You need a few smart habits, a simple routine, and the confidence to catch issues early.
Why Household Plumbing Maintenance Matters
In 2026, household plumbing maintenance matters more than ever for three simple reasons: costs are up, homes are more complex, and water is not getting cheaper.
First, water damage isn’t just “a little mess.” A slow leak behind a wall can quietly rot wood, soften drywall, and invite mold. By the time you notice a musty smell, the repair can involve demolition, drying equipment, and rebuilding. Many homeowners are shocked by how quickly the bill climbs.
Second, modern household plumbing has more “extras” than it used to—better fixtures, filtration systems, smart water shut-off devices, water-efficient toilets, and sometimes tankless heaters. These upgrades are significant, but they also require a clearer understanding of how your system behaves day to day. Small changes—like a pressure drop or an odd noise—can actually be early warning signs.
Third, people are paying closer attention to waste. A leak isn’t just a financial problem; it’s also an environmental one. If you care about conserving water, preventing plumbing leaks is one of the easiest “green” wins you can get at home.
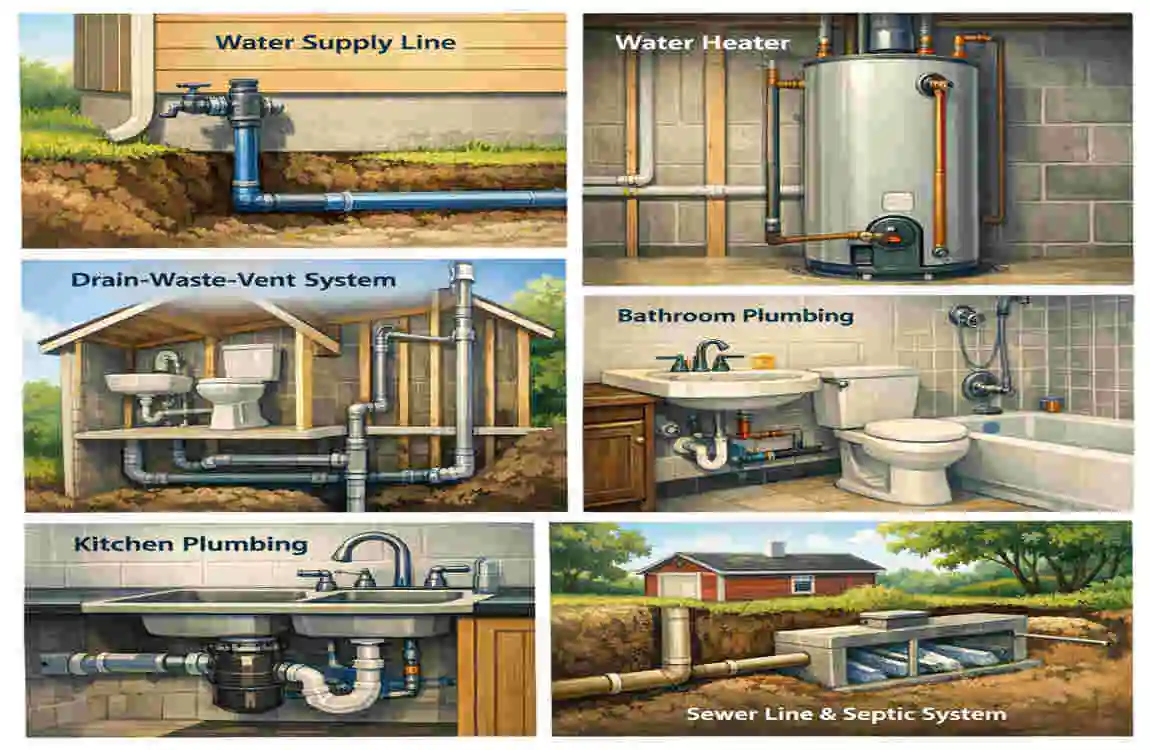
Know Your Home’s Household Plumbing Basics
A lot of household plumbing problems feel scary simply because you can’t see most of the system. Pipes run through walls. Drains disappear into floors. Water heaters sit in closets like mysterious metal boxes.
When you learn the basics, you stop guessing—and you start acting quickly when something looks off.
The simplest way to think about household plumbing
Your household plumbing has two main “paths”:
- Supply lines bring clean water in under pressure (to sinks, showers, toilets, appliances).
- Drain/waste lines take used water out using gravity (plus venting to keep drains flowing smoothly).
Most homeowner frustration comes from confusing these two. A supply issue often looks like low pressure or dripping. A drain issue usually manifests as slow drains, gurgling, or backups.
What to locate today so you’re not scrambling later
If you do nothing else after reading this article, do this one task: locate your main water shut-off valve.
You usually find it:
- Where the water line enters your home (near an exterior wall)
- Near the meter (standard in many setups)
- In a utility area, basement, or near a front-facing wall in some homes
Turn it off and on once to make sure it moves. Valves that haven’t been touched in years can stick when you need them most.
Five key household plumbing components and why they matter
Below is a quick beginner map of what you’re dealing with. Keep it simple. You’re just learning “what does what,” so you can maintain your household plumbing with confidence.
- Shut-off valves (central + fixture valves) — Let you stop water fast during repairs or leaks. Pro: saves your home in emergencies. Con: older valves can seize if never used.
- Supply pipes (often PEX, copper, or PVC/CPVC) — Deliver clean water to fixtures. Pro: modern PEX is flexible and freeze-tolerant. Con: joints and fittings can fail if installed poorly.
- Fixtures (faucets, toilets, showers) — Where you interact with water daily. Pro: easy to upgrade. Con: small worn parts cause a big waste.
- Drains + traps (P-traps under sinks) — Move wastewater out and block sewer gas. Pro: Traps protect indoor air. Con: Traps clog if hair/grease builds up.
- Water heater — Produces hot water and affects pressure/comfort. Pro: significant quality-of-life component. Con: neglected heaters can leak or fail suddenly.
A quick note about pipe types without the technical overload
- Copper: durable and standard, but it can corrode with specific water chemistry.
- PEX: flexible plastic tubing, popular in newer work, easier to route, often good in freezing risk areas.
- PVC/CPVC: often used for drains (PVC) and sometimes hot/cold supply (CPVC), depending on local rules.
You don’t need to memorize everything. Just know what you have, so you buy the right parts and make smarter decisions for your household plumbing.
Spot Early Signs of Household Plumbing Leaks
Leaks rarely announce themselves with drama. Most start as tiny failures—an aging washer, a loose fitting, a cracked seal—then they grow.
If your goal is to detect plumbing leaks early, watch for changes. Your home speaks in slight hints.
The most common leak signals you can’t ignore
A leak may show up as:
- A water bill that jumps without a lifestyle change
- Damp spots on walls, ceilings, or flooring
- Paint bubbling or peeling
- Musty odors that don’t go away
- A toilet that “refills” when nobody uses it
- A faucet that never entirely stops dripping
- Lower water pressure in one area
Do the simple meter test it’s easier than it sounds
If you have access to your water meter, you can do a quick leak check:
Turn off all water use in the luxury house (no laundry, no dishwasher, no showers).
Check the meter reading (or the small leak indicator dial if your meter has one).
Wait 15–30 minutes without using any water.
Check again.
A “food coloring” toilet test that works surprisingly well
Toilets can leak silently from the tank into the bowl. Here’s the quick test:
- Add a few drops of food coloring into the tank (not the bowl).
- Wait 10–15 minutes without flushing.
- If color appears in the bowl, the flapper is leaking.
This is one of the cheapest ways to prevent plumbing leaks from turning into a monthly bill increase.
Master Regular Drain Cleaning for Household Plumbing
Clogs are one of the most common household plumbing frustrations because they interrupt your day instantly. A slow shower drain turns into a standing puddle. A kitchen sink backs up right when you’re cleaning up after dinner.
The good news is you can avoid most clogs with gentle, regular care.
What actually causes most drain clogs
In real homes, it’s usually not mysterious. It’s simple stuff that builds up over time:
- Hair + soap residue in bathroom drains
- Grease + food particles in kitchen drains
- “Flushable” wipes that don’t break down well (they’re a significant cause of backups)
- Mineral buildup in hard-water areas (common in many regions, including parts of Lahore and other cities with mineral-heavy supply)
A natural unclog routine that’s friendly to your pipes
You don’t need harsh chemicals every time your sink slows down. Overusing strong drain cleaners can wear out older pipes and seals, especially in aging household plumbing.
Try this simple approach first:
Remove the drain cover and pull out hair or debris you can reach (gloves help).
Pour hot (not boiling) water down the drain to soften buildup.
Add baking soda, then vinegar, and let it fizz for 10–15 minutes.
Flush with more hot water.
If it’s still slow, use a plunger (yes, on sinks too) or a small drain snake.
This routine works well for early buildup. If the clog keeps coming back, you likely have deeper buildup in the line—or a venting issue—both of which can affect household plumbing performance across multiple fixtures.
The easiest prevention tool is also the cheapest.
Use mesh screens in shower and sink drains. This one small habit prevents a considerable percentage of clogs. It’s not glamorous, but it’s effective household plumbing maintenance.
Fix Dripping Faucets – A Top Household Plumbing Quick Win
A dripping faucet is a classic “I’ll do it later” problem. But drips are sneaky. They waste water, stain sinks, and can slowly damage the fixture itself.
Fixing a drip is also a confidence-builder. Once you repair one faucet, other household plumbing tasks feel less intimidating.
Why faucets drip in plain terms
Most faucet drips come from worn internal parts:
- A rubber washer that no longer seals well
- An O-ring that cracked or flattened
- A cartridge that wore out
- Mineral buildup that prevents a tight closure (familiar with hard water)
Different faucet styles exist (compression, cartridge, ceramic disc, ball). You don’t need to memorize them. You need to match the replacement part to your faucet model.
Tools you’ll actually use
Keep it simple:
- Adjustable wrench
- Screwdriver
- Replacement washer/O-ring or cartridge
- Towel (to protect finishes and catch small parts)
A step-by-step faucet drip repair you can follow
Safety first: Turn off the water at the shut-off valves under the sink. Then open the faucet to relieve pressure.
Plug the drain (small screws are prone to disappearing).
Remove the handle carefully. Look for a hidden screw under a cap.
Pull out the cartridge/stem assembly. Take a photo as you go so reassembly is easy.
Replace the worn washer/O-ring or the whole cartridge (often faster and more reliable).
Reassemble, turn the water back on slowly, and test.
If you fix one drip, you’ll often save a noticeable amount over a year—plus you’ll reduce stress on your household plumbing system.
External link (no embed): A straightforward visual tutorial can help if you’re a “show me” learner—choose a reputable channel and match your faucet type. For example:
Toilet Maintenance to Avoid Household Plumbing Nightmares
Toilets don’t get enough respect until they fail. A toilet issue can waste a lot of water, raise your bill, and in worst cases, cause overflow damage.
If you want to prevent plumbing leaks, toilets are among the best places to focus on, since they can leak silently for months.
The two most common toilet problems (and what they usually mean)
1Running toilet:
You hear water cycling on and off. Usually this means:
- The flapper isn’t sealing
- The chain is too tight or tangled
- The fill valve needs adjustment or replacement
Weak flush:
Often caused by:
- Low tank water level
- Mineral buildup under the rim jets (hard water)
- Partial clog in the trapway
The “easy wins” inside the tank
Inside the tank, you’re mainly dealing with simple parts that cost little and install quickly. If your toilet runs, replacing the flapper is often the first move. It’s a small rubber piece, but it has a big job: it seals the tank so water doesn’t leak into the bowl.
Also, check the overflow tube and the float setting. If the water level sits too high, the toilet will constantly send water into the overflow tube, and you’ll never stop the run cycle.
A 60-second monthly check that protects your household plumbing
Once a month, take the tank lid off and do a quick look:
- Do you see water trickling into the bowl?
- Does the flapper look warped or stiff?
- Is the chain snagging?
- Does the tank refill randomly?
These quick checks keep your household plumbing stable and help you catch problems before they become emergencies.
Insulate Pipes for Year-Round Household Plumbing Protection
Pipe insulation sounds like a “cold climate only” thing. But it helps in more situations than most people realize.
Yes, insulation helps prevent freezing and bursts during cold snaps. But it also reduces condensation on cold-water lines—which can drip onto wood, drywall, or stored items and look like a leak.
That’s why insulation is a simple, high-impact household plumbing upgrade.
Where pipe insulation makes the most significant difference
Focus on exposed pipes in:
- Basements
- Garages
- Attics
- Crawl spaces
- Utility closets near exterior walls
Even a short uninsulated section can become a weak point.
What to use simple options
Most homeowners choose:
- Foam pipe sleeves: easy to cut and fit
- Pipe wrap: useful for odd shapes and tight areas
- Heat tape (for freezing risk zones): follow manufacturer instructions carefully
Water Heater Care – The Heart of Household Plumbing
Your water heater sits quietly until it doesn’t. When it fails, it can leak, flood, or leave you without hot water at the worst time.
If you want steady comfort and fewer surprises, treat your heater like the heart of your household plumbing.
Set the right temperature for comfort and safety.
Many homes do well with 120°F (about 49°C). This setting often:
- Reduces scald risk
- Saves energy
- Slows mineral scaling
If you have specific household needs (such as small children, elderly family members, or medical needs), consider professional guidance. But as a general home baseline, 120°F is widely recommended.
Why sediment is your water heater’s quiet enemy
Over time, minerals settle at the bottom of the tank. In hard-water areas, this can happen faster. Sediment can:
- Reduce efficiency (your heater works harder)
- Create popping or rumbling noises
- Shorten heater life
- Contribute to uneven hot water
A yearly flush often helps, especially as part of overall household plumbing maintenance.
A simple annual water heater routine
You can follow this once a year (or ask a pro to do it if you prefer):
Check around the base for moisture or corrosion.
Look at the temperature/pressure relief valve area for signs of leakage.
Flush a portion of the tank to remove sediment (follow your unit’s manual).
Inspect exposed hot-water piping for corrosion or drips.
Re-check the temperature setting after any maintenance.
If you notice rusty water, frequent temperature swings, or moisture around the tank, treat it as a household plumbing warning sign. Early action beats emergency replacement.
Smart Habits for Everyday Household Plumbing Prevention
If you want the most straightforward route to fewer household plumbing problems, build habits that prevent damage in the first place. This is the part that saves you money without any tools.
Your kitchen habits matter more than you think.
Most kitchens create plumbing issues in slow motion.
Grease is the most prominent example. Hot grease looks harmless when you pour it down the drain because it’s liquid. But it cools, hardens, traps food bits, and slowly narrows your pipe like cholesterol in an artery. That’s why the “no grease down the drain” rule protects household plumbing better than most people realize.
Instead, pour grease into a container, let it cool, and throw it away.
Use your garbage disposal the right way (if you have one)
A disposal isn’t a magic machine. It’s a helper, and it needs the proper treatment:
- Run cold water while you use it. Cold water helps fats solidify so the disposal can chop them, and it helps move debris along.
- Feed small amounts instead of dumping a full plate at once.
- Avoid fibrous foods (like celery) that can wrap around blades.
Laundry and dishwasher habits reduce strain.
Spacing out loads helps your household plumbing by reducing continuous drain stress and allowing pipes to recover. It also enables you to notice problems sooner—like slow draining or odd sounds—before they become complete clogs.
A reader-friendly challenge (try this)
Pick one habit from this section and commit to it for two weeks. Then look for changes: fewer slow drains, fewer odors, less gurgling, and fewer “mystery” water bill spikes. Slight behavior changes often create big household plumbing wins.
When to Call a Pro for Household Plumbing Issues
DIY is great—until it isn’t. The most competent homeowners don’t do everything themselves. They choose the right battles and protect their home when the risk is high.
Here are moments when calling a professional is the best form of household plumbing maintenance.
Problems that usually need expert tools and experience
You should seriously consider a pro if you deal with:
- Suspected slab leaks (leaks under the foundation)
- Sewer line backups or repeated main drain clogs
- Persistent foul smells that return after cleaning the traps
- Water stains that grow quickly or appear on ceilings
- Central pressure drops across the whole home.
- Any leak you can’t locate after basic checks.
These issues can involve specialized cameras, pressure testing, or safe access to main lines. If you guess wrong, you can make the damage worse.
What does a typical service call cost?
Costs vary by region, timing, and complexity. Many homeowners see a range like $150–$500 for a basic callout and diagnosis, then additional costs for repairs and parts. Even if that feels steep, it can be cheaper than repairing water damage caused by delaying action on household plumbing leaks.
Make it easy to act CTA
If you run into any of the red flags above, don’t wait for the problem to “self-resolve.” It usually won’t.
CTA: Contact a licensed plumbing professional, describe the symptoms clearly, and ask what diagnostic approach they recommend.
Upgrade to Leak-Proof Household Plumbing Fixtures
Maintenance prevents many problems, but smart upgrades can reduce risk even further. Newer fixtures are often designed to use less water, resist wear, and detect leaks earlier.
If you’re planning a renovation or even a minor refresh, consider upgrades to strengthen your household plumbing system rather than just changing the look.
Upgrades that pay off in daily life
Here are a few high-value improvements:
- Low-flow toilets that still flush well (especially modern designs)
- Touchless or single-handle faucets that reduce wear and improve control
- Leak detectors under sinks, behind toilets, and near water heaters
- Smart shut-off valves that can stop water automatically when they detect unusual flow
Many homeowners see meaningful savings from efficiency upgrades—sometimes 20–50% in water savings, depending on what they replace and how wasteful the old fixtures were. Your results depend on your starting point, but the direction is almost always positive for household plumbing health.
Old vs. new: a quick comparison
Fixture Area: Older Setup (Common Issues), Newer Setup (Leak-Resistant Benefits), Best For
Toilet Worn flapper, higher gallons per flush, silent running leaks, better seals, efficient flush design, optional dual-flush, cutting bills, and stopping silent waste
Kitchen faucet drips from worn washers, stiff handles, and mineral buildup. Ceramic disc/cartridge designs, smoother control, better aerators. Frequent use in homes and hard water areas.
Under-sink area: No detection, small leaks go unnoticed. Leak sensor alarms and intelligent alerts. Catching leaks early.
Main water line, manual shut-off only, bright shut-off that detects unusual flow, vacation homes, busy families
Shower fixtures, older valves, inconsistent temperature, pressure-balancing valves, stronger seals, comfort + reduced leak risk
A simple upgrade strateg
Don’t try to upgrade everything at once. Choose the fixture that causes the most annoyance—or the one most likely to leak (often toilets and under-sink connections). One targeted upgrade can noticeably improve your household plumbing reliability.
Bonus: Quick Household Plumbing Emergency Kit Checklist

When a leak hits, you don’t want to run to the store while water spreads. A small kit helps you act fast and protect your home.
Here’s a basic household plumbing emergency kit you can keep in a bucket or plastic bin:
- Plunger (a sturdy one; ideally one for toilets)
- Adjustable wrench (medium size)
- Pipe tape (PTFE/Teflon tape) for threaded connections
- A bucket and a few old towels/rags
- Rubber gloves
- Basic screwdriver set
- Hose clamps (helpful for temporary holds)
- Small drain snake for hair clogs
- Flashlight (leaks love dark corners)
- Shut-off valve tags/labels (so anyone can turn water off fast)
FAQ
Q: What is this?
A: A brief description of your product/service.
Q: How do I get started?
A: Step 1, step 2, step 3 (keep it to 1–2 sentences).
Q: How much does it cost?
A: Pricing summary + where to find full details.
Q: Can I cancel anytime?
A: Yes/no + key conditions.
Q: How do I contact support?
A: Email/phone/chat + support hours.
Make it “short” (Rule of thumb)
- Keep each answer to 1–2 sentences.
- Limit to 5–7 questions.
- Use plain language and avoid jargon.
If you want, I can tailor it
Tell me the topic (product/service) and the audience, and I’ll generate a short, ready-to-paste FAQ.