
Home renovation can be expensive—sometimes shockingly so. Did you know that homeowners spend an average of $3,000 or more to install new flooring? If you’ve ever considered updating your home, you might wonder, “Can vinyl plank flooring be removed and reinstalled?” The good news is that, with the right approach, you can often reuse your existing vinyl planks, saving you both money and hassle. This guide will walk you through everything you need to know, from the types of vinyl flooring that lend themselves to DIY removal and reuse, to step-by-step instructions for getting the job done without damaging your floors. Read on to discover how you can transform your space—without breaking the bank.
What Is Vinyl Plank Flooring and Why Consider Removing and Reinstalling It?
Understanding Vinyl Plank Flooring
Vinyl plank flooring is a popular choice in many homes today. It mimics the look of real wood while offering added benefits, such as water resistance and durability. There are several types, but the most common are Luxury Vinyl Plank (LVP) and Standard Vinyl Plank. LVP is thicker and more robust, while standard versions are thinner and often more flexible.
Key Features of Vinyl Plank Flooring
- Water-Resistant: Perfect for kitchens, bathrooms, and basements.
- Affordable: Costs much less than hardwood or tile.
- Easy to Clean: Sweep and mop.
- Variety of Styles: Looks like wood, stone, or even ceramic.
Common Installation Methods
- Click-Lock (Floating) Flooring: Planks snap together like puzzle pieces, floating over the subfloor.
- Glue-Down Flooring: Each plank is glued directly to the subfloor, providing a solid feel.
- Peel-and-Stick Flooring: Each plank has an adhesive backing—peel and apply.
Why Remove and Reinstall Vinyl Plank Flooring?
There are several reasons you might want to remove and reinstall your vinyl flooring:
- Subfloor Issues: Need to repair or level the floor underneath.
- Style Updates: Want to change the pattern or direction.
- Moving: Take the floors with you to a new home.
Cost Savings
Installing new flooring typically costs between $2 and $7 per square foot. If you can reuse your vinyl planks, you’ll only pay for labor (if any) and a few materials—saving hundreds or even thousands of dollars.
Can Vinyl Plank Flooring Be Removed and Reinstalled? The Short Answer
Let’s get straight to the point: Yes, vinyl plank flooring can often be removed and reinstalled, especially if it’s a floating, click-lock system. The process is generally straightforward for floating floors, but more challenging for glued or peel-and-stick versions.
Here’s a quick comparison:
Installation Type Removable? Re installable? Success Rate
Click-Lock/Floating Yes Yes 80-90%
Glue-Down Difficult Rarely 20-30%
Peel-and-Stick Possible Sometimes 50-60%
Floating click-lock floors are your best bet for successful removal and reinstallation, with experts estimating an 80-90% success rate if you work carefully.
Types of Vinyl Plank Flooring: Which Ones Can Be Removed and Reinstalled?
Floating Click-Lock Vinyl Planks
Click-lock or floating vinyl planks are designed for easy installation and removal. These planks snap together without glue or nails and “float” over the subfloor. Brands like Lifeproof and Coretec are known for this method. If you’re hoping to remove vinyl plank flooring without damage and reuse it, click-lock is your best option.
Pros:
- Easiest to remove and reinstall
- Minimal risk of damaging planks if handled gently
- Can be reused in other rooms or homes
Cons:
- Tongue-and-groove edges can break if forced.
Glue-Down Vinyl Planks
Glued vinyl planks offer a sturdy, seamless look, but they’re much harder to remove. You’ll need special tools, such as a heat gun or a scraper, to soften and lift the adhesive. Even then, some planks may crack or warp during removal.
Pros:
- Very secure installation
- Good sound insulation
Cons:
- Removal can damage planks or the subfloor
- Rarely reusable
Peel-and-Stick Vinyl Planks
Peel-and-stick vinyl planks are somewhat in between. These use a pressure-sensitive adhesive, making them easier to remove than glue-down, but not as simple as click-lock. Carefully scoring the edges and peeling slowly are key to avoiding tears.
Pros:
- Simple installation
- Possible to remove and reuse if the adhesive remains tacky
Cons:
- Adhesive can degrade over time
- Edges may curl with age
Factors Affecting Reusability
- Age of Flooring: Older planks may be more brittle.
- Quality of Material: Thicker, higher-quality planks fare better.
- Condition of Underlayment: Damaged underlayment can make removal trickier.
Tools and Materials Needed for Removing Vinyl Plank Flooring
Before you begin your DIY project, make sure you have the right tools and materials on hand. Being prepared will help you remove vinyl plank flooring without damage and save as many planks as possible for reuse.
Essential Tools
- Pry Bar: For gently lifting planks, especially at edges.
- Heat Gun or Hair Dryer: Softens glue for easier removal.
- Utility Knife: For scoring seams or cutting tough spots.
- Rubber Mallet: Taps planks loose without cracking them.
- Measuring Tape: Keeps cuts precise.
Safety Gear
- Gloves: Protect your hands from splinters or sharp edges.
- Knee Pads: Save your knees during hours on the floor.
- Dust Mask: Helps keep dust away, especially on older floors.
Materials
- Painter’s Tape: Marks planks or protects walls.
- Flooring Adhesive (if needed): For reinstalling glue-down types.
- Storage Boxes or Bins: Keep removed planks organized.
Budgeting for Tools
You can assemble a beginner-friendly DIY kit for under $100. Many tools, such as a pry bar or a utility knife, can be found at any hardware store and used for future projects.
Step-by-Step Guide: How to Remove Vinyl Plank Flooring Without Damage
Let’s break down the removal process into clear, manageable steps. With patience and the right approach, you’ll see that vinyl plank flooring can be removed and reinstalled—often with little to no damage.
Prepare the Room
- Move all furniture and rugs out of the room.
- Remove baseboards or molding gently using a pry bar.
- Protect door frames and walls with painter’s tape.
Inspect and Score Seams
- Carefully examine where planks meet, especially at edges and doorways.
- For glue-down or peel-and-stick planks, score along seams with a utility knife to break the adhesive bond.
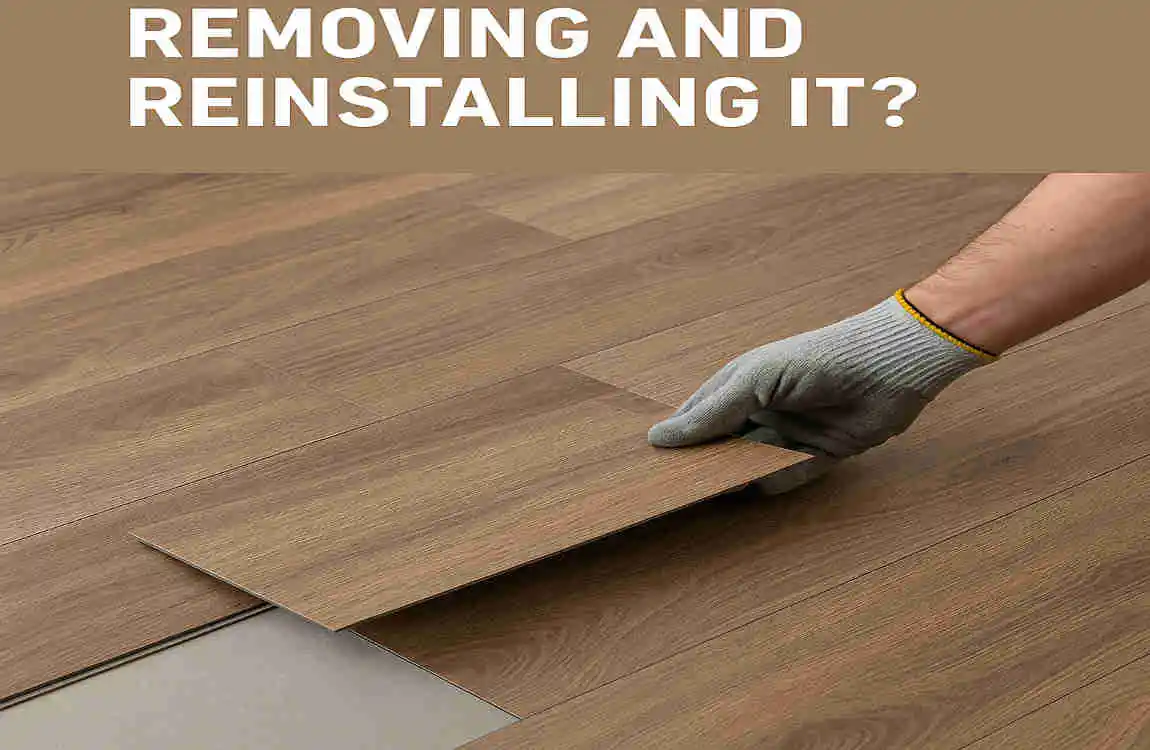
Start at the Edges
- Begin at the wall where the last plank was installed (usually the easiest to lift).
- Use a pry bar or your hands to lift click-lock planks gently.
- For floating floors, the planks should come up with little effort.
Use Heat for Stubborn Planks
- For glue-down installations, use a heat gun (200°F) or a hair dryer to soften the adhesive.
- Work slowly, heating a small section at a time and prying gently.
Clean the Subfloor
- Once all planks are up, remove any leftover adhesive with a scraper.
- Sweep and mop the subfloor to remove debris.
- Inspect for moisture or damage, and repair as needed.
Sort and Store Planks
- Label planks with painter’s tape if you plan to reinstall them in the same order.
- Stack planks neatly in boxes or bins to prevent warping.
- Store in a dry, climate-controlled area.
Troubleshooting Common Issues
- Snapped Tongue or Groove: If a click-lock edge breaks, you can trim the damaged area with a utility knife and use that plank for cuts or edges during reinstallation.
- Adhesive Residue: For stubborn glue, apply more heat and scrape gently.
Time Estimate
- For an average-sized room (400 sq ft), expect to spend 1-2 days on careful removal.
Pro Tip Table: Quick Fixes
Issue Solution
Stuck planks . Apply heat gun at 200°F
Damaged edges . Trim with a utility knife
How to Reinstall Vinyl Plank Flooring: Make It Look Brand New
Reinstalling your vinyl planks is where your hard work pays off. With the proper prep, you can make old planks look like new—and enjoy serious savings.
Acclimate the Planks
- Place the removed planks in the new room at least 48 hours before installation.
- This step allows the material to adjust to the room’s temperature and humidity.
Prep the Subfloor
- Make sure the subfloor is clean, dry, and level.
- Patch any holes or cracks.
- For floating floors, lay down new underlayment as needed.
Installation Sequence
- Start at one corner of the room.
- Lay the first row of planks with the groove side facing the wall, using spacers to leave a 1/4-inch expansion gap.
- For click-lock systems, angle and snap planks together.
- For glue-down, apply a thin, even layer of adhesive, then press the planks into place.
- For peel-and-stick, peel the backing and press firmly.
Cut and Fit Around Obstacles
- Use a utility knife or jigsaw to cut planks to fit around doorways, vents, or corners.
- Always measure twice before cutting!
Seal Edges for Longevity
- Reinstall baseboards or trim.
- For high-moisture areas, run a bead of silicone caulk along the edges.
Tools Recap
- Rubber mallet, spacers, utility knife, straight edge, tape measure.
Mistakes to Avoid
- Rushing the subfloor prep.
- Skipping acclimation—this can cause planks to warp or buckle.
- Not leaving expansion gaps—this leads to buckling over time.
Pro Tips
- Arrange planks in the same pattern they were initially installed for the best fit.
- Replace any damaged planks in less-visible areas (such as under furniture).
Pros and Cons of Removing and Reinstalling Vinyl Plank Flooring

Let’s weigh the benefits and drawbacks of tackling this DIY project.
Pros:
- Huge Savings: Reusing planks can cut your flooring budget in half or more.
- Eco-Friendly: Keeps old planks out of landfills.
- Quick Project: Floating floors can be removed and reinstalled in a weekend.
Cons:
- Risk of Damage: Some planks may break or lose their locking edges.
- Time-Intensive: Careful removal takes patience.
- Not for Every Floor: Glued or timeworn planks may not come up cleanly.
Cost Comparison: DIY Removal and Reinstall vs. Full Replacement
Here’s why more homeowners are asking, “Can vinyl plank flooring be removed and reinstalled?” The cost savings are clear:
Option Cost per 400 sq ft Time Skill Level
DIY Reuse $200–$500 2–3 days Beginner
New Install $1,200–$3,000 1 day Pro
Pro Removal $800–$1,500 1 day N/A
Choosing to reuse your planks can save you up to 70% compared to buying and installing new flooring.
Common Mistakes to Avoid When Removing and Reinstalling Vinyl Plank Flooring
- Skipping Subfloor Prep: Always clean and level the subfloor before reinstalling.
- Forcing Damaged Planks: If a plank doesn’t come up easily, apply more heat or try a different angle.
- Ignoring Moisture Issues: Check for and fix any water damage before reinstalling.
- Poor Storage: Store planks flat and in a climate-controlled area to prevent warping.
Avoiding these pitfalls will help ensure your floors look great the second time around!
Real-Life Success Stories: Homeowners Who Reused Their Vinyl Plank Flooring
The Budget-Savvy Renovator
Emily, a homeowner in Ohio, wanted to remodel her home office. Instead of buying new floors, she carefully removed her existing click-lock planks, repaired the subfloor, and reinstalled them in a new pattern. “I saved over $1,000 and learned a new DIY skill!” she says.
Moving Made Easy
When Tom and his family moved to a new house, they loved their current flooring so much that they decided to bring it with them. With patience and help from friends, they lifted the entire living room floor and reinstalled it in their new basement.
The Water Damage Rescue
After a leak in her laundry room, Sarah feared she’d have to replace all her vinyl planks. Instead, she removed only the affected area, dried everything out, and put the same planks back down. No one could tell the difference!