")
Wiring a house can seem daunting, especially for beginners. However, with the right tools, knowledge, and safety precautions, you can tackle small wiring tasks yourself.
Electrical wiring mistakes are a leading cause of house fires. According to the National Fire Protection Association (NFPA), faulty wiring is responsible for nearly 51,000 fires annually, resulting in property damage, injuries, and even fatalities. That’s why it’s critical to follow proper procedures when taking on any DIY electrical project.
Essential Tools and Materials for House Wiring
Before diving into the wiring process, gather the necessary tools and materials. Having high-quality and reliable tools will make your job safer and more efficient.
Tools You’ll Need:
- Voltage Tester: To confirm the absence of electrical current before working.
- Wire Strippers: For safely removing insulation from wires.
- Multimeter: To measure voltage, resistance, and continuity.
- Insulated Pliers: For gripping and bending wires safely.
- Fish Tape: To guide wires through walls and conduits.
Materials:
- NM-B Cable: Standard wiring for homes.
- Electrical Boxes: To secure outlets, switches, and light fixtures.
- Wire Nuts: To connect wires securely.
- Outlets and Switches: Based on your room’s requirements.
- GFCI Outlets: For areas near water, such as kitchens and bathrooms.
Here’s a handy table to summarize the tools and materials you’ll need:
Tool/Material Purpose Beginner Tip
Voltage Tester: Check if the power is off. Test multiple times before touching.
Wire Stripper: Remove insulation from wires. Avoid nicking the cables.
NM-B Cable Standard house wiring: Match the wire gauge to the circuit load.
Electrical Boxes: Secure outlets and switches. Use metal boxes for greater durability.
Fish Tape: Guide wires through walls. Practice threading before starting.
Understanding Electrical Basics
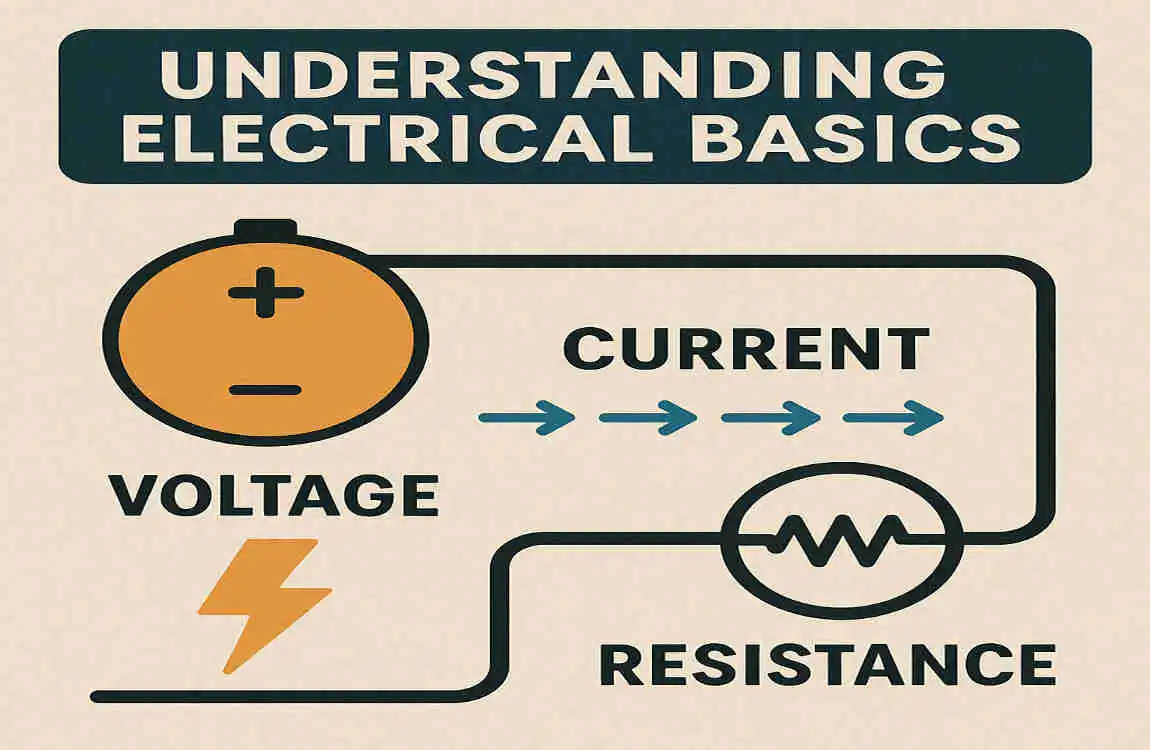
To wire a house safely, you’ll need a basic understanding of how electrical systems work. Let’s break it down into manageable sections.
The Basics of Electricity
- Voltage (V): The force that pushes electricity through a circuit. Most homes use 120V or 240V circuits.
- Amperage (Amps): The amount of electricity flowing through the circuit. Each circuit has a maximum amp capacity.
- Grounding: A safety measure that prevents electric shocks by directing stray currents to the ground.
Wire Colors and Their Purpose
Understanding wire colors is essential for safe wiring:
- Black or Red: Hot wires carrying live current.
- White: Neutral cables, completing the circuit.
- Green or Bare Copper: Ground wires, ensuring safety.
Types of Wiring for Homes
- Romex (NM-B Cable): Used for indoor wiring.
- UF Cable: Designed for outdoor use due to its waterproof coating.
Here’s a simplified diagram of how electricity flows in a circuit:
- Power enters through the hot wire.
- It passes through the device (e.g., light or appliance).
- The neutral wire completes the circuit.
- The ground wire provides a safety path for stray currents.
Safety First: Precautions Before Starting
Electrical work can be dangerous if proper precautions aren’t taken. Follow these safety tips to protect yourself and your home.
Turn Off the Power
- Locate your home’s circuit breaker panel.
- Switch off the breaker for the area you’re working on.
- Use a voltage tester to confirm the power is off.
Personal Safety Measures
- Wear insulated gloves to avoid electric shocks.
- Ensure your hands are parched before handling wires.
- Never touch metal pipes or exposed wires while working.
Check Local Codes and Permits
Before starting, verify that your project complies with the National Electrical Code (NEC). Some areas may also require permits for certain types of wiring work.
Common Hazards and How to Prevent Them
- Overloading Circuits: Avoid connecting too many devices to a single circuit.
- Shocks: Always double-check that the power is off.
- Fire Risks: Use the correct wire gauge and avoid loose connections.
How to Do Wiring in a House: Room-by-Room Guide
Wiring an entire house can be overwhelming, so it’s helpful to break it down room by room. Here’s a guide to help you create a safe and efficient wiring layout.
Planning Your Wiring Layout
- Map the Circuits: Decide which outlets, switches, and lights will be on the same circuit.
- Calculate the Load: Ensure that the total wattage on each circuit doesn’t exceed its capacity.
- Mark Box Locations: plan where outlets and switches will be installed, typically 12-18 inches from the floor.
Wiring a Bedroom or Living Room
- Use 14-gauge NM-B cable for general outlets and lighting.
- Install outlet boxes along walls, ensuring no spot is farther than 6 feet from an outlet.
- Run cables through the walls using fish tape, securing them with staples every 4.5 feet.
Kitchen and Bathroom Wiring (GFCI Focus)
- Install GFCI outlets near water sources, such as sinks.
- Use 12-gauge wire for higher-amperage appliances like microwaves and refrigerators.
- Ensure outlets are positioned at least 20 inches above countertops for safety.
Outdoor and Garage Wiring
- Use weatherproof electrical boxes and UF cables for outdoor wiring.
- Install dedicated circuits for high-power tools in the garage.
Step-by-Step: Installing Outlets and Switches
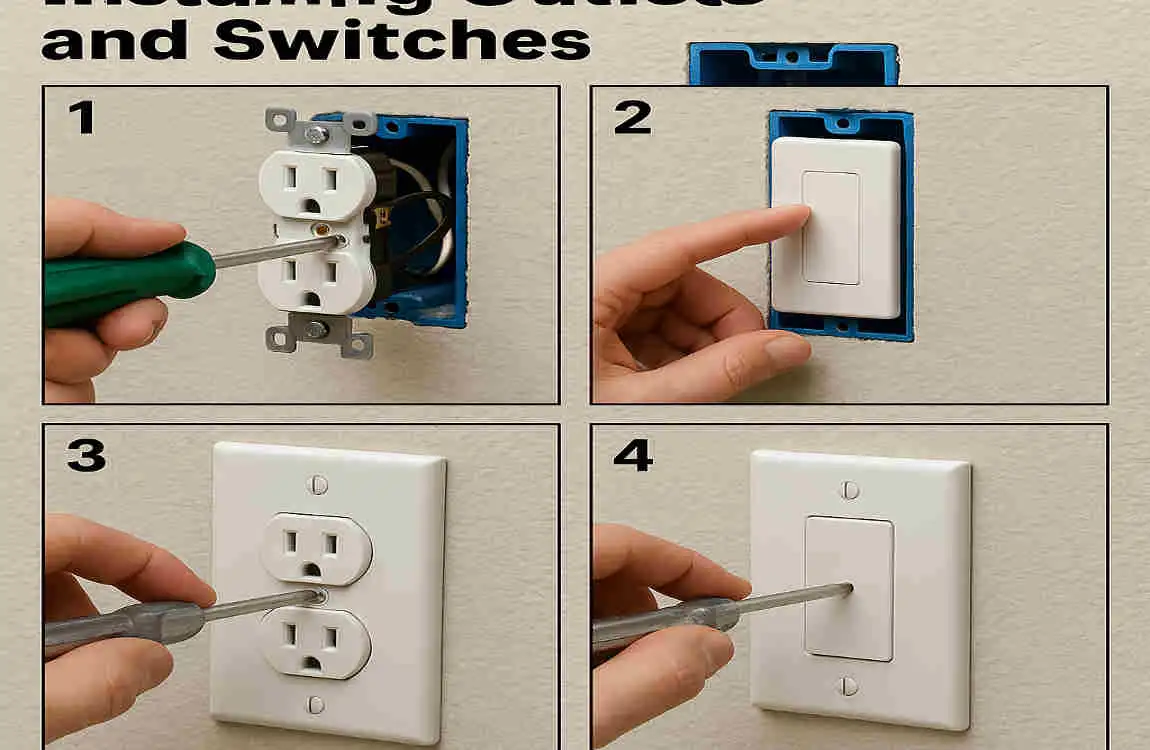
Here’s a simple guide to installing outlets and switches:
- Turn Off Power: Confirm that the breaker is off using a voltage tester.
- Prepare the Wires: Strip about 3 inches of insulation from the wires.
- Connect the Wires: Attach the hot wire to the brass screw, the neutral wire to the silver screw, and the ground wire to the green screw.
- Test and Secure: Use a multimeter to check continuity before mounting the outlet or switch.
- Restore Power: Turn the breaker back on and test the outlet or switch.
Common Mistakes and How to Avoid Them
Even experienced DIYers can make mistakes when wiring a house. Here are some common errors and tips to avoid them:
- Overloading Circuits: Use a load calculator to ensure each circuit can handle the devices connected to it.
- Using the Wrong Wire Gauge: Match the wire gauge to the circuit’s amperage; for example, use 12-gauge wire for 20-amp circuits.
- Loose Connections: Always tighten screws and secure wire nuts to prevent arcing.
- Ignore Insulation Damage: Replace damaged wires rather than taping them.
Testing and Final Inspection
Once your wiring is complete, it’s crucial to test and inspect your work:
- Test with a Multimeter: Check voltage and continuity to ensure everything is working correctly.
- Professional Inspection: Have a licensed electrician inspect your work to confirm code compliance.
- Ongoing Maintenance: Perform annual checks and promptly repair any issues.