
Imagine pulling into your driveway after a long road trip, your RV loaded with memories, but now you face the hassle of dealing with its waste system. What if you could skip the dump station lines and connect everything right to your home’s plumbing? That’s where learning how to connect the RV to the house sewer comes in handy. It’s a game-changer for many RV owners, offering convenience and saving you time and money.
You might be wondering why anyone would bother with this setup. Well, think about those times when you’re storing your RV at home during the off-season. Or you’re doing some maintenance work in your driveway. Even during extended power outages, having your RV hooked up can turn it into a cosy backup living space. I’ve heard from many people who use this method to keep things running smoothly without frequent trips to public facilities.
Connecting your RV’s sewer to your house drain isn’t just about ease—it’s about making your RV lifestyle more sustainable and stress-free. But let’s be real: if done wrong, it can lead to messy backups or even health risks. That’s why we’re diving deep into this topic today.
Understanding RV Sewer and House Drain Systems
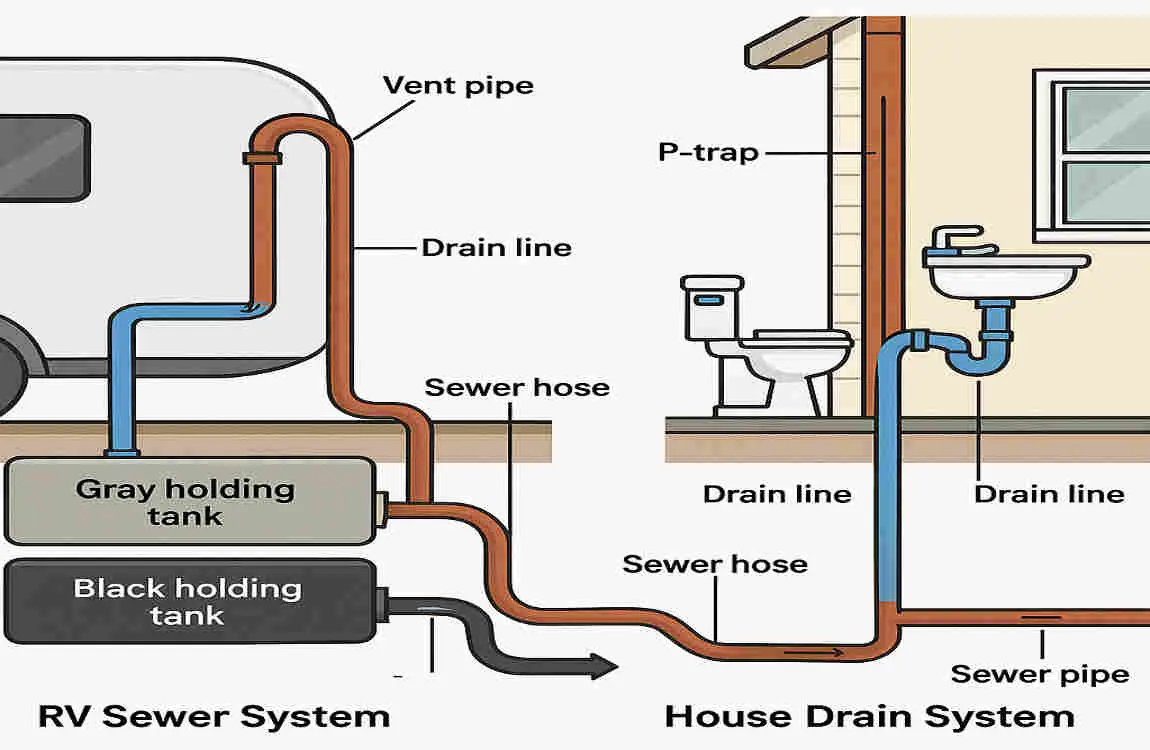
Before you even think about hooking things up, you need a solid grasp of what you’re working with. Your RV’s sewer system is like its own mini plumbing setup, designed for life on the road. It handles waste from toilets, sinks, and showers, splitting it into two main types: black water and grey water.
Black water is the stuff from your toilet—think human waste and toilet paper. It’s stored in a sealed tank to prevent odours and contamination. Grey water, on the other hand, comes from sinks and showers—it’s soapy but not as hazardous. Both flow out through an RV sewer hose when you’re ready to dump.
Now, shift your attention to your house drain system. Most homes connect to a municipal sewer or a septic tank via underground pipes. These systems are designed for steady, everyday use, featuring cleanouts or outlets that provide easy access for maintenance and repair. The key here is compatibility: your RV’s output needs to match up with your home’s input without causing issues.
Why does this matter? If you don’t ensure a proper house drain connection, you could end up with backups that flood your yard or even your home. Smells might waft up, or worse, contamination could spread bacteria. I’ve seen RV owners ignore this and regret it—think clogged pipes or health hazards.
Let’s break it down further. Your RV sewer system typically uses a 3-inch outlet valve, while house drains might vary from 2 to 4 inches. Adapters bridge that gap. Safety is huge too—always prioritise preventing leaks to avoid environmental damage or fines.
You might be asking, “Is my setup even compatible?” Check your RV manual and home plumbing specs. If you’re on a septic system, be extra cautious, as RV chemicals can harm the bacteria that keep it working. Understanding these basics sets you up for success in connecting the RV to the house sewer.
One common pitfall? Assuming all systems are the same. They’re not—urban homes plumbing might tie into city sewers, while rural ones use septic. Factor that in to avoid surprises.
Key Components of an RV Sewer System
Start with the tanks: black for toilet waste, grey for everything else. Valves control the flow, and the sewer hose is your lifeline for dumping.
How House Drains Work
House drains collect wastewater and send it away via gravity or pumps. Cleanouts are access points—often capped pipes in your yard or basement.
Potential Risks and Why Compatibility Matters
Mismatched sizes lead to leaks. Improper setups invite sewer gas or backups. Always test for safety.
Tools and Materials Needed for Connection
Gathering the right tools and materials is like prepping for a road trip—you don’t want to be caught short halfway through. For how to connect an RV to a house sewer, you’ll need items that ensure a secure, leak-free link. Let’s list them out and explain why each matters.
First, the star of the show: a quality RV sewer hose. Go for one that’s at least 10-20 feet long, flexible, and reinforced to handle pressure without kinking. Pair it with RV sewer adapters—these twist onto your house drain to match sizes.
Don’t forget connectors and clamps. Bayonet-style fittings lock everything in place, while hose clamps tighten seals. Teflon tape wraps threads to prevent drips.
Safety gear is non-negotiable. Grab heavy-duty gloves to handle waste, eye protection for splashes, and maybe a mask to block odours. For sealing, use rubber gaskets or silicone caulk.
Where do you get this stuff? Your local RV supply store, like Camping World, or online spots like Amazon, have RV sewer hose connection kits. Look for reviews to ensure durability—cheap hoses crack easily.
You might also want flexible pipes if your setup needs bends. And a bucket? Handy for catching any spills during testing.
Here’s a quick bulleted list of essentials to make your shopping easier:
- RV sewer hose (10-20 feet, collapsible for storage)
- Adapters and connectors (3-inch to match RV outlet)
- Clamps and Teflon tape for secure seals
- Gloves, mask, and eye protection for safety
- Cleaning supplies like bleach wipes for sanitation
Investing in good materials pays off. Cheap alternatives might save a buck now, but could lead to costly repairs later. What tools do you already have in your garage? Double-check before heading out.
Choosing Quality Supplies
Opt for UV-resistant hoses to avoid sun damage. Brands like Camco or RhinoFLEX are reliable.
Budget Tips
You can find kits under $50, but splurge on adapters for peace of mind.
Step-by-Step Guide to Connect RV Sewer to House Drain
Alright, this is the meat of it— the hands-on part where we walk through how to connect the RV to the house sewer. We’ll take it slow, step by step, so you can follow along without feeling overwhelmed. Remember, preparation is key to avoiding messes. Let’s dive in.
First, prepare like a pro. Check local regulations—some areas ban direct RV drain hookups without permits. Inspect your RV’s outlet for cracks and your house’s cleanout for blockages. Gather everything in one spot: tools, hose, adapters. Clear the area around your RV and drain to give yourself room to work.
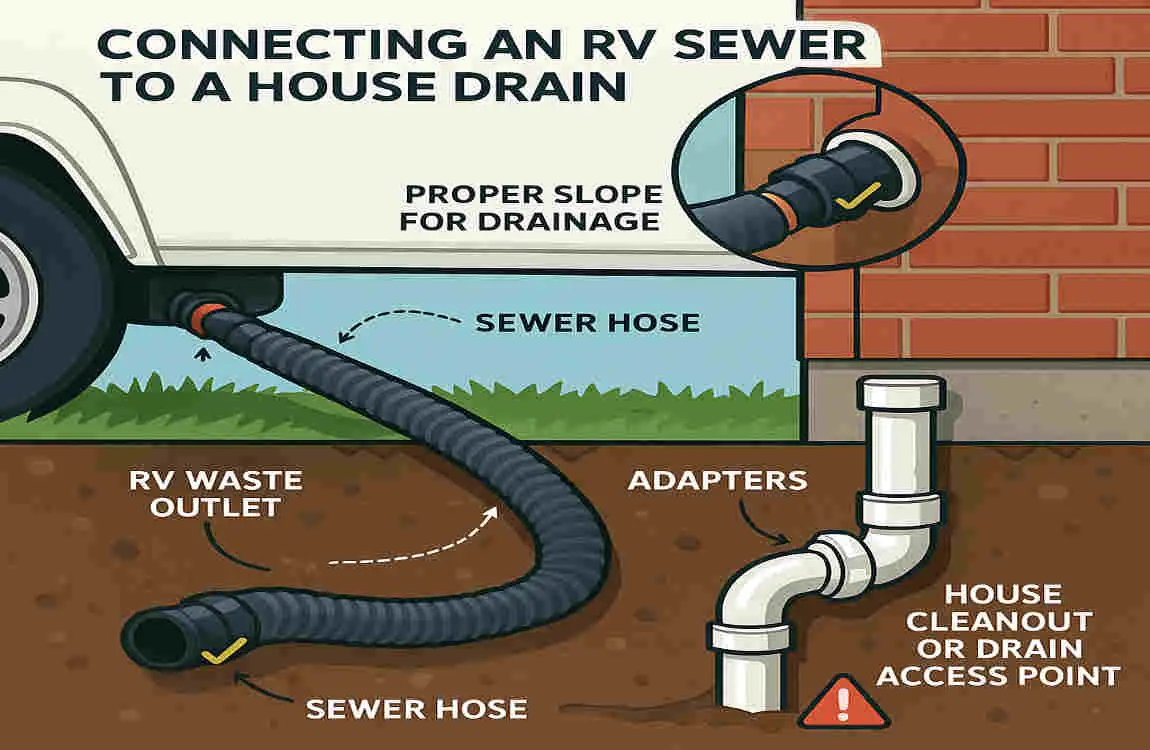
Locate the Appropriate House Drain Cleanout or Sewer Outlet
Start by finding your home’s sewer access point. It’s usually a capped pipe in the yard, basement, or near the foundation. Unscrew the cap carefully—use a wrench if it’s stuck. Why this spot? It’s the safest entry to your main drain line, avoiding indoor plumbing overload.
If you can’t find it, check your home’s blueprints or call a plumber. Pro tip: Mark it for future use.
Select and Fit the Correct Adapter or Connector to the House Sewer
Choose an adapter that matches your drain’s size—most are 3-4 inches. Twist or push it into the cleanout, securing with clamps. Apply Teflon tape to threads for a watertight fit. This step prevents leaks right from the start.
Test the fit by gently tugging. It should hold firm. If it’s loose, swap for a better size.
Attach RV Sewer Hose Securely to RV Outlet
On your RV, open the sewer valve compartment. Connect one end of the RV sewer hose to the outlet—usually a bayonet twist. Double-check it’s locked; a loose connection spells disaster.
Wear gloves here—waste can splash. If your hose has an apparent elbow, use it to monitor flow.
Connect the Other End of the Sewer Hose to the House Drain Adapter
Run the hose from the RV to the house, keeping it straight to avoid kinks. Attach the free end to the adapter you fitted earlier. Use clamps for extra security.
Slope the hose downward slightly for gravity flow. No sags— that’s how backups happen.
Use Clamps and Sealing Methods to Avoid Leaks
Tighten all clamps with a screwdriver. Add rubber seals or caulk around joints. This seals out odours and prevents spills.
Walk the length of the hose, checking for weak spots. Better safe than sorry.
Gradual Flushing and Testing Connection for Leaks or Backups
Slowly open your RV’s grey water valve first—it’s less messy. Watch for leaks. Then, flush black water gradually. Run water through your RV sinks to test.
If you spot drips, tighten or reseal. No issues? Great—you’ve nailed the RV waste connection.
Now, troubleshooting: If there’s a backup, close valves immediately and check for clogs. Smells? Reseal joints. Low flow? Ensure the hose isn’t kinked.
Here’s a numbered list for quick reference on the core steps:
- Locate and prep the house cleanout.
- Fit the adapter securely.
- Attach the hose to the RV outlet.
- Connect the hose to the adapter.
- Clamp and seal everything.
- Test with gradual flushing.
Pat yourself on the back—you’ve just mastered how to connect the RV to the house sewer. But if something feels off, stop and consult a pro.
Preparation Tips
Organise your workspace to avoid trips. Have a helper if possible.
Common Mistakes to Avoid
Don’t force fittings— that breaks things. Always test small before a complete dump.
Safety and Sanitation Tips
Safety first, right? When dealing with RV sewer safety, you’re handling waste that can carry bacteria, so protect yourself and your surroundings. Let’s talk about how to keep things clean and hazard-free.
Wear personal protective equipment every time. Gloves shield your skin from contaminants, while a mask blocks nasty gases. Eye goggles prevent splashes—trust me, you don’t want that in your face.
Handle RV waste sanitation properly. Never dump directly on the ground; that’s illegal and gross. Use your connection to direct everything into the house drain safely.
Avoid cross-contamination by washing your hands thoroughly after. Keep pets and kids away from the area during setup.
After the hookup, clean the hose with a bleach solution. Rinse everything to prevent buildup. This keeps odours down and systems running smoothly.
To prevent sewer line damage, avoid harsh chemicals in your RV tanks—they can corrode pipes. Opt for enzyme-based treatments instead.
You might wonder, “What if I smell sewer gas?” That’s a sign of poor sealing—fix it fast to avoid health risks like headaches or worse.
Stay vigilant, and you’ll enjoy a worry-free connection.
Personal Protective Gear Essentials
Gloves, masks, and more—don’t skimp.
Long-Term Sanitation Habits
Regular cleanings prevent significant issues.
Legal and Regulatory Considerations
Before you start, let’s chat about the rules. RV sewer regulations vary by location, so ignoring them could land you in hot water—literally.
Local zoning codes might restrict legal RV waste hookup in residential areas. Health departments worry about contamination, especially with septic systems.
Check for RV sewer permits. Some cities require one for long-term connections. It’s easy—call your municipal office or check online.
Environmental laws protect waterways from improper disposal. Dumping waste illegally harms ecosystems, so follow guidelines.
My advice? Consult a professional or the authorities first. It’s better to ask than assume.
Where to Find Regulations
Online city websites or apps like RV LIFE.
Alternative Methods and Solutions
Not every situation allows a direct house drain connection. That’s okay—there are solid backups.
Consider portable waste tanks. Wheel them to an RV dump station for easy emptying. Or use pump-out stations at campgrounds.
Pros of direct hookup: Convenience at home. Cons: Potential regulations. Alternatives shine when you’re on the road or in restricted areas.
Alternative RV sewer connections, such as macerator pumps, grind waste for more straightforward disposal. Weigh your options based on your needs.
Pros and Cons Table
For clarity, here’s a quick table comparing methods:
MethodProsCons
Direct House Connection: Convenient, cost-effective. Requires permits, risk of backups.
Portable Tanks Mobile, no home mods needed. Heavy to transport
Dump Stations Widely available Time-consuming trips
Maintenance and Troubleshooting Post-Connection
Once connected, don’t kick back—maintenance keeps things flowing. Watch for signs of trouble in your RV sewer maintenance.
Look for leaks: Wet spots under the hose mean seals failed. Clogs show as slow drainage or backups. Damaged hoses crack or bulge.
Inspect weekly: Check clamps, hoses, and adapters. Clean with soapy water monthly.
To disconnect safely, close valves, remove clamps, and rinse everything. Store hoses coiled and dry.
If issues persist, call a plumber—don’t DIY major clogs.