
To fix a dropped kitchen sink quickly, it’s essential to secure it properly to prevent water damage and restore functionality. This simple step-by-step guide will help homeowners safely lift and reinforce their sink, ensuring it stays firmly in place with minimal tools and time home kitchen.
Understanding a Dropped Kitchen Sink
A dropped kitchen sink happens when the sink loosens and sinks below the countertop level, where it’s supposed to sit. This usually happens because the things holding it in place — like mounting clips or caulk — wear out or fail. The sink might sag, wobble, or even leak water underneath.
Common Causes of a Dropped Kitchen Sink
There are several reasons why your kitchen sink might drop:
Loose mounting clips: These clips hold the sink firmly to the countertop. Over time, they can loosen or break.
Worn-out sink caulk or sealant: Caulk keeps water from seeping underneath the sink. Old or cracked caulk can cause gaps and loosen the sink.
Heavy items placed in the sink: If you regularly put heavy pots or items in the sink, the weight can pull it down.
Aging or damaged cabinetry: Cabinets that hold the sink may weaken or become damaged, leading to poor support.
Signs Your Kitchen Sink Has Dropped
How can you tell if your sink has dropped? Watch out for these signs:
Gaps between the sink and countertop: You might see visible spaces that weren’t there before.
Movement or wobbling: The sink might shift or feel loose when you press on it.
Water leakage: Puddles or dampness under the sink or around the countertop edges.
Why Timely Repair Is Essential
Fixing a dropped home kitchen sink quickly is essential because delaying repairs can lead to water damage to your cabinets, countertop, and even the floor. Water leaks can encourage mold growth and decay, leading to costly repairs. Additionally, a loose sink is not only inconvenient but can also worsen over time.
Tools and Materials Needed to Fix a Dropped Kitchen Sink
Before you start, gather these tools and materials to make the repair smooth and safe:
Tool/Material Purpose
Screwdriver (Phillips and flathead) to tighten or remove mounting clips
Adjustable wrench for loosening or tightening plumbing parts
Putty knife to remove old caulk or sealant
Caulk gun and waterproof caulk or silicone sealant to reseal the sink edges
Replacement sink clips or brackets to secure the sink to the countertop
Wood shims or supports to provide extra support under the sink, if needed
Cleaning cloth and mild cleaner to clean surfaces before sealing
Safety gloves and goggles to protect your hands and eyes during work
Safety first! Always wear gloves and goggles to protect yourself from sharp edges, chemicals, or unexpected splashes.
Step-by-Step Guide: How to Fix a Dropped Kitchen Sink Quickly
Prepare Your Workspace
Start by clearing everything out of and around your sink. Remove dishes, cleaning supplies, and any clutter that might get in the way.
Next, turn off the water supply valves beneath the sink. This prevents accidental leaks or flooding while you work.
Finally, protect your cabinets and floors with towels or plastic sheets. This step helps avoid water damage or scratches during the repair.
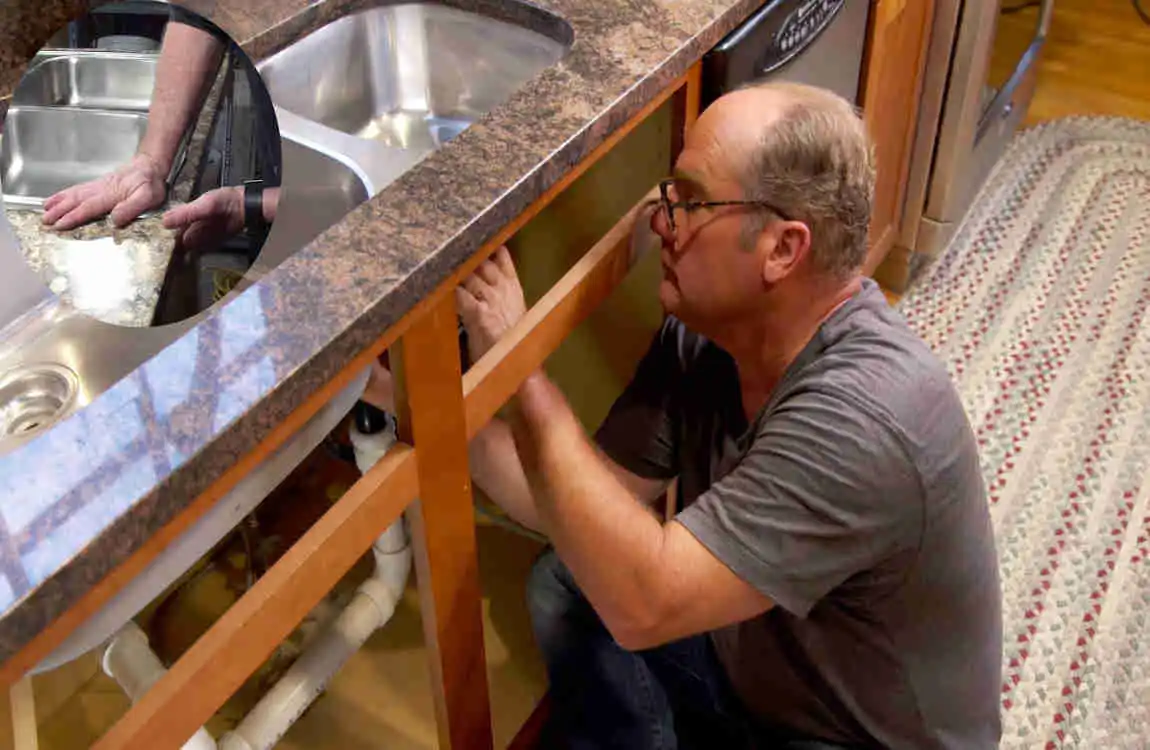
Inspect the Sink and Mounting Clips
Empty the sink thoroughly. Then, look underneath the countertop to check the mounting clips holding the sink in place.
You’re looking for:
Broken or missing clips
Loose screws or bolts
Signs of rust or damage
If clips are loose, you should tighten them. If they’re broken or missing, replacement clips are necessary.
You may also read (what is a spice kitchen a home guide to flavorful cooking spaces).
Tighten or Replace Mounting Clips
Use your screwdriver to tighten any loose mounting clips carefully. Turn screws slowly and feel for resistance; don’t overtighten, or you risk cracking the sink or damaging the countertop.
If clips are damaged:
Remove the old clips by unscrewing them.
Position the new clips where the old ones were.
Screw the new clips in firmly, but gently.
Make sure the clips hold the sink snugly against the countertop without forcing anything.
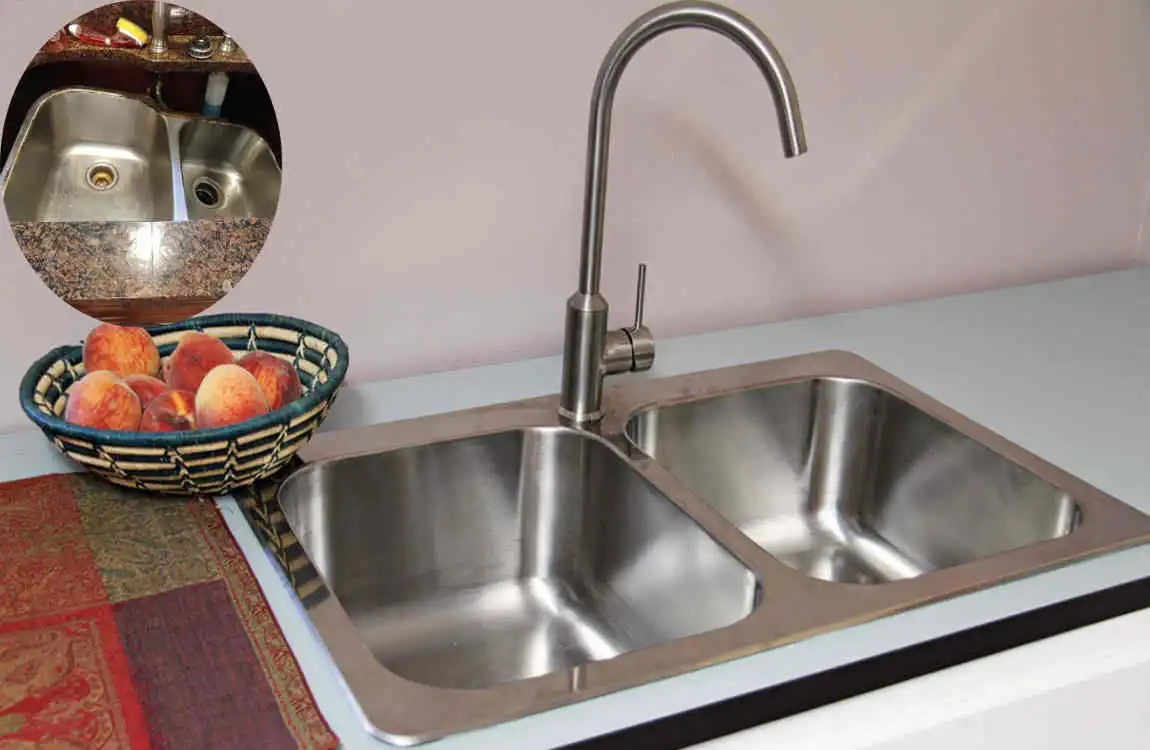
Re-Caulk the Sink Edges
Old caulk can crack or peel, causing leaks and gaps. Here’s how to refresh the seal:
Use a putty knife to scrape away all the old caulk around the sink edge.
Clean the surface thoroughly with a mild cleaner and dry it completely.
Load your caulk gun with waterproof kitchen-grade silicone sealant.
Apply a smooth, even bead of caulk all around the sink edge where it meets the countertop.
Use a wet finger or caulk-smoothing tool to even out the bead.
Let the caulk cure as per the manufacturer’s instructions — usually 24 hours — before using the sink again.
Support the Sink from Below (Optional for Heavy or Damaged Cabinets)
If your cabinets seem weak or damaged, you can add extra support using wood shims:
Gently slide thin shims under the sink from underneath the cabinet.
Place them where the sink needs lifting, avoiding plumbing pipes.
Don’t force the sink up too hard; provide stable support.
If your cabinets are badly damaged or sagging, it’s best to call a professional for repairs to avoid further issues.
Common Mistakes to Avoid When Fixing a Dropped Kitchen Sink
Knowing what not to do can save you time and money:
Over-tightening clips: This can crack porcelain or damage countertops. Using the wrong caulk: Always choose kitchen-grade waterproof sealant. Ignoring cabinet damage: A loose sink can be a sign of deeper problems. Not turning off the water supply: This can cause flooding or water damage.
You may also read (howhighshoulda kitchen sink drain be from the floor in your home).