
Your roof is one of the most essential parts of your home. It protects you from the elements, keeps your house warm in the winter and cool in the summer, and can even boost your property value. That’s why it’s crucial to know how to install roofing correctly, especially in 2025 when new materials and technologies are available.
A properly installed roof offers numerous benefits. It provides superior protection against rain, wind, and snow. It can improve your home’s energy efficiency, reducing your heating and cooling costs. And a well-maintained, attractive roof can increase your property’s curb appeal and resale value.
Understanding Roofing Basics
Before you start your roofing project, it’s essential to understand the different types of roofing materials available in 2025 and their pros and cons.
Types of Roofing Materials
- Asphalt Shingles: The most common and affordable option, asphalt shingles are durable, easy to install, and come in a variety of colors and styles.
- Metal Roofing: Metal roofs are highly durable, energy-efficient, and can last up to 50 years. They’re also recyclable and can be made from sustainable materials.
- Tile Roofing: Clay or concrete tiles offer a classic, attractive look and excellent durability. They’re heavy, so they require a strong roof structure.
- Slate Roofing: Slate is a natural stone that’s incredibly durable and can last over 100 years. It’s also cumbersome and expensive.
- Wood Shakes and Shingles: Wood roofing provides a rustic, natural look. It’s less durable than other materials and requires regular maintenance.
- Synthetic Roofing: Made from recycled materials, synthetic roofing mimics the look of other materials while offering durability and affordability.
Pros and Cons of Each Roofing Material
Material Pros Cons
Asphalt Shingles: Affordable, easy to install, and available in a variety of styles. Less durable than other materials, may not be eco-friendly.
Metal Roofing: Durable, energy-efficient, recyclable. It cannot be quiet during rain or hail, and it is more expensive upfront.
Tile Roofing: Attractive, durable, fire-resistant. Heavy, requires a strong roof structure, and is more expensive.
Slate Roofing: Extremely durable, attractive, and eco-friendly. Very heavy, expensive, and requires professional installation.
Wood Shakes and Shingles: Rustic look, renewable resource, less durable, requires regular maintenance, and has a fire risk.
Synthetic Roofing: Durable, affordable, eco-friendly. It may not have the same aesthetic appeal as natural materials.
Tools and Safety Equipment
To install your new roof safely and efficiently, you’ll need the following tools and safety equipment:
- Hammer
- Nail gun
- Roofing nails
- Utility knife
- Measuring tape
- Chalk line
- Roofing shovel
- Pry bar
- Ladder
- Safety harness
- Hard hat
- Gloves
- Safety glasses
Roofing Terminology
Before you start your roofing project, familiarize yourself with these standard roofing terms:
- Roof Deck: The structural base of your roof, typically made of plywood or oriented strand board (OSB).
- Underlayment: A water-resistant layer installed over the roof deck before the roofing material.
- Flashing: Thin sheets of metal used to prevent water from seeping into vulnerable areas, such as around chimneys and vents.
- Drip Edge: A metal strip installed along the roof’s edges to direct water away from the fascia and into the gutters.
- Valley: The area where two roof slopes meet, forming a V-shape.
- Ridge: The highest point of the roof, where two slopes meet at the top.
- Hip: The diagonal edge of a roof where two slopes meet.
Planning Your Roofing Installation
Proper planning is crucial for a successful roofing project. Here’s what you need to do before you start:
Assessing Your Current Roof Condition
Before you can install a new roof, you need to assess the condition of your current one. Look for signs of damage, such as missing or cracked shingles, leaks, or sagging areas. If your roof is in poor condition, you may need to replace the entire roof deck.
Measuring Your Roof for Material Estimates
To determine how much roofing material you’ll need, measure your roof’s area. Start by measuring the length and width of each roof section, then multiply these numbers to get the area. Add up the areas of all sections to get the total roof area.
Checking Local Building Codes and Permits
Before you start your roofing project, check with your local building department to see if you need any permits. Some areas require permits for roofing work, especially if you’re changing the roof’s structure or appearance.
Budgeting for Materials and Labor
Once you know the size of your roof and the type of material you want to use, you can start budgeting for your project. Get quotes from multiple suppliers to compare prices, and factor in the cost of tools, safety equipment, and any professional help you may need.
Step-by-Step Guide on How to Install Roofing
Now that you’ve planned your project, it’s time to start installing your new roof. Follow these steps carefully to ensure a strong, long-lasting result.
Preparing the Roof Surface
Removing Old Roofing Materials Safely
Start by removing the old roofing materials. Use a roofing shovel to pry up the shingles or tiles, working from the top down. Be careful not to damage the roof deck underneath. Dispose of the old materials properly in accordance with local regulations.
Inspecting and Repairing Roof Decking and Structure
Once the old roofing is removed, inspect the roof deck for any damage or rot. Replace any damaged sections with new plywood or OSB, ensuring they are securely fastened to the roof structure. If you find any structural issues, such as sagging or weak areas, consult a professional before proceeding.
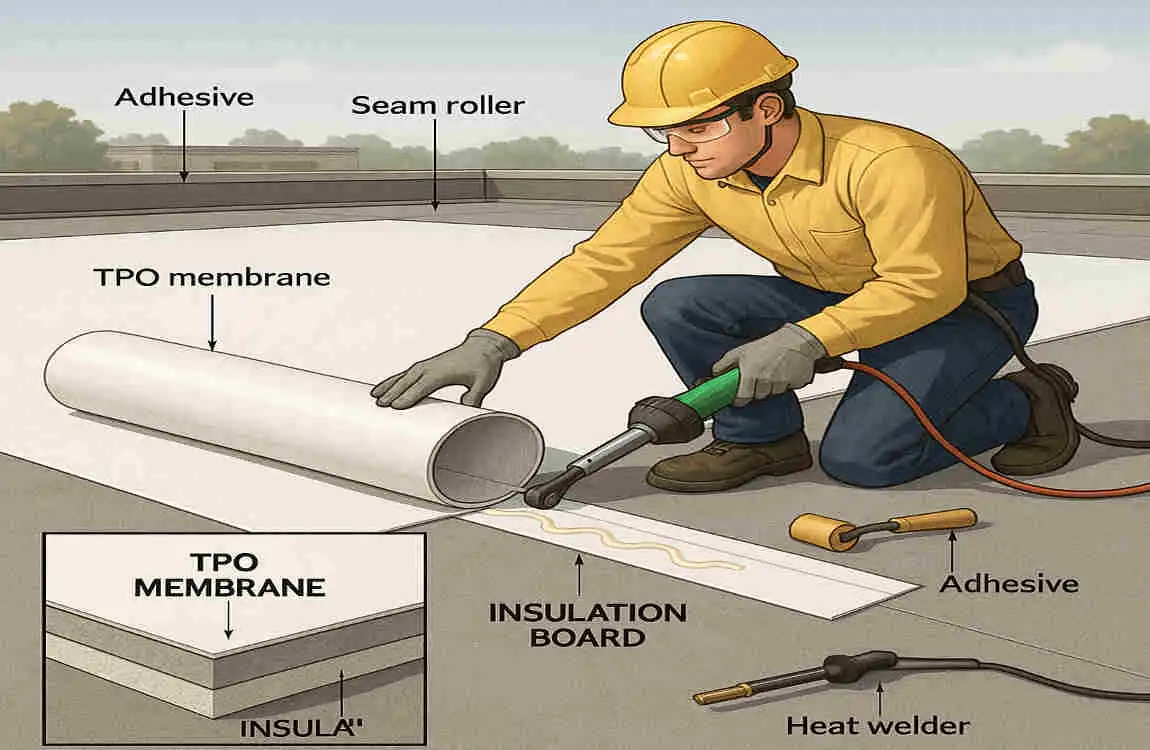
Installing Drip Edge and Underlayment
Next, install the drip edge along the roof’s edges, nailing it in place every 12 inches. Then, roll out the underlayment, starting at the bottom of the roof and working your way up. Overlap each row by at least 6 inches, and secure it with roofing nails every 12 inches.
Installing the Roofing Material
Starting with Starter Strips or Flashing
If you’re using asphalt shingles, start by installing the starter strip along the bottom edge of the roof. This strip provides a solid base for the first row of shingles and helps prevent wind uplift. If you’re using metal or tile, you may need to install flashing around the edges and valleys first.
Correct Methods for Laying Shingles, Tiles, or Metal Panels
Follow the manufacturer’s instructions for laying your chosen roofing material. For asphalt shingles, start at the bottom left corner of the roof and work your way up and to the right, overlapping each row by at least 5 inches. For tiles, start at the bottom and work your way up, using a chalk line to keep the rows straight. For metal panels, start at one end of the roof and work your way across, overlapping each panel by at least 6 inches.
Proper Nailing or Fastening Techniques
Use the right type and number of nails or fasteners for your roofing material. For asphalt shingles, use 4-6 nails per shingle, placed about 1 inch from the edge and 1 inch above the cutout. For tiles, use special tile nails or screws and insert them into the pre-drilled holes. For metal panels, use self-tapping screws, placed every 12-18 inches along the seams.
Overlapping and Alignment Best Practices
To prevent leaks and ensure a strong, attractive roof, follow these best practices for overlapping and aligning your roofing material:
- Always overlap each row or panel by the recommended amount, usually at least 5-6 inches.
- Keep the rows straight and even, using a chalk line as a guide.
- Please make sure the edges of each piece are correctly aligned with those above and below it.
- Use a roofing hatchet or utility knife to trim the material as needed to fit around vents, chimneys, and other obstacles.
Special Considerations
Installing Roof Vents and Flashing
Proper ventilation is crucial for a healthy roof, so make sure to install roof vents as needed. Follow the manufacturer’s instructions for cutting the vent holes and securing the vents. Use flashing around the vents to prevent leaks.
You’ll also need to install flashing around chimneys, skylights, and other roof penetrations. Cut the flashing to fit snugly around the obstacle, and secure it with roofing nails or screws. Apply a bead of roofing cement around the edges to create a watertight seal.
Weatherproofing and Waterproofing Tips
To keep your roof watertight, follow these weatherproofing and waterproofing tips:
- Use a high-quality underlayment to protect the roof deck from moisture.
- Apply roofing cement around all flashing and vent penetrations.
- Use a ridge cap or a ridge vent to cover the roof peak and prevent water from seeping in.
- Install a drip edge along the roof’s edges to direct water away from the fascia and into the gutters.
Handling Roof Valleys, Ridges, and Hips
Roof valleys, ridges, and hips require special attention to prevent leaks. For valleys, use special valley flashing or install roofing material in a “woven” pattern, overlapping the shingles or tiles on both sides. For ridges and hips, use a ridge cap or hip cap to cover the seam, securing it with roofing nails or screws.
Common Mistakes to Avoid During Installation
Even with careful planning and execution, mistakes can still occur during a roofing project. Here are some common pitfalls to avoid:
- Inadequate Ventilation: Proper ventilation is crucial for a healthy roof. Make sure to install enough roof vents to allow air to circulate and prevent heat and moisture buildup.
- Poor Nail Placement or Insufficient Fastening: Using too few nails or placing them incorrectly can result in loose or missing shingles, leading to leaks and wind damage. Follow the manufacturer’s recommendations for nail placement and quantity.
- Ignoring Manufacturer Instructions or Warranties: Each roofing material comes with specific installation instructions and warranty requirements. Ignoring these can void your warranty and lead to premature roof failure.
- Not Wearing Proper Safety Gear: Roofing can be a dangerous job, so always wear a safety harness, hard hat, gloves, and safety glasses to protect yourself from falls and flying debris.
Maintenance Tips to Extend Roof Lifespan
Once your new roof is installed, proper maintenance is key to extending its lifespan. Follow these tips to keep your roof in top condition:
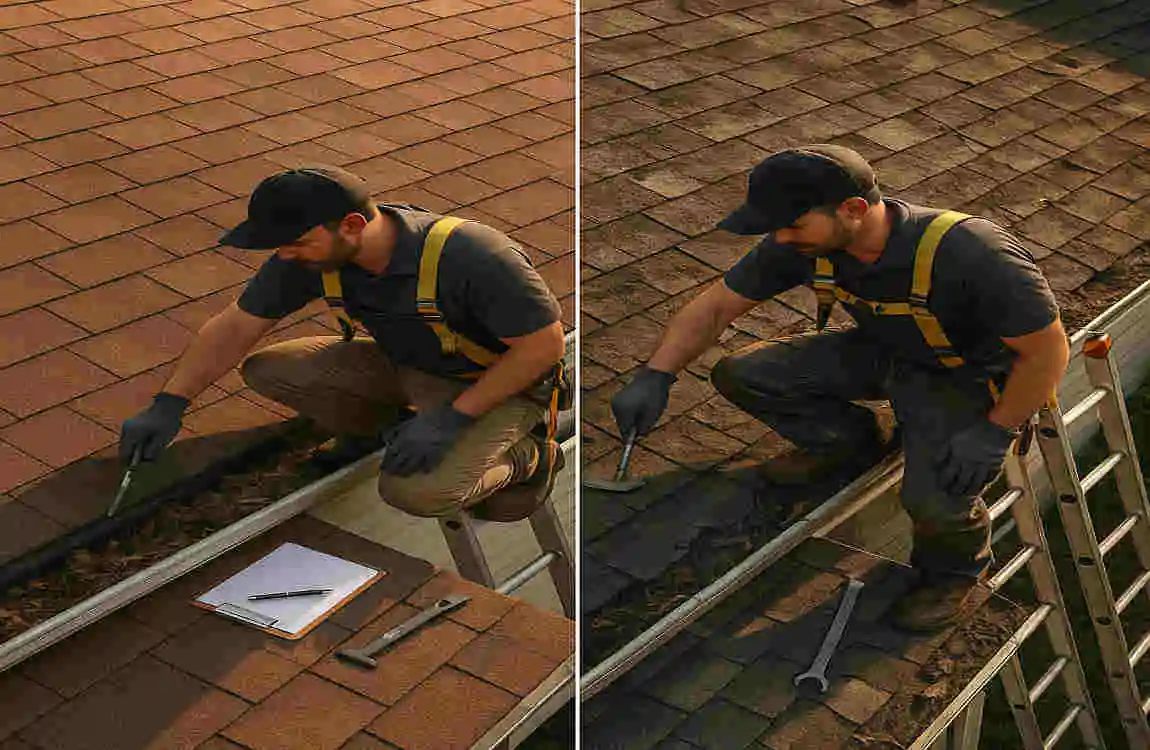
- Regular Inspections and Cleaning: Inspect your roof at least twice a year—spring and fall—looking for any signs of damage or wear. Clean your gutters and remove any debris from the roof surface to prevent clogs and water damage.
- Spot Repairs and Timely Addressing of Damages: If you notice any missing, cracked, or curling shingles or any signs of leaks, address them promptly. Minor problems can quickly become big ones if left unchecked.
- Seasonal Care: Winterizing and Summer Preparations: In the winter, make sure your roof is free of snow and ice to prevent damage. In the summer, check for any signs of heat damage, such as buckling or blistering shingles.
Hiring Professionals vs. DIY Roofing Installation
While installing a new roof yourself can save you money, it’s not always the best option. Here are some factors to consider when deciding whether to hire a professional or do it yourself:
- When to Call a Roofing Contractor: If your roof is steep, complex, or in poor condition, or if you’re not comfortable working at heights, it’s best to hire a professional. They have the experience, tools, and safety equipment to get the job done right.
- Cost Comparison and Risk Factors: Hiring a professional can be more expensive upfront, but it can save you money in the long run by ensuring a high-quality installation. DIY roofing can be risky for both your personal safety and your home.
- How to Vet and Select a Trustworthy Roofing Professional: When choosing a roofing contractor, look for someone who is licensed, insured, and experienced. Ask for references and check online reviews. Get multiple quotes and make sure the contractor provides a detailed, written estimate.
Latest Trends and Innovations in Roofing for 2025
The roofing industry is constantly evolving, and 2025 is no exception. Here are some of the latest trends and innovations to consider for your new roof:
- Eco-Friendly and Energy-Efficient Roofing Options: More and more homeowners are choosing eco-friendly roofing materials, such as recycled metal or sustainable wood shakes. Energy-efficient options, such as cool or green roofs, can also help reduce your carbon footprint and save on energy costs.
- Smart Roofing Technologies: Smart roofing technologies, such as integrated solar panels or temperature sensors, are becoming increasingly popular. These can help you monitor your roof’s condition and performance, and even generate your own renewable energy.
- Advances in Roofing Materials: New roofing materials are constantly being developed, offering improved durability, aesthetics, and performance. Look for materials with enhanced UV, impact, or fire resistance to protect your home and extend your roof’s lifespan.