
Have you ever driven past a house with a stunning exterior paint job and wondered how they achieved such a smooth and professional finish? A well-painted exterior not only boosts curb appeal but also protects your home from the elements.
Understanding Exterior Wall Painting Basics
Why Choosing the Right Method Matters: Brush vs. Roller vs. Sprayer
When it comes to painting your exterior walls, you have three main options: brushes, rollers, and sprayers. Each method has its pros and cons, but using a roller offers several advantages that make it the go-to choice for many homeowners and professionals alike.
Benefits of Using a Roller for Exterior Walls
- Even Coverage: Rollers distribute paint more evenly than brushes, resulting in a smoother finish.
- Efficiency: You can cover larger areas faster with a roller compared to a brush.
- Less Dripping: Rollers tend to have less dripping and splattering than sprayers, making them easier to control.
- Texture Adaptability: Rollers come in various nap lengths, allowing you to choose the best option for your wall’s texture.
Key Challenges and How to Avoid Them When Using a Roller
While rollers offer many benefits, there are some common challenges you might face. Here’s how to avoid them:
- Roller Marks and Streaks: Use the right roller nap length for your wall texture and maintain a wet edge as you work.
- Uneven Coverage: Load the roller evenly and apply paint using consistent pressure and strokes.
- Dripping and Splattering: Don’t overload the roller with paint, and use a paint tray with a grid to remove excess paint.
Tools and Materials Overview for Exterior Painting with Roller
To paint your exterior walls with a roller, you’ll need the following tools and materials:
- High-quality exterior paint
- Paint roller frame and covers
- Paint tray and liner
- Extension pole
- Drop cloths
- Painter’s tape
- Caulk and putty knife
- Sandpaper
- Primer (if needed)
- Cleaning supplies (pressure washer, detergent, brushes)
Preparing Exterior Walls for Painting
Inspecting Walls for Damage: Cracks, Mold, Dirt, Peeling Paint
Before you start painting, take a close look at your exterior walls. Look for any cracks, mold, dirt, or peeling paint. Addressing these issues before painting will ensure a smoother, longer-lasting finish.
Cleaning Exterior Walls Thoroughly (Pressure Washing Tips)
A clean surface is essential for proper paint adhesion. Here’s how to clean your exterior walls effectively:
- Remove Loose Debris: Use a broom or brush to remove any loose dirt or cobwebs.
- Pressure Wash: Use a pressure washer with a wide fan tip and low pressure to avoid damaging the surface. Start at the bottom and work your way up, keeping the nozzle at least 12 inches away from the wall.
- Detergent Solution: For stubborn stains, mix a mild detergent with water and apply it to the wall before pressure washing.
- Rinse Thoroughly: After cleaning, rinse the walls thoroughly with clean water and allow them to dry completely before painting.
Repairing Cracks and Holes with Exterior Filler
Once your walls are clean, it’s time to repair any cracks or holes. Use an exterior-grade filler and follow these steps:
- Clean the Area: Remove any loose debris from the crack or hole.
- Apply Filler: Use a putty knife to apply the filler, pressing it firmly into the crack or hole.
- Smooth and Feather: Smooth the filler with the putty knife, feathering the edges to blend with the surrounding surface.
- Allow to Dry: Let the filler dry completely according to the manufacturer’s instructions.
- Sand Smooth: Once dry, sand the filled area until it’s smooth and flush with the surrounding surface.
Sanding and Smoothing Surfaces for Roller Application
After repairing any damage, sand the entire surface lightly to create a smooth, even base for painting. Use a fine-grit sandpaper and sand in a circular motion, feathering the edges of any repaired areas.
Priming: When and How to Prime Exterior Walls
Priming is essential in certain situations:
- New or Bare Wood: Always prime new or bare wood to seal the surface and ensure proper paint adhesion.
- Previously Painted Surfaces: If the existing paint is in poor condition or you’re significantly changing the color, prime the surface to create a uniform base.
- Stains or Discoloration: Prime any areas with stains or discoloration to prevent them from bleeding through the new paint.
To prime your exterior walls:
- Choose the Right Primer: Select a high-quality exterior primer suitable for your surface type.
- Apply Evenly: Use a brush or roller to apply the primer evenly, following the manufacturer’s instructions.
- Allow to Dry: Let the primer dry completely before painting, typically 24 hours.
Selecting the Best Paint and Roller for Exterior Walls
Choosing High-Quality Exterior Paint Types (Latex vs. Oil-Based)
When it comes to exterior paint, you have two main options: latex (water-based) and oil-based. Here’s a comparison:
Paint Type Pros Cons
Latex – Easier to clean up with water
– Quicker drying time
– Less odor
– More flexible and less prone to cracking – May not adhere as well to glossy surfaces
– Can be less durable in high-traffic areas
Oil-Based – More durable and resistant to wear
– Better adhesion to glossy surfaces
– Smoother finish – Longer drying time
– Stronger odor
– Requires mineral spirits for cleanup
– Can yellow over time
For most exterior painting projects, latex paint is the preferred choice due to its ease of use and environmental friendliness.
Factors in Choosing Paint: Weather Resistance, Durability, Color Retention
When selecting your exterior paint, consider these factors:
- Weather Resistance: Look for paints specifically designed for exterior use, with additives that protect against UV rays, moisture, and temperature fluctuations.
- Durability: Choose a paint with a high level of durability to withstand the wear and tear of outdoor conditions.
- Color Retention: Opt for paints with good color retention properties to maintain your home’s appearance over time.
Selecting Roller Types and Nap Lengths Ideal for Exterior Walls and Textures
The right roller can make a big difference in your painting results. Here’s a guide to choosing the best roller for your exterior walls:
- Smooth Surfaces: For smooth surfaces like stucco or wood siding, use a roller with a 3/8-inch nap.
- Medium Textures: For medium-textured surfaces like brick or rough stucco, a 1/2-inch nap roller works well.
- Rough Textures: For very rough surfaces like concrete or heavily textured stucco, choose a roller with a 3/4-inch or 1-inch nap.
Importance of Quality Rollers for Smooth, Even Coverage
Investing in a high-quality roller is essential for achieving a smooth, professional finish. Quality rollers:
- Hold More Paint: Allowing you to cover more area with fewer dips into the paint tray.
- Release Paint Evenly: Ensuring a consistent coat without streaks or roller marks.
- Last Longer: Saving you money in the long run and reducing the need for frequent replacements.
Step-by-Step Guide on How to Paint Exterior House Walls with a Roller
Now that you’ve prepared your walls and gathered your materials, it’s time to start painting. Follow these steps for a smooth, professional finish:
Setting Up the Work Area Safely and Efficiently
Before you begin painting, set up your work area for safety and efficiency:
- Clear the Area: Remove any furniture, plants, or decorations from around the walls you’ll be painting.
- Protect Surfaces: Lay down drop cloths to protect the ground and any surfaces you don’t want to paint.
- Mask Off Areas: Use painter’s tape to mask off windows, doors, and trim that you want to keep paint-free.
- Set Up Ladders and Scaffolding: If needed, set up ladders or scaffolding safely and securely.
Using Drop Cloths and Masking to Protect Windows and Trim
To protect your windows and trim from paint splatters:
- Lay Down Drop Cloths: Place drop cloths on the ground and against the walls to catch any drips or splatters.
- Mask Off Windows and Trim: Use painter’s tape to create a barrier between the walls and any windows, doors, or trim you don’t want to paint.
- Cover Light Fixtures: Use plastic bags or painter’s tape to cover any exterior light fixtures.
Techniques for Loading Paint on the Roller Evenly
Properly loading your roller with paint is crucial for achieving a smooth finish:
- Dip the Roller: Dip the roller into the paint tray, rolling it back and forth to distribute the paint evenly.
- Remove Excess Paint: Roll the roller over the tray’s grid to remove any excess paint. The roller should be fully saturated but not dripping.
- Check for Even Coverage: Before applying paint to the wall, roll the roller on a piece of cardboard or scrap paper to ensure even coverage.
How to Apply the First Coat: Starting from Top to Bottom, Applying “W” or “M” Strokes
When applying the first coat of paint:
- Start at the Top: Begin painting at the top of the wall and work your way down to avoid drips and splatters.
- Use “W” or “M” Strokes: Apply the paint using a “W” or “M” pattern, filling in the gaps between the strokes.
- Maintain Even Pressure: Keep consistent pressure on the roller to ensure an even coat.
Maintaining a Wet Edge to Avoid Lap Marks
To avoid lap marks and ensure a smooth finish:
- Work in Sections: Paint in small sections, completing each one before moving on to the next.
- Keep a Wet Edge: Always maintain a wet edge by overlapping the previous stroke slightly with the next one.
- Blend Edges: If you need to stop and start again, blend the edges of the painted area with the new section to avoid visible lines.
Applying Multiple Coats and Optimal Drying Times
For the best results, you may need to apply multiple coats of paint:
- Allow Drying Time: Let the first coat dry completely according to the manufacturer’s instructions, typically 4-6 hours.
- Inspect the Surface: After the first coat has dried, inspect the surface for any missed spots or uneven coverage.
- Apply Additional Coats: Apply additional coats as needed, following the same techniques and allowing proper drying time between each coat.
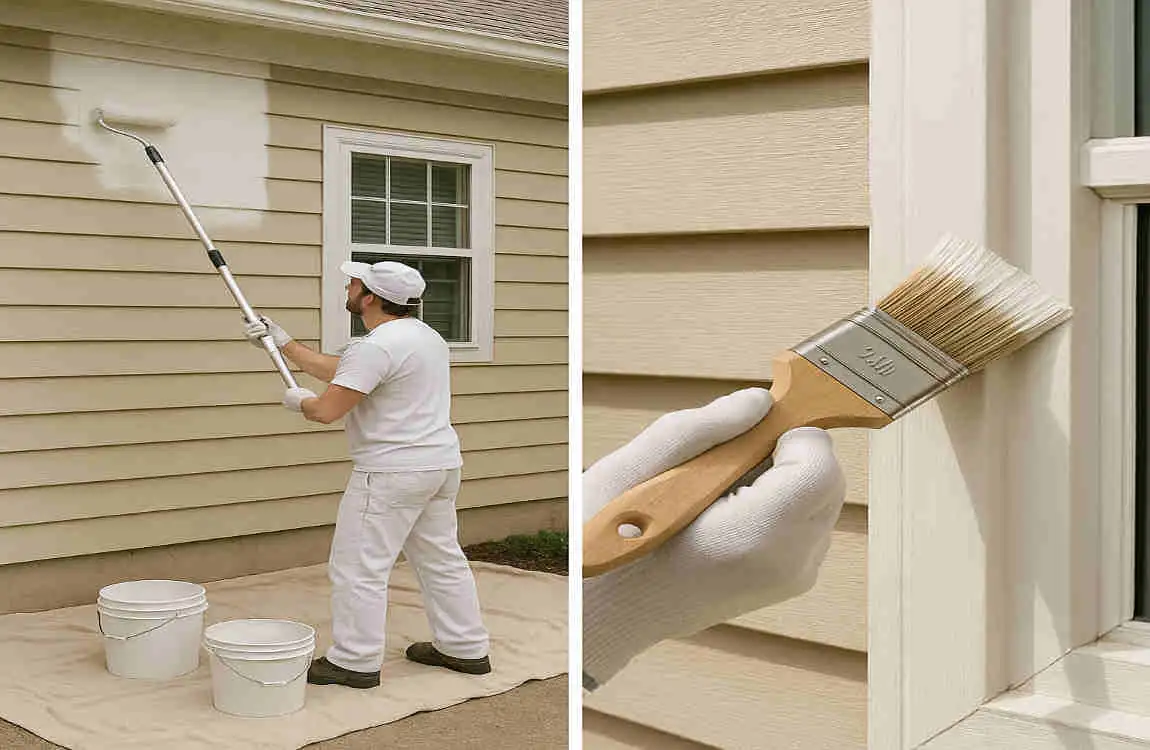
Painting Corners and Edges with a Brush, Blending with Roller Areas
To paint corners and edges:
- Use a Brush: Use a high-quality brush to paint corners, edges, and any areas the roller can’t reach.
- Blend with the Roller: Once the brushwork is complete, use the roller to blend the painted areas with the rest of the wall, feathering the edges to create a seamless finish.
Troubleshooting Common Problems While Rolling Exterior Walls
Even with the best techniques, you may encounter some common problems while painting your exterior walls. Here’s how to troubleshoot them:
Avoiding Roller Marks and Streaks
To prevent roller marks and streaks:
- Use the Right Roller Nap: Choose a roller nap appropriate for your wall’s texture.
- Maintain a Wet Edge: Always keep a wet edge and blend your strokes to avoid visible lines.
- Apply Even Pressure: Keep consistent pressure on the roller to ensure an even coat.
Fixing Paint Drips and Splatters
If you notice paint drips or splatters:
- Act Quickly: Wipe up any drips or splatters immediately with a damp cloth.
- Allow to Dry: If the paint has already dried, wait until the entire surface is dry before attempting to fix it.
- Sand and Repaint: Lightly sand the affected area and repaint it, feathering the edges to blend with the surrounding surface.
How to Handle Uneven Texture on Wall Surfaces
If your wall has an uneven texture:
- Choose the Right Roller: Select a roller with a longer nap to help fill in the texture.
- Apply Multiple Coats: You may need to apply more coats of paint to achieve an even finish on textured surfaces.
- Back-Rolling: After applying paint, use a technique called back-rolling, where you roll over the painted area in the opposite direction to help smooth out the texture.
Tips for Painting on Hot, Cold, or Humid Days for Best Results
Painting in extreme weather conditions can be challenging. Here are some tips:
- Hot Days: Paint in the early morning or late afternoon when temperatures are cooler. Avoid painting in direct sunlight, as it can cause the paint to dry too quickly and leave lap marks.
- Cold Days: Choose a day when temperatures are above 50°F (10°C) for best results. Cold temperatures can slow down drying times and affect paint adhesion.
- Humid Days: Allow for longer drying times between coats, as high humidity can slow down the evaporation process. Avoid painting on very humid days, as it can lead to a tacky finish.
Post-Painting Tips for a Professional Finish
Congratulations, you’ve finished painting your exterior walls! Here are some post-painting tips to ensure a professional finish:
Inspecting the Painted Surface for Missed Spots
After the final coat has dried, take a close look at your painted surface:
- Check for Missed Spots: Look for any areas you may have missed or that need a touch-up.
- Examine for Uneven Coverage: Check for any uneven coverage or visible brush or roller marks.
- Assess the Overall Appearance: Step back and assess the overall appearance of your painted walls, making sure you’re happy with the results.
Clean-Up Tips: Washing Rollers, Brushes, and Disposing of Paint Safely
Proper clean-up is essential for maintaining your painting tools and disposing of paint safely:
- Clean Rollers and Brushes: Wash your rollers and brushes thoroughly with water (for latex paint) or mineral spirits (for oil-based paint) until the water or solvent runs clear.
- Store Tools Properly: Allow your tools to dry completely before storing them to prevent mold or mildew growth.
- Dispose of Paint Safely: Follow your local regulations for disposing of paint. Many communities have designated facilities for paint disposal, or you can donate unused paint to community organizations.
Caring for the Paint Job to Extend Longevity
To extend the life of your paint job:
- Regular Cleaning: Gently wash your exterior walls with a mild detergent and water solution to remove dirt and grime.
- Inspect for Damage: Regularly inspect your painted surfaces for any cracks, peeling, or other damage, and address issues promptly.
- Touch Up as Needed: Keep some extra paint on hand for touch-ups as needed to maintain the appearance of your home.
When to Consider a Touch-Up or Repaint
Over time, your exterior paint may need a touch-up or a full repaint. Consider these factors:
- Fading or Discoloration: If your paint has faded or discolored significantly, it may be time for a fresh coat.
- Cracking or Peeling: Cracking or peeling paint indicates that it’s time for a repaint to protect your home from the elements.
- Damage or Wear: If your walls have sustained significant damage or wear, a repaint can help restore their appearance and protect them from further damage.
Additional Tips to Master Exterior Painting with a Roller
Here are some additional tips to help you master exterior painting with a roller:
Using Extension Poles for High Walls and Ceilings
For high walls or ceilings, use an extension pole to reach the areas safely and efficiently:
- Choose the Right Length: Select an extension pole that’s long enough to reach the highest point of your wall or ceiling but not so long that it becomes unwieldy.
- Secure the Roller: Make sure the roller is securely attached to the extension pole to prevent it from falling off during use.
- Work in Sections: Paint in small sections, moving the extension pole smoothly and consistently to maintain even coverage.
Working with a Partner to Speed Up the Job
Painting with a partner can help you complete the job faster and more efficiently:
- Divide and Conquer: Divide the work into sections, with each person responsible for painting a specific area.
- Assist Each Other: Help each other with tasks like setting up ladders, moving drop cloths, and cleaning up.
- Communicate: Communicate regularly to ensure you’re both on the same page and working together effectively.
Safety Precautions for Ladders and Scaffolding
When using ladders or scaffolding, always prioritize safety:
- Follow Manufacturer’s Instructions: Always follow the manufacturer’s instructions for setting up and using ladders and scaffolding.
- Use Proper Footing: Ensure that your ladder or scaffolding is on a level, stable surface.
- Secure the Equipment: Secure ladders and scaffolding to prevent them from shifting or falling during use.
- Wear Appropriate Safety Gear: Wear a hard hat, safety glasses, and non-slip shoes when working at heights.
Eco-Friendly and Low-VOC Paint Options
If you’re concerned about the environmental impact of your paint job, consider these eco-friendly options:
- Low-VOC Paints: Choose paints with low levels of volatile organic compounds (VOCs) to reduce indoor air pollution and environmental impact.
- Water-Based Paints: Opt for water-based paints, which have lower VOC levels than oil-based paints.
- Recycled Paint: Look for recycled paint options, which are made from leftover paint that would otherwise go to waste.