
A well-attached roof not only keeps you and your family safe during harsh weather conditions but also ensures the durability and longevity of your home. In this expert guide, we’ll dive deep into the world of roof attachment, exploring the basics, key components, step-by-step installation process, latest techniques, common mistakes, and maintenance tips.
Understanding Roof Attachment Basics
What Does Roof Attachment Mean?
Roof attachment refers to the process of securely connecting the roof structure to the house’s framing system. It involves various components and techniques that work together to ensure the roof remains stable and intact, even during extreme weather conditions.
Why Is Proper Attachment Critical?
Proper roof attachment is essential for several reasons. First and foremost, it helps your home resist the forces of nature, such as strong winds, heavy rain, and snow. A securely attached roof can prevent leaks, water damage, and even structural failure.
Moreover, proper attachment contributes to the overall structural integrity of your home. It ensures the roof’s weight is evenly distributed across the framing system, preventing sagging or collapse over time.
Common Roof Types and Their Attachment Needs
Different roof types have unique attachment requirements. Let’s take a look at some common roof materials and their specific needs:
- Asphalt Shingles: These are the most popular roofing material in North America. They are typically attached using nails and require a solid decking surface for proper installation.
- Metal Roofs: Metal roofs are known for their durability and longevity. They are usually attached using screws or clips, depending on the specific type of metal roofing system.
- Tile Roofs: Tile roofs add a touch of elegance to any home. They are heavier than other roofing materials and require a sturdy framing system and specialized fasteners for secure attachment.
Overview of House Framing and Roof Structure Relationship
The roof structure is closely tied to the house’s framing system. The framing provides the foundation for the roof and plays a crucial role in its overall stability and strength.
The roof structure consists of components, such as trusses or rafters, designed to evenly distribute the roof’s weight across the framing system. Understanding this relationship is essential to ensuring a secure, long-lasting roof attachment.
Key Components Involved in Roof Attachment
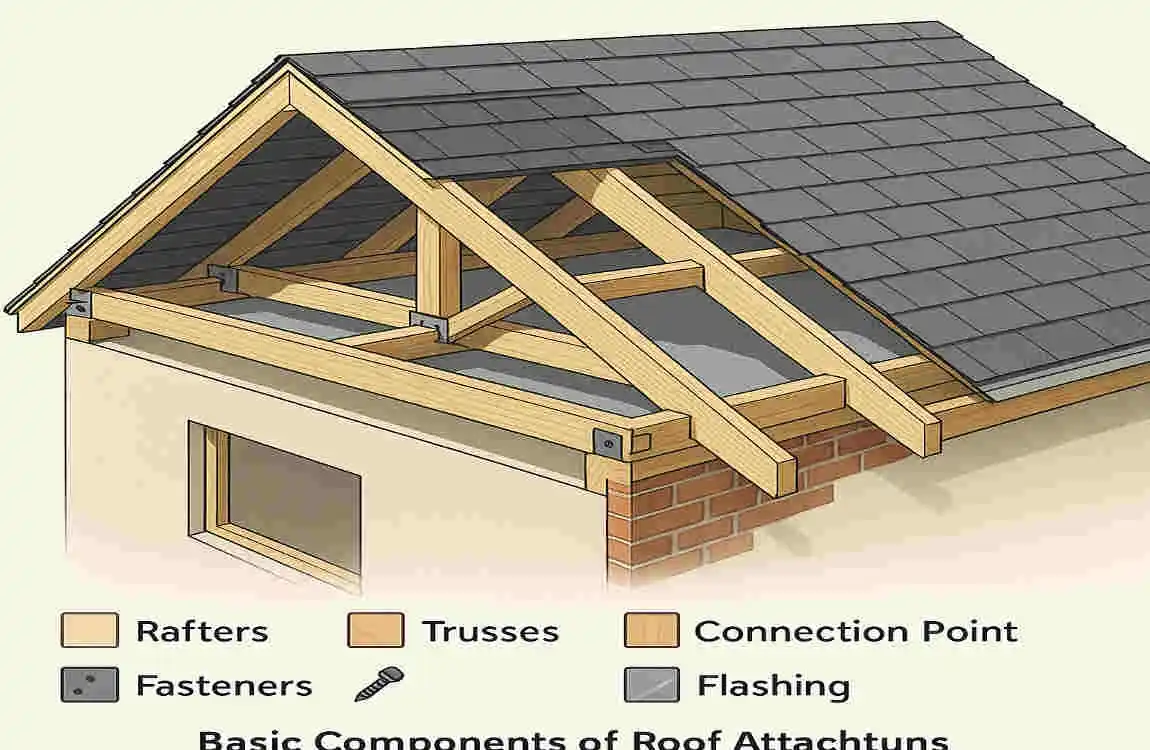
Roof Trusses and Rafters: The Backbone of Roof Support
Roof trusses and rafters are the primary structural elements that support the roof’s weight. They are typically made of wood or engineered wood products and are designed to withstand the forces acting on the roof.
Trusses are prefabricated, triangular structures commonly used in modern construction. They are designed to be strong and lightweight, making them an excellent choice for roof support.
Rafters, on the other hand, are individual beams that run from the roof ridge to the exterior walls. They are often used in traditional construction and can be customized to fit the specific needs of the roof design.
Sheathing and Decking Materials: The Roof’s Foundation
Sheathing and decking materials form the foundation of the roof. They provide a solid surface for attaching roofing materials and help distribute the roof’s weight evenly across the trusses or rafters.
Common sheathing materials include plywood or oriented strand board (OSB). These materials are strong, durable, and provide excellent roof support.
Underlayment: The Unsung Hero of Roof Protection
Underlayment is a crucial component of roof attachment that often goes unnoticed. It is a layer of material installed between the sheathing and roofing materials, serving as an additional barrier against moisture and wind.
Underlayment helps prevent water from seeping into the roof structure and can provide temporary protection until the final roofing materials are installed. It is typically made of asphalt-saturated felt or synthetic materials and is essential to ensuring the roof’s longevity and durability.
Fasteners: The Ties That Bind
Fasteners are the unsung heroes of roof attachment. They are responsible for securely connecting the various components of the roof, ensuring that everything stays in place, even during the harshest weather conditions.
Standard fasteners used in roof attachment include nails, screws, and clips. The choice of fastener depends on the specific roofing material and the manufacturer’s requirements.
Nails are the most common fastener used for attaching asphalt shingles and some metal roofing systems. Screws are often used for metal roofs and provide a more secure connection. Clips are used in some metal roofing systems to allow for expansion and contraction of the metal panels.
Flashing and Sealants: Securing the Edges and Joints
Flashing and sealants play a crucial role in securing the edges and joints of the roof. They help prevent water from seeping into the roof structure and can extend the roof’s lifespan.
Flashing is typically made of metal or plastic and is used to cover roof joints and edges, such as around chimneys, vents, and skylights. It is essential to direct water away from these vulnerable areas and prevent leaks.
Sealants, on the other hand, are used to fill gaps and cracks in the roof, providing an additional layer of protection against water intrusion. They are typically applied around flashing, vents, and other roof penetrations.
Step-by-Step Process of Attaching a Roof to a House
Preparing the House Framing and Inspecting Structural Support
Before you can begin attaching the roof, it’s essential to prepare the house framing and inspect the structural support. This step ensures that the framing is strong enough to support the roof’s weight and that there are no issues that could compromise the roof attachment’s integrity.
Start by examining the condition of the framing members, such as the wall studs and ceiling joists. Look for any signs of damage, rot, or weakness that could affect the roof’s stability. If you find any issues, address them before proceeding with the roof attachment.
Next, ensure the framing is correctly aligned and spaced in accordance with the roof design and local building codes. This step is crucial to ensuring that the roof trusses or rafters fit correctly and that the roof’s weight is evenly distributed.
Installing Roof Trusses or Rafters Securely
Once the framing is prepared, it’s time to Install the roof trusses or rafters. This step is critical for providing the structural support needed to hold the roof in place.
If you’re using trusses, start by lifting them into place and securing them to the top plates of the walls using hurricane ties or other approved fasteners. Make sure the trusses are correctly spaced and aligned according to the roof design and manufacturer’s instructions.
If you’re using rafters, begin by cutting them to the appropriate length and angle to fit the roof design. Install the ridge board first, then attach the rafters to the ridge board and the top plates of the walls using nails or screws. Ensure the rafters are correctly spaced and aligned to provide adequate roof support.
Applying Roof Decking/Sheathing Correctly
With the trusses or rafters in place, it’s time to apply the roof decking or sheathing. This step provides a solid surface for attaching roofing materials and helps evenly distribute the roof’s weight across the trusses or rafters.
Start by installing the decking or sheathing in a staggered pattern, ensuring the panel edges are adequately supported by the trusses or rafters. Use nails or screws to secure the decking or sheathing to the trusses or rafters, following the manufacturer’s recommendations for spacing and placement.
Make sure to leave a small gap between the panels to allow for expansion and contraction due to temperature changes. This gap will help prevent buckling or cracking of the decking or sheathing over time.
Laying Underlayment for Moisture Barrier
Once the decking or sheathing is in place, it’s time to lay the underlayment. This step provides an additional layer of protection against moisture and wind, helping extend the roof’s lifespan.
Start by rolling out the underlayment across the decking or sheathing, ensuring that it overlaps the edges and joints by at least 6 inches. Use roofing nails or staples to secure the underlayment to the decking or sheathing, following the manufacturer’s recommendations for spacing and placement.
Make sure to work from the bottom of the roof up, ensuring that the underlayment is appropriately aligned and free of wrinkles or bubbles. This step will help prevent water from seeping under the underlayment and into the roof structure.
Attaching Roofing Materials with Detailed Methods
With the underlayment in place, it’s time to attach the roofing materials. This step varies depending on the type of roofing material you’re using, but the general process remains the same.
If you’re using asphalt shingles, start by installing the starter course along the bottom edge of the roof. Use roofing nails to secure the starter course to the decking or sheathing, following the manufacturer’s recommendations for spacing and placement.
Next, begin installing the field shingles, starting at the bottom of the roof and working your way up. Overlap the shingles according to the manufacturer’s instructions, and use roofing nails to secure them to the decking or sheathing.
If you’re using metal roofing panels, start by installing the underlayment and any necessary flashing. Then, begin attaching the metal panels to the decking or sheathing using screws or clips, following the manufacturer’s recommendations for spacing and placement.
Make sure to work from the bottom of the roof up, ensuring that the panels are correctly aligned and secured. This step will help prevent leaks and extend the roof’s lifespan.
Securing Edges with Flashing and Sealants
Once the roofing materials are in place, it’s time to secure the edges with flashing and sealants. This step helps prevent water from seeping into the roof structure and can extend the roof’s lifespan.
Start by installing flashing around any roof penetrations, such as chimneys, vents, and skylights. Use roofing nails or screws to secure the flashing to the decking or sheathing, following the manufacturer’s recommendations for spacing and placement.
Next, apply sealants around the flashing and any other joints or gaps in the roof. Use a high-quality sealant that is designed for roofing applications, and follow the manufacturer’s instructions for application and drying times.
Work carefully and thoroughly, ensuring that all edges and joints are properly sealed. This step will help prevent leaks and extend the roof’s lifespan.
Importance of Adherence to Building Codes and Manufacturer Instructions
Throughout the roof attachment process, it’s essential to adhere to local building codes and manufacturer instructions. These guidelines are designed to ensure the roof’s safety and durability, and failure to follow them could result in structural issues or voided warranties.
Before beginning the roof attachment process, take the time to familiarize yourself with the relevant building codes and manufacturer instructions. If you’re unsure about any aspect of the process, don’t hesitate to consult with a qualified roofing professional.
By following the proper procedures and guidelines, you can ensure that your roof is securely attached to your house and will provide years of reliable protection.
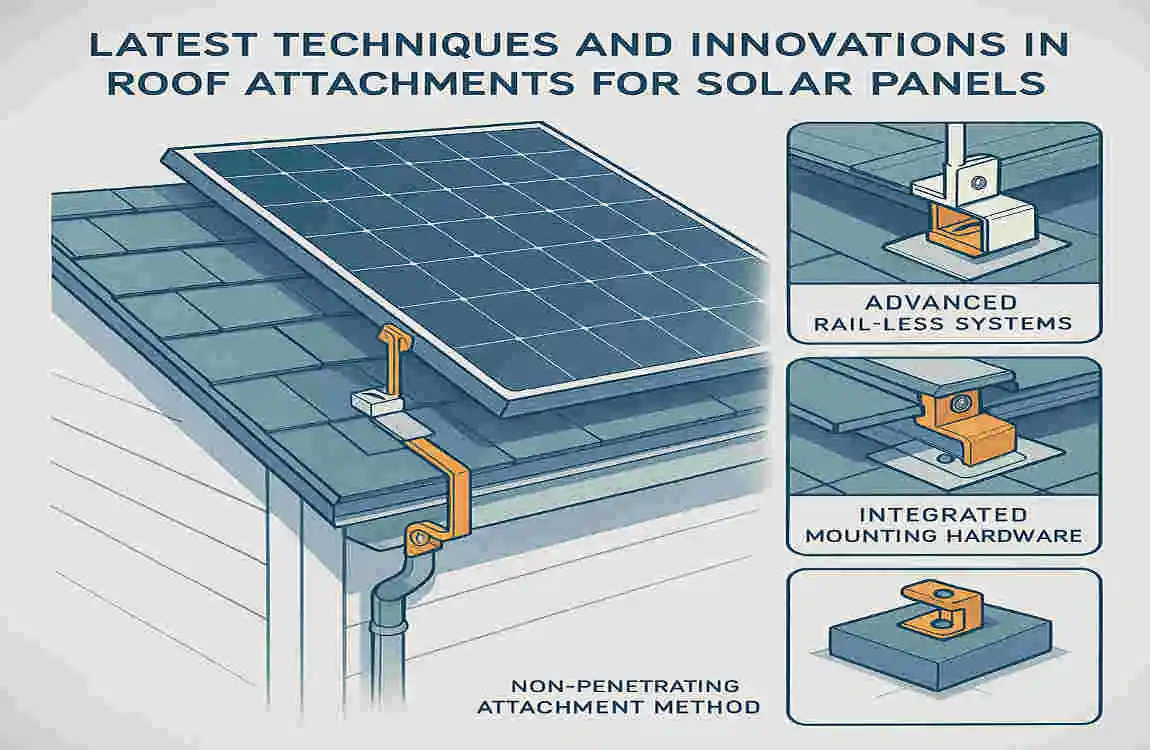
Latest Techniques and Innovations in Roof Attachment
Advanced Fasteners and Hurricane Straps for Enhanced Wind Resistance
In recent years, significant advancements have been made in the development of fasteners and hurricane straps for roof attachment. These innovations have been designed to enhance roof wind resistance, particularly in areas prone to hurricanes and high winds.
Advanced fasteners, such as ring-shank nails and structural screws, provide a more secure connection between roofing materials and decking or sheathing. These fasteners have a unique design that helps prevent them from pulling out of the wood, even under extreme wind forces.
Hurricane straps, on the other hand, are used to secure the roof trusses or rafters to the wall framing. These metal straps are designed to resist uplift forces from high winds, helping keep the roof securely attached to the house.
By using these advanced fasteners and hurricane straps, you can significantly enhance your roof’s wind resistance and provide an added layer of protection against storm damage.
Adhesive-Based Attachment Systems and Their Benefits
Another innovative approach to roof attachment is adhesive-based systems. These systems use specialized adhesives to bond the roofing materials directly to the decking or sheathing, eliminating the need for traditional fasteners.
Adhesive-based attachment systems offer several benefits over traditional methods. For one, they provide a more secure, weather-tight seal, helping prevent leaks and water damage. They also reduce the risk of wind uplift, as there are no exposed fasteners that can be pulled out by high winds.
Moreover, adhesive-based systems can be faster and easier to Install than traditional methods, as they eliminate the need for nailing or screwing. This can result in significant time and labor savings, particularly on large roofing projects.
While adhesive-based systems are still relatively new, they are gaining popularity among roofing professionals and homeowners alike. If you’re considering a new roof or re-roofing project, be sure to ask your contractor about the potential benefits of an adhesive-based attachment system.
Engineered Wood Products and Metal Connector Plates
Engineered wood products and metal connector plates are another innovation in roof attachment that is worth exploring. These products have been designed to provide enhanced strength and durability, helping ensure the roof’s long-term stability.
Engineered wood products, such as laminated veneer lumber (LVL) and oriented strand board (OSB), are made by bonding together multiple layers of wood fibers or strands. These products are stronger and more consistent than traditional solid-sawn lumber, making them an excellent choice for roof trusses and rafters.
Metal connector plates, on the other hand, are used to join the various components of the roof structure together. These plates are typically made of galvanized steel and designed to provide a strong, durable connection between trusses or rafters and the wall framing.
By using engineered wood products and metal connector plates, you can enhance the strength and durability of your roof attachment, ensuring it stands the test of time.
Impact of Drones and 3D Modeling for Installation Precision
Drones and 3D modeling technology are revolutionizing the way roofs are attached to houses. These tools enable roofing professionals to gather precise data on the roof structure and create detailed models for planning and executing the attachment process.
Drones equipped with high-resolution cameras can be used to survey the roof and identify potential issues before the attachment process begins. This can help roofing professionals develop a more accurate and efficient project plan, reducing the risk of costly mistakes or delays.
3D modeling software, on the other hand, can be used to create a virtual representation of the roof structure and the surrounding environment. This allows roofing professionals to visualize the attachment process and make any necessary adjustments before work begins.
By leveraging drones and 3D modeling, roofing professionals can achieve greater precision and accuracy in the roof attachment process, resulting in a more secure, long-lasting roof.
Recent Building Code Updates Influencing Attachment Methods
In recent years, several updates to building codes have influenced how roofs are attached to houses. These updates have been designed to enhance the safety and durability of roofs, particularly in areas prone to high winds and severe weather.
One significant update has been the increased emphasis on wind resistance and the use of hurricane straps and advanced fasteners. Many building codes now require the use of these products in areas prone to high winds, helping to ensure that roofs can withstand the forces of nature.
Another update has been the increased focus on proper flashing and sealant application. Building codes now require more rigorous standards for securing roof edges and joints, helping prevent leaks and water damage.
By staying up to date with the latest building code requirements, you can ensure your roof attachment meets the highest safety and durability standards. If you’re planning a new roof or re-roofing project, be sure to consult with a qualified roofing professional who is familiar with the latest codes and regulations.
Common Mistakes and How to Avoid Them
Improper Fastener Selection and Placement
One of the most common mistakes in roof attachment is improper fastener selection and placement. Using the wrong type of fastener or installing them incorrectly can compromise the roof’s integrity, leading to leaks or structural issues.
To avoid this mistake, always follow the manufacturer’s recommendations for fastener type, size, and placement. Use high-quality fasteners designed for roofing applications, and ensure they are correctly spaced and aligned to provide maximum holding power.
If you’re unsure about the proper selection or placement of fasteners, don’t hesitate to consult a qualified roofing professional. They can help you choose the correct fasteners for your specific roof type and ensure that they are installed correctly.
Skipping Flashing or Underlayment
Another common mistake in roof attachment is skipping the flashing or underlayment. These components are essential for preventing leaks and water damage, and skipping them can lead to costly repairs down the road.
To avoid this mistake, always Install flashing around any roof penetrations, such as chimneys, vents, and skylights. Use high-quality flashing materials designed for roofing applications, and ensure they are adequately secured to the decking or sheathing.
Similarly, always Install underlayment between the decking or sheathing and the roofing materials. This provides an additional layer of protection against moisture and wind, helping extend the roof’s lifespan.
If you’re unsure about the proper installation of flashing or underlayment, consult with a qualified roofing professional. They can help you choose the right materials and ensure that they are installed correctly.
Neglecting Roof Framing Inspection
Neglecting to inspect the roof framing before beginning the attachment process is another common mistake that can lead to serious issues. If the framing is damaged, rotten, or misaligned, it can compromise the roof’s integrity and lead to structural failure.
To avoid this mistake, always inspect the roof framing before beginning the attachment process. Look for any signs of damage, rot, or weakness that could affect the roof’s stability. If you find any issues, address them before proceeding with the roof attachment.
If you’re unsure about the condition of the roof framing, consult with a qualified roofing professional. They can help you identify potential issues and recommend the best course of action to ensure the roof’s long-term stability.
Overlooking Local Building Codes and Regulations
Overlooking local building codes and regulations is another common mistake that can lead to serious consequences. Failing to comply with these codes can result in fines, legal issues, and even the need to tear down and rebuild the roof.
To avoid this mistake, always familiarize yourself with the relevant building codes and regulations before beginning the roof attachment process. If you’re unsure about any aspect of the codes, consult with a qualified roofing professional who is familiar with the local requirements.