
Imagine a heavy storm rolling in, rain pounding down, and wind whipping around your house. Now, picture your roof holding firm, keeping everything inside safe and dry. That’s the dream. But what if something as small as a nail could turn that dream into a nightmare? Proper roofing nail depth plays a massive role in making sure your home stays protected. Get it wrong, and you might deal with leaks, blown-off shingles, or even costly repairs.
Many homeowners overlook this detail, leading to common problems like water sneaking in or shingles lifting in high winds. These issues don’t just annoy you—they can rack up big bills over time. So, let’s dive into the key question: how far should house roofing nails penetrate to keep your roof secure?
Understanding Roofing Nails: Basics and Importance
What Are Roofing Nails?
Roofing nails might seem like simple hardware, but they’re the unsung heroes holding your roof together. These are special fasteners designed just for roofs, made from tough materials like steel or aluminium to withstand the elements. They come in various sizes and styles, each suited for different roofing jobs.
Think of them as the glue that keeps shingles, tiles, or metal panels in place. Without them, your roof would be a loose collection of materials, vulnerable to wind and rain. Common types include coil nails for nail guns, hand-driven nails for smaller projects, and ring-shank nails for extra grip. Sizes range from short ones for thin shingles to longer ones for thicker materials.
Why does this matter to you? As a homeowner, knowing the basics helps you spot if your roof was installed correctly. Next time you’re up there (safely, of course), take a peek—these little guys are working hard to protect your home.
Why Nail Penetration Depth Matters in Roofing
Nail penetration depth isn’t just a fancy term—it’s about how deep the nail sinks into the roof’s base layer, called the decking. If it doesn’t go far enough, your shingles could flap around like flags in the wind. Too deep, and you might damage the structure underneath.
This depth ensures your roof can handle Mother Nature’s worst. Proper penetration creates a strong bond, preventing leaks and extending your roof’s life. Imagine nails that barely hold on; one gust, and goodbye shingles! Getting it right means peace of mind during storms.
Experts stress this because roofs face constant stress from weather, temperature changes, and even foot traffic during maintenance. So, ask yourself: Is your roof nailed down securely? If you’re unsure, it might be time to check.
The Role of Nails in Securing Shingles and Roofing Materials
Nails do more than poke holes—they secure everything. Asphalt shingles lock each layer in place, creating a watertight seal. In metal roofing, they fasten panels to prevent rattling or lifting.
This securing role is vital for overall roof integrity. Nails distribute weight and resist forces like wind uplift, which can tear roofs apart in hurricanes. Without proper nailing, materials shift, leading to gaps where water creeps in.
Picture your roof as a puzzle; nails are the pieces that hold it all together. If one fails, the whole thing weakens. That’s why pros follow strict guidelines to ensure every nail does its job.
Quick Mention of Relevant Building Codes and Standards
Building codes aren’t just rules—they’re safeguards for your home. Organisations like the International Building Code (IBC) set standards for nail usage, including minimum penetration depths to meet safety requirements. For instance, codes often require nails to penetrate at least 3/4 inch into the decking for a solid hold.
These standards vary by location, so check your local rules. Manufacturers like those referenced in sources [7] and [3] align their products with these codes. Ignoring them could void warranties or lead to failed inspections. As a homeowner, staying informed keeps your roof compliant and safe.
How Far Should House Roofing Nails Penetrate?
Recommended Penetration Depth
You may also read (why is my house so hot in summer solutions explained).
So, let’s get to the heart of it: how far should house roofing nails penetrate? The golden rule is at least 3/4 inch into the roof deck or completely through thinner decking materials. This ensures a firm grip without compromising the structure.
Why this depth? It provides enough hold to resist wind and weather while avoiding weak spots. Sources like [3], [5], and [7] support this, emphasising that proper penetration prevents shingles from loosening over time.
Think about your own roof—does it meet this standard? If nails are too shallow, you’re inviting trouble. Aim for that 3/4-inch mark, and your roof will thank you.
Explanation of Roof Decking Types and Thickness Affecting Nail Length Requirements
Roof decking is the base layer under your shingles, usually plywood or oriented strand board (OSB). Its thickness directly impacts how far nails need to go. Thicker decks, like 5/8-inch plywood, require longer nails to achieve proper penetration.
Different types matter too. Solid wood decks hold nails better than particleboard, which might need special considerations. If your deck is thin, nails should poke through slightly for maximum security, as per guidelines in [3] and [5].
Don’t guess—measure your decking thickness before choosing nails. This simple step can save you from future headaches. What’s your deck made of? Knowing helps you pick the right nails.
Industry Guidelines and Manufacturer Recommendations for Penetration Depth
Industry pros, including the Asphalt Roofing Manufacturers Association (ARMA), recommend consistent depths. For most homes, that 3/4-inch penetration is key, but always check manufacturer specs for your specific shingles.
Brands like GAF or CertainTeed provide detailed guides, often aligning with sources [1], [3], and [5]. They warn against skimping on depth, as it reduces holding power.
Follow these to avoid warranty issues. Manufacturers know their products best, so heed their advice. Have you reviewed your shingle’s instructions? It could make all the difference.
Differentiating Between Sufficient Penetration and Over-Penetration
Sufficient penetration means the nail grabs just enough—3/4 inch or through the deck. It holds firm without excess.
Over-penetration happens when nails drive too deep, potentially splitting wood or creating leak points. Under-penetration is the opposite, leaving nails loose.
Balance is key. Use the right length and technique to hit that sweet spot. If you’re DIY-ing, practice on scrap material first. Remember, getting it right protects your home for years.
Choosing the Right Nail Length for Your Roofing Materials
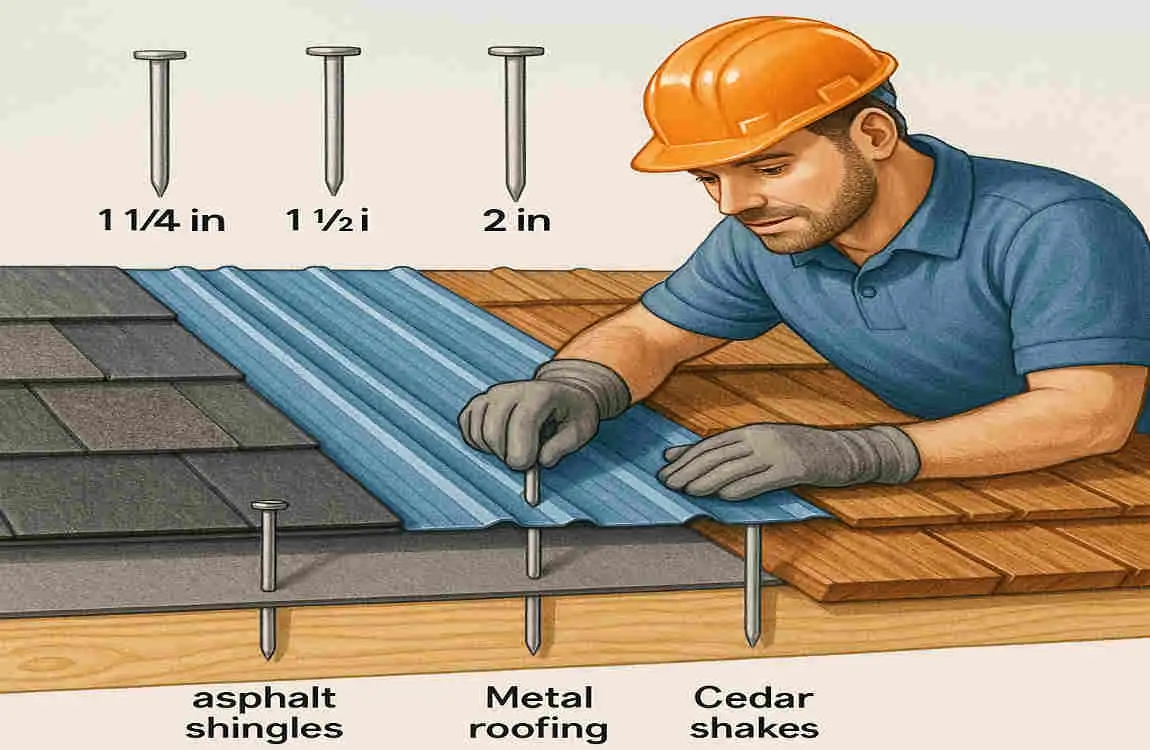
Standard Nail Lengths for Different Roofing Types
Choosing nail length depends on your roofing material. For standard asphalt shingles, 1 1/4 inch to 1 3/4 inch nails work best, as noted in [1] and [7]. These provide solid penetration without overdoing it.
Thicker architectural shingles might need up to 2 inches for heavy-duty hold. They’re popular for their durability, so match the nail accordingly.
Metal roofing varies—thinner panels use 1-inch nails, while thicker ones require longer nails. For tile or slate, go even longer, often 2 to 3 inches, to handle the weight ([1]).
What type of roof do you have? Picking the right length ensures everything stays put.
How to Measure Nail Length Correctly
Measuring nail length is straightforward. Start from the head’s underside to the tip—that’s the shank length, which determines penetration.
Please don’t confuse it with overall length; focus on what sinks in. Use a ruler or tape for accuracy. If adding underlayment, account for that extra thickness.
Pro’s tip: Always add a bit extra for safety. Measure twice, nail once—it’s a motto worth following.
Impact of Underlayments, Layers, and Flashing on Nail Length Choice
Underlayments like felt or synthetic barriers add layers, so nails must be longer to reach the deck. Multiple shingle layers? Bump up the length even more ([3]).
Flashing around edges or vents requires nails that penetrate without bending. These elements protect vulnerable spots, so proper nailing here is crucial.
Factor in everything on your roof. Ignoring this could lead to weak spots. Take a moment to assess your setup—does it need longer nails?
To help visualise, here’s a quick table of recommended nail lengths:
Roofing Type Recommended Nail Length Notes
Asphalt Shingles 1 1/4 – 1 3/4 inches For standard decks
Architectural Shingles 1 1/2 – 2 inches Thicker materials need more hold
Metal Roofing 1 – 2 inches Varies by panel thickness
Tile/Slate Roofing 2 – 3 inches Handles heavy weight
This table simplifies choices—use it as a starting point.
Nail Penetration Techniques: Installation Best Practices
Correct Nail Placement and Angle for Maximum Hold
Placement is everything. Nails should go through the shingle’s nailing strip, usually marked, at a straight angle for best grip.
Angle them slightly if needed for a better hold, but avoid extremes. Proper placement distributes force evenly, preventing pull-out.
You can do this right by aligning nails in rows. Practice makes perfect—try it on a test piece.
Driving Nails Flush vs. Over-Driving and Under-Driving Problems
Drive nails flush with the shingle surface—no deeper, no shallower. Flush means secure without dents.
Over-driving crushes materials, creating divots where water pools ([5]). Under-driving leaves nails proud, easy to snag.
Aim for a flush every time. Use a hammer or nail gun with depth control for consistency.
Effects of Improperly Driven Nails on Roof Performance and Water Resistance
Improper driving weakens your roof. Loose nails let shingles shift, allowing water in and causing rot.
This reduces water resistance, leading to interior damage. Wind performance suffers, too—shingles fly off more easily.
Don’t let this happen to you. Proper driving keeps your home dry and firm.
Specialised Nailing Zones and Product-Specific Instructions
Some shingles have zones like Malarkey’s The Zone® for optimal nailing ([5]). These areas maximise adhesion.
Follow product instructions—they’re tailored for best results. Ignoring them risks failure.
Check your shingles guide. It could highlight these zones for you.
Tools and Tips for Ensuring Proper Nail Depth
Use a roofing nail gun for speed and accuracy—it has adjustable depth settings.
Hand hammers work for small jobs; pair with a depth gauge. Tips: Wear gloves, work in good weather, and double-check each nail.
You may also read (modern roof paint colors elevate your houses curb appeal).
These tools make the job easier. Ready to tackle your roof?
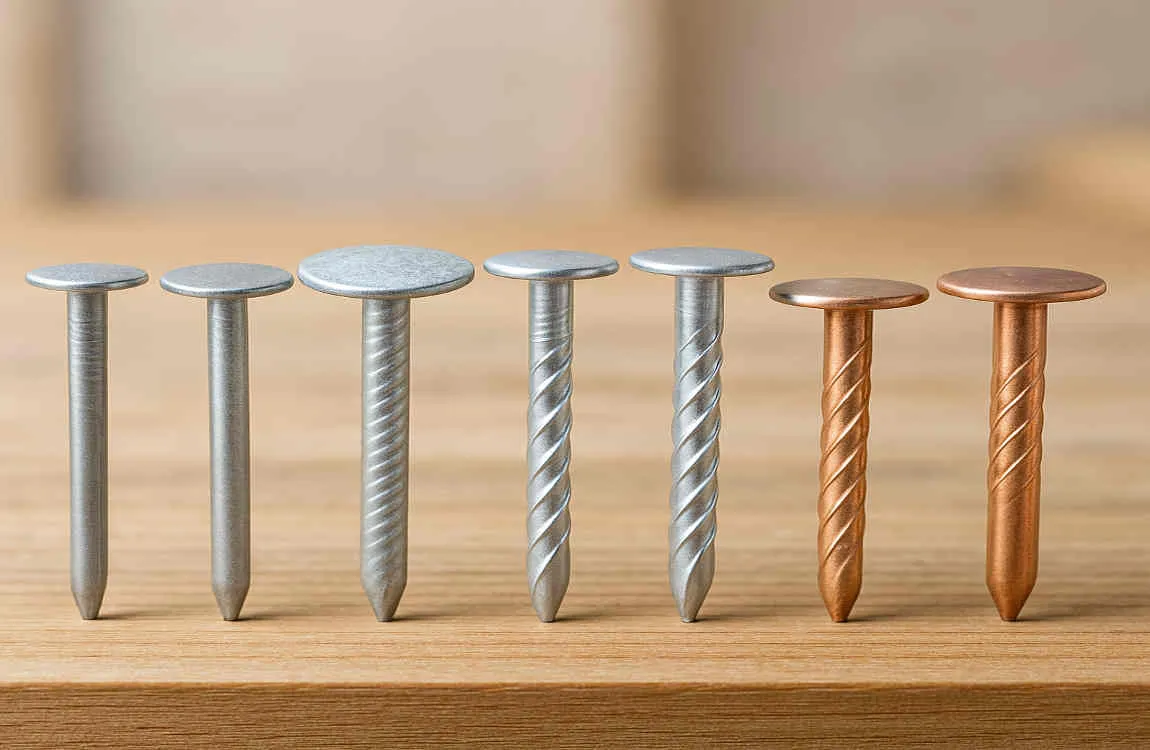
Materials and Types of Roofing Nails and Their Effect on Penetration
Common Materials: Galvanized Steel, Aluminum, Stainless Steel, Copper
Nail materials affect durability. Galvanised steel is rust-resistant and affordable, making it great for most homes ([5], [7]).
Aluminium is lightweight and corrosion-proof, ideal for coastal areas. Stainless steel offers top strength against elements.
Copper nails suit high-end roofs, resisting corrosion beautifully. Choose based on your climate—what’s best for yours?
Gauge and Diameter Requirements According to Building Codes
Gauge measures thickness—lower numbers mean thicker nails. Codes require at least 11-gauge for shingles ([7], [9]).
Diameter ensures holding power. Thicker diameters penetrate better without bending.
Follow the codes to avoid issues. It’s simple compliance that pays off.
Comparing Nail Heads and Shanks for Effectiveness and Nail Holding Power
Flat heads distribute pressure; large heads prevent tear-through.
Smooth shanks are easy to drive; ring shanks grip tighter for wind-prone areas.
Compare: Ring shanks hold 2x better in tests. Pick what suits your needs.
Corrosion Considerations Impacting Nail Choice and Longevity
Corrosion weakens nails over time. Choose galvanised or stainless for longevity in wet climates.
Avoid mixing metals to prevent reactions. Regular checks spot corrosion early.
Protect your investment—the right choice means longer-lasting nails.
Here’s a list of pros and cons for common nail materials:
- Galvanised Steel: Pros: Affordable, strong; Cons: Can rust if coating wears.
- Aluminium: Pros: Lightweight, no rust; Cons: Softer, may bend more easily.
- Stainless Steel: Pros: Highly durable; Cons: More expensive.
- Copper: Pros: Excellent corrosion resistance; Cons: High cost, softer material.
Use this to decide.
Consequences of Improper Roofing Nail Penetration
Under-Driven Nails Leading to Loose Shingles and Increased Wind Damage Risk
Under-driven nails don’t hold well. Shingles loosen, flapping in the wind and risking tear-off ([5]).
This increases wind damage—think hurricanes ripping roofs apart. Your home becomes vulnerable.
Check for loose shingles now. Fixing early prevents bigger problems.
Over-Driven Nails Causing Roof Deck Damage and Potential Leaks
Over-driving punches holes or cracks decks, inviting leaks .
Water seeps in, causing mould and rot. It’s a hidden danger.
Avoid by controlling depth. Your roof’s health depends on it.
Long-Term Risks: Roof Leaks, Water Damage, Insurance Claims Statistics
Long-term, improper penetration leads to persistent leaks and extensive water damage.
Stats show thousands of insurance claims yearly from roof failures . Costs average $5,000+ per claim.
Don’t add to those numbers. Proper nailing saves money and stress.
Visual Signs Homeowners Should Look For Indicating Nailing Problems
Look for raised shingles, exposed nail heads, or water stains inside.
Buckling materials or granule loss signal issues. Dark spots on the ceiling? Leak alert!
Inspect regularly. Spotting signs early lets you act fast.
You may also read (why choose an architectural roof for your home).